These no-bake peanut clusters harken back to childhood afternoons, when the simplest treats brought the biggest smiles. But I’ve tweaked the recipe to suit grown-up tastes—less sugar, more salty crunch, with a hint of smoky complexity from a dash of sea salt. It’s a quick fix for those moments when a sweet, salty snack feels absolutely necessary and nothing else will do.
What I love most is how forgiving and adaptable this recipe is. You can toss in a few dried cranberries or a sprinkle of flaky sea salt on top, depending on what you have lying around. It’s the kind of treat that’s perfect to whip up in a hurry and still feels like a little indulgence, without the fuss of turning on the oven.
Focusing on the nostalgic comfort of childhood treats, but with a modern, health-conscious twist that makes them suitable for grown-ups craving a sweet, salty, crunchy fix without the fuss of baking.
Nostalgia in Every Bite
- Making these clusters always takes me back to lazy Sunday afternoons, the smell of roasted peanuts filling the kitchen.
- I love how quick and forgiving this recipe is—perfect for when I need a sweet fix without the fuss of baking.
- There’s a quiet pride I feel when I see the shiny, slightly sticky clusters ready to crack into, knowing I made them myself.
The story behind this recipe
- This recipe came about one afternoon when I was rummaging through my pantry, craving something sweet but quick. I remembered how my grandmother used to toss peanuts and chocolate chips together without any fuss—just enough warmth to melt everything into gooey clusters. It’s funny how simple ingredients and a little bit of heat can turn into a treat that feels like a warm hug. Now, I keep a batch handy for those hectic days when dessert feels out of reach but I still want something satisfying.
- Over the years, I’ve tweaked that old instinct into this no-bake version, adding a touch of sea salt and smoky paprika just to keep it interesting. It’s a reminder that sometimes, the best recipes aren’t about precision but about feeling your way through the ingredients. Plus, it’s a no-pressure project—no oven, no fuss, just a handful of pantry staples and a little patience for cooling.
- story_type
Historical & Cultural Roots
- These clusters likely originated as a simple, homemade treat among Southern cooks in the early 20th century, making use of pantry staples like peanuts and chocolate.
- The no-bake aspect gained popularity during wartime shortages, when oven space and ingredients were limited, turning this into a quick, satisfying fix.
- Peanut clusters became a regional favorite in the U.S., especially in the South, where peanuts are a staple crop and cultural touchstone.
Key Ingredients & Tips
- Peanut butter: Creamy and rich, I prefer a natural, unsweetened kind—smooths out well and adds a nutty aroma. Swap with almond butter for a different nutty twist, but expect a slightly different flavor profile.
- Peanuts: Roasted peanuts give that warm, toasty smell and crunch I love. If you’re out, chopped almonds or cashews work, but the flavor won’t be quite the same—less smoky, more neutral.
- Chocolate chips: Semi-sweet are my go-to—they melt just right without overpowering. For a darker hit, use dark chocolate; for sweeter, milk chocolate adds more sugary richness.
- Honey or maple syrup: I use honey for a sticky, floral sweetness that binds everything. Maple syrup gives a deeper, caramel note—adjust your sweetness if you go with a different syrup.
- Sea salt: Flaky sea salt on top makes the flavors pop and adds a salty crunch. If you don’t have sea salt, coarse kosher salt works, but skip the fine salt—go for texture.
- Vanilla extract: Just a splash deepens the flavor and balances the saltiness. If you’re out, a tiny pinch of cinnamon could add warmth—use sparingly.
- Coconut flakes (optional): I love the chewy texture and tropical aroma they bring. Dried cranberries or chopped dried fruits are nice substitutes for a tangy twist, but keep an eye on moisture levels.
Spotlight on key ingredients
Peanuts:
- Roasted peanuts bring a warm, smoky aroma and a satisfying crunch that’s essential for texture. They soften slightly but maintain their bite, adding depth to each cluster.
- Chocolate chips: When melted, they turn glossy and smooth, creating a sticky, luscious coating. They set into a firm shell that cracks satisfyingly when bitten, with a rich cocoa flavor that balances sweetness.
Chocolate chips:
- Their semi-sweet richness melts just enough to coat evenly, providing a shiny, inviting finish. During melting, they emit a sweet, cocoa scent that’s irresistible, and they set with a slight tackiness perfect for biting into.
- ingredient
Notes for ingredient swaps
- Dairy-Free: Swap regular chocolate chips for coconut-based or dairy-free chocolate. Expect a slightly different melt and flavor, but still sweet and satisfying.
- Nut Alternatives: Use roasted almonds or cashews instead of peanuts for a different crunch and flavor profile. Keep in mind, they might be less oily and more delicate.
- Sweetener Choices: Replace honey with agave syrup or brown rice syrup. These will give a different depth of sweetness and slightly tweak the sticky texture.
- Salt Variations: If you don’t have flaky sea salt, coarse kosher salt works—just use a bit less to avoid over-salting. Skip if you prefer a milder finish.
- Add-ins: Dried cranberries, chopped dried apricots, or shredded coconut can add texture and flavor. Just keep moisture content in mind to prevent sticking or sogginess.
- Chocolate Type: Swap semi-sweet chips for dark, milk, or even white chocolate. Each offers a unique sweetness and visual contrast, so choose based on your mood.
- Peanut Butter: Almond or cashew butter can replace peanut butter for a different nutty flavor. Use natural, unsweetened versions for best results.
Equipment & Tools
- Microwave-safe bowl: For melting chocolate and peanut butter evenly
- Silicone spatula or spoon: To stir and combine ingredients smoothly
- Baking sheet with parchment or silicone mat: To hold clusters while they set and prevent sticking
- Tablespoon or small cookie scoop: For portioning out uniform clusters
- Measuring cups and spoons: To measure ingredients accurately
Step-by-step guide to peanut clusters
- Gather all ingredients and tools before starting. Line a baking sheet with parchment or a silicone mat for easy cleanup.
- In a microwave-safe bowl, combine 1 cup of semi-sweet chocolate chips and 1/2 cup of peanut butter. Microwave in 30-second bursts, stirring in between, until smooth and shiny. Total time about 1-2 minutes.
- Add 1 1/2 cups of roasted peanuts to the melted mixture. Stir until evenly coated, making sure all peanuts are well covered.
- Using a tablespoon or small cookie scoop, portion out the mixture onto the prepared baking sheet, forming small clusters. Leave space between each for spreading.
- Optionally, sprinkle a pinch of flaky sea salt or a dash of smoked paprika on top of each cluster for added flavor and contrast.
- Let the clusters sit at room temperature for about 15 minutes to firm up slightly, or refrigerate for 30 minutes if you prefer them extra set and crunchy.
- Check for doneness: the clusters should be glossy and firm but not hard. The chocolate should be shiny and slightly tacky to the touch.
- Once cooled and set, gently peel the clusters from the parchment. Store in an airtight container at room temperature for up to a week, or freeze for longer storage.
Allow the clusters to rest at room temperature or in the fridge until fully set. Once firm, gently peel from the parchment and store in an airtight container. Serve straight from the fridge or at room temperature for softer texture.
How to Know It’s Done
- Chocolate is fully melted and shiny, with no lumps.
- Clusters hold their shape firmly but aren’t hard or brittle.
- Surface is glossy with a slight tackiness, indicating proper setting.
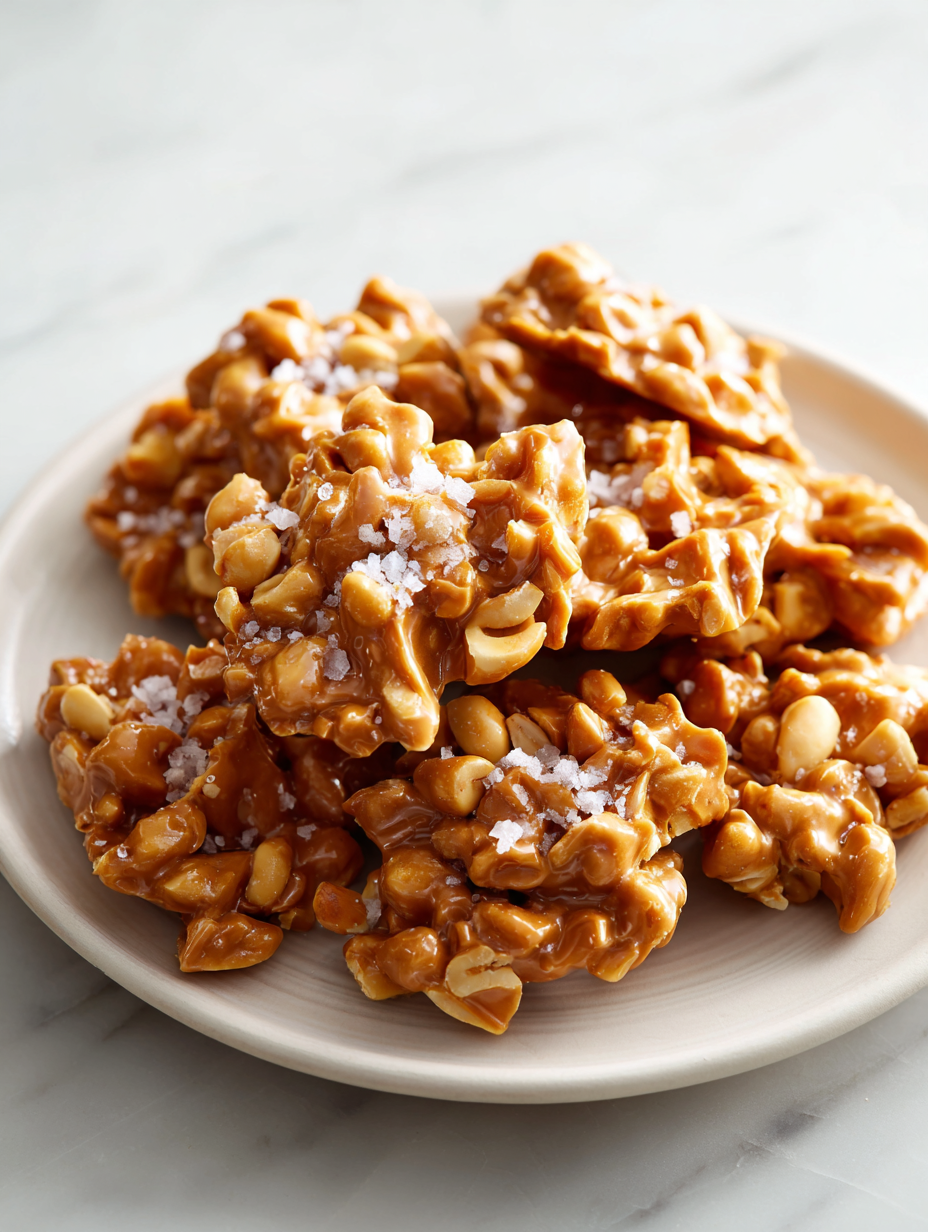
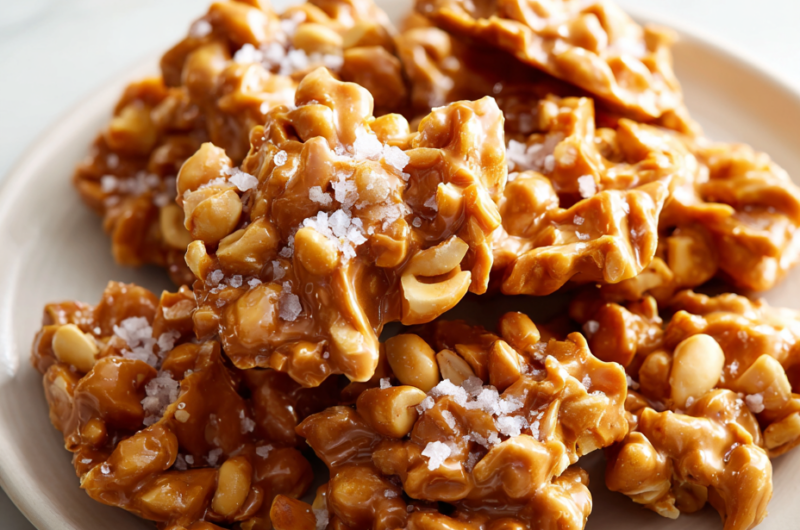
No-Bake Salted Peanut Clusters
Ingredients
Equipment
Method
- Combine the chocolate chips and peanut butter in a microwave-safe bowl, then microwave in 30-second bursts, stirring each time, until smooth and glossy.
- Add the roasted peanuts, honey, and vanilla extract to the melted mixture. Stir until the peanuts are evenly coated and the mixture looks thick and sticky.
- Use a tablespoon or small cookie scoop to portion the mixture onto your prepared baking sheet lined with parchment or a silicone mat. Leave some space between each cluster for spreading.
- Sprinkle a tiny pinch of flaky sea salt on top of each cluster for that perfect salty contrast.
- Let the clusters sit at room temperature for about 15 minutes, or refrigerate for 30 minutes until they are firm and shiny.
- Once set, gently peel the clusters from the parchment or silicone mat. Serve immediately or store in an airtight container at room temperature or in the fridge for up to a week.
Notes
Pro tips for perfect clusters
- Bolded Mini-Head: Use high-quality chocolate chips for a glossy, smooth melt that sets perfectly.
- Bolded Mini-Head: Warm the peanut butter slowly in short bursts to avoid overheating and separation.
- Bolded Mini-Head: Add a pinch of sea salt flakes on top immediately after scooping for a burst of flavor contrast.
- Bolded Mini-Head: Chill the clusters briefly in the fridge to speed up setting and achieve a firm snap.
- Bolded Mini-Head: When melting chocolate, stir frequently to prevent burning and ensure even consistency.
- Bolded Mini-Head: For extra crunch, toast the peanuts lightly in a dry skillet before mixing.
- Bolded Mini-Head: Use a small cookie scoop for uniform-sized clusters that look professional and bite-sized.
Common mistakes and how to fix them
- FORGOT to stir: Clusters may be uneven; fold gently and reheat briefly to fix.
- DUMPED too much salt: Use sparingly; too much overwhelms peanut flavor.
- OVER-TORCHED chocolate: Remove from heat immediately; burnt chocolate ruins texture and smell.
- MISSED cooling step: Let clusters rest until fully set to prevent sticking or melting during handling.
Quick fixes and pantry swaps
- If chocolate seizes, splash in a teaspoon of vegetable oil to smooth it out.
- When clusters stick to parchment, patch with a gentle tap and refrigerate briefly to set.
- Splash a tiny bit of warm water on stubborn mixture to loosen and stir smoothly.
- When mixture is too dry, open a new jar of honey or syrup for extra sticky binding.
- Shield overcooked chocolate by quickly removing from heat and stirring in more chips.
Prep, store, and reheat tips
- You can prep the mixture a day ahead; keep it covered in the fridge to prevent drying out.
- Store the finished clusters in an airtight container at room temperature for up to a week, or freeze for longer shelf life.
- Chilled clusters stay firm and shiny; if they soften, give them a quick 10-minute stint in the fridge before serving.
- Reheat gently in the microwave in 10-second bursts if you want the chocolate to soften slightly for a softer bite, watching for melty smells.
Top questions about peanut clusters
1. Can I use processed peanut butter instead of natural?
Using natural peanut butter gives a richer, nuttier flavor and better texture, but processed works fine too.
2. How long do I need to chill the clusters?
Chilling in the fridge for at least 30 minutes helps the clusters set and become firm enough to handle.
3. My chocolate is seizing or burning, what do I do?
If the chocolate isn’t melting smoothly, microwave in short bursts and stir well to avoid burning.
4. Can I omit the sea salt on top?
Adding a pinch of sea salt on top enhances flavor contrast, but you can skip it for a sweeter taste.
5. What nuts can I substitute for peanuts?
You can swap peanuts for almonds, cashews, or other roasted nuts, but expect a different crunch and flavor.
6. How should I store the peanut clusters?
Store these clusters in an airtight container at room temp for up to a week or in the freezer for longer.
7. Are these peanut clusters dairy-free?
To make these dairy-free, choose dairy-free chocolate chips and check that your nut butter is unsweetened.
8. Should I toast the peanuts first?
Lightly toasting the peanuts beforehand adds an extra smoky aroma and crunch, but raw peanuts work too.
9. My clusters are too soft after setting, what now?
If clusters are too sticky or soft, refrigerate them briefly to help set the chocolate and firm up.
10. How can I make my clusters look more uniform?
Use a small cookie scoop for uniform clusters, which makes portioning easier and presentation more consistent.
These no-bake peanut clusters are more than just a sweet treat—they’re a little moment of nostalgia with a modern twist. Perfect for when you need something quick, satisfying, and just a bit indulgent, especially now when simple comfort foods are in high demand.
I like how forgiving and adaptable this recipe is, making it easy to customize with what you have on hand. Once you get the hang of it, it’s a go-to for impulsive sweet cravings or last-minute gifts that feel personal and homemade.

Hi, I’m Grace Morgan, and welcome to my kitchen. This is a space shaped by family meals, curious hands reaching for snacks, paws under the table, and recipes that come together in the middle of real life. I’m a food blogger, a mother, and a passionate pet keeper. Most days, I’m cooking with one eye on the stove and the other on someone who needs me, whether that’s a child asking for a taste or a dog hoping something might fall.


