This recipe is a secret weapon for busy mornings when you need a quick, satisfying snack that feels indulgent but is actually healthy. It’s a no-fuss, no-bake fix that I keep in my fridge for those hectic days when time is tight but I still crave something sweet and wholesome.
What I love most is how adaptable these bites are. You can toss in a handful of nuts, sprinkle a dash of sea salt, or even add a hint of espresso powder to amp up the flavor. They come together fast, no oven needed, and they’re perfect for grabbing on your way out the door.
These chocolate oat bites aren’t just a treat—they’re a little jar of calm in a chaotic day. They remind me of simpler times, when a small, sweet moment could turn everything around. Plus, they’re a great way to use up those last bits of chocolate lurking in your pantry.
This recipe is a secret weapon for busy mornings when you need a quick, satisfying snack that feels indulgent but is actually healthy. It’s a no-fuss, no-bake fix that I keep in my fridge for those hectic days when time is tight but I still crave something sweet and wholesome.
A Snack That Saves Busy Mornings
- These bites are my go-to when I need a quick fix that doesn’t feel like cheating.
- I love how they turn out a little gooey inside, which makes each bite satisfyingly rich.
- Nothing beats the smell of melting chocolate and toasted oats filling the kitchen on a lazy afternoon.
- I’ve made these so many times, I can whip them up in my sleep; they’re surprisingly forgiving.
- Sharing these with friends always sparks a little joy—simple, honest, and just enough sweetness.
The story behind this recipe
I stumbled upon this recipe during a particularly hectic week when I was craving something sweet but had zero energy to bake. It’s become my secret stash for those days when I need a quick, comforting bite without the fuss of turning on the oven. The idea of combining oats and chocolate came from a messy baking session, where I was trying to use up odds and ends from my pantry and somehow ended up with these little no-bake wonders. Now, they’re my go-to for a little moment of calm amid chaos, and I love how forgiving and adaptable they are—just like my kitchen mood during busy times.
Trivia and Hidden Origins
- These no-bake bites originated in a small kitchen during a busy holiday season, where oven space was limited and cravings were high.
- They draw inspiration from traditional energy ball recipes but adapt the concept for chocolate lovers seeking easy, fuss-free snacks.
- This recipe gained popularity in the early 2000s with the rise of health-conscious, no-bake snack trends shared through blogs and social media.
Key Ingredients and Tips
- Old-fashioned rolled oats: I love their chewy texture, which adds substance. For a softer bite, try quick oats—though they’re a tad less hearty.
- Dark chocolate: I use 70% cocoa for richness, but if you prefer sweeter, milk chocolate works too. Watch it melt into a luscious, oozy pool.
- Nut butter: Almond or peanut butter? Both give a creamy base, but peanut adds a smoky depth, while almond keeps it subtly nutty—choose your vibe.
- Honey or maple syrup: I prefer honey for its floral notes and stickiness that helps everything bind. Swap with agave if you want a milder sweetness.
- Coconut oil: It smooths out the mixture and adds a slight shimmer when melted. You can skip it for a firmer bite, but it helps everything come together.
- Vanilla extract: A splash enhances the chocolate flavor, making it more rounded. Skip if you’re feeling minimalist, but your bites might feel a tad dull.
- Optional add-ins: Chopped nuts, dried fruit, or a pinch of sea salt—these give texture and surprise bursts of flavor. Use what’s lurking in your pantry.
Spotlight on key ingredients
Dark chocolate:
- I love its rich, bittersweet flavor and how it melts into a silky, oozy pool that coats the oats. It’s the soul of these bites.
- Oats: Chewy and hearty, they soak up the chocolate and nut butter, giving each bite a satisfying texture that’s almost like a tiny oatmeal cookie.
Nut butter:
- Peanut or almond—both add a creamy richness that binds everything together. The aroma of melting nut butter is irresistibly comforting.
- It also helps the bites hold shape, making them easier to scoop and roll into perfect little balls.
Notes for ingredient swaps
- Dairy-Free: Use coconut oil or vegan chocolate instead of dairy butter; expect a slightly different melt and flavor profile.
- Nut Butter: Swap peanut butter for sunflower seed butter if allergies are a concern; the texture stays creamy, but flavor shifts slightly.
- Sweetener: Maple syrup can replace honey for a more caramel-like note, though it’s a tad thinner and may affect binding.
- Chocolate: Carob chips are a good non-cocoa alternative, offering a milder, earthy sweetness without the deep chocolate richness.
- Oats: For gluten-free needs, choose certified gluten-free oats; they behave the same but keep the bites safe for celiac diets.
- Add-ins: Dried cranberries or chopped dried apricots can replace nuts for a chewy, tart surprise, keeping the bites fruity and colorful.
- Coconut Oil: If you skip it, expect a slightly denser, less glossy texture, but the bites will still hold together.
Equipment & Tools
- Microwave-safe bowl: To melt the chocolate evenly and quickly.
- Spatula: To stir the melted chocolate and combine ingredients.
- Measuring spoons: For accurate portioning and scooping.
- Baking sheet: To hold the formed bites while chilling.
- Parchment paper: To prevent sticking and easy cleanup.
Step-by-step guide to no bake bites
- Gather all ingredients and equipment. Line a baking sheet with parchment paper, and have a mixing bowl ready.
- Chop the dark chocolate into small, even pieces. This helps it melt quickly and evenly. Set aside.
- In a microwave-safe bowl, melt the chocolate in 30-second bursts, stirring each time until smooth and shiny. About 1-2 minutes total.
- Add the nut butter, honey, and vanilla extract to the melted chocolate. Mix well until fully incorporated. The mixture should be glossy and slightly thickened.
- In a large bowl, combine the oats and optional mix-ins like chopped nuts or dried fruit. Pour the chocolate mixture over and stir vigorously until evenly coated.
- Scoop out spoonfuls (about 1-2 tablespoons each) and roll into compact balls. Place on the prepared baking sheet, spacing them apart.
- Gently press each ball down with the back of a spoon for a flatter, more snackable shape. Chill in the fridge for 30-60 minutes until firm.
- Once set, store in an airtight container in the fridge for up to a week or freeze for longer storage.
- For best texture, let the bites sit at room temperature for 5 minutes before eating. They should be chewy with a slight snap from the chocolate coating.
Chill the bites in the fridge for at least 30 minutes until firm. Store in an airtight container, layered with parchment paper, for up to a week. Serve at room temperature for optimal chewiness and flavor release.
How to Know It’s Done
- Chocolate is fully melted and smooth before mixing.
- Bites are firm and hold shape after chilling.
- Surface appears shiny and slightly cracked when ready for refrigeration.
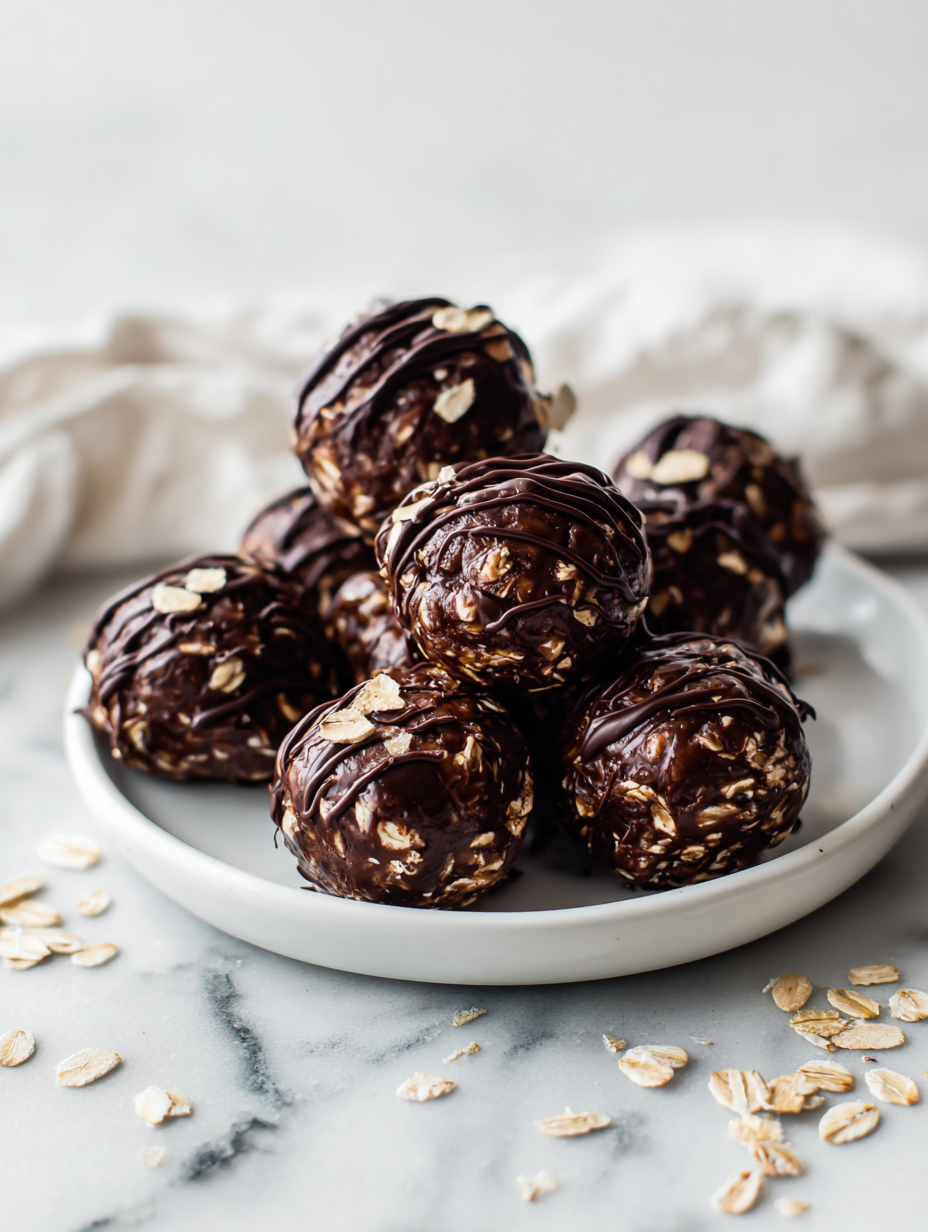
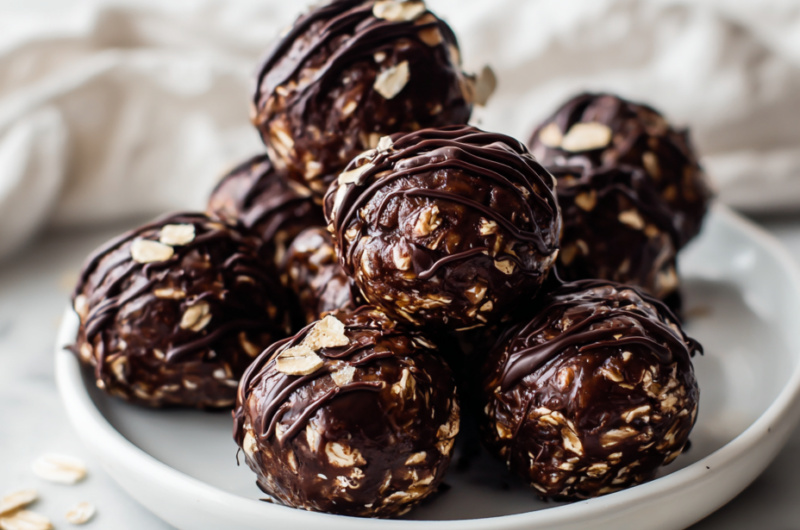
No-Bake Chocolate Oat Bites
Ingredients
Equipment
Method
- Place the dark chocolate into a microwave-safe bowl and melt in 30-second intervals, stirring each time until smooth and glossy.
- Add the nut butter, honey, vanilla extract, and coconut oil to the melted chocolate. Stir thoroughly until the mixture is smooth and well combined.
- In a large mixing bowl, combine the oats and optional add-ins like chopped nuts or dried fruit. Pour the chocolate mixture over the oats and stir vigorously until everything is coated evenly and the mixture is sticky.
- Using a spoon or your hands, scoop out about 1-2 tablespoons of the mixture and roll it into a compact ball. Place each ball on a parchment-lined baking sheet.
- Gently press each ball down slightly to flatten, shaping them into snack-sized disks if desired. Repeat until all the mixture is used.
- Place the baking sheet in the refrigerator and chill for at least 30 minutes, or until the bites are firm and glossy.
- Once set, transfer the bites to an airtight container. Store in the fridge for up to a week or freeze for longer storage.
- When ready to enjoy, let the bites sit at room temperature for 5 minutes to soften slightly, then serve and savor the chewy, chocolatey goodness.
Pro tips for perfect bites
- Melt chocolate carefully → Use short bursts in the microwave to prevent overheating and seize-up.
- Chill for texture → Rest the bites in the fridge until they’re firm and slightly shiny, about 30 minutes.
- Mix thoroughly → Stir vigorously to evenly coat oats and prevent dry patches or clumps.
- Add a splash of oil → If mixture feels too stiff, a tiny bit of coconut oil helps it come together smoothly.
- Use cold ingredients → Cold nut butter and honey keep the mixture from becoming too sticky and hard to handle.
- Adjust sweetness → Taste your mixture before forming balls; add more honey or syrup if needed for balanced sweetness.
- Handle gently → When forming bites, don’t press too hard to keep them tender and chewy inside.
Common mistakes and how to fix them
- TOO DRY: If mixture feels crumbly, add a teaspoon of melted coconut oil and stir.
- TOO OILY: Dumped in too much nut butter? Reduce amount or add more oats to balance.
- CANDY-LIKE: Over-melting chocolate causes hard, brittle bites—stir more often and remove from heat early.
- UNMELTED CHOCOLATE: If chocolate isn’t smooth, re-melt in short bursts, stirring in between.
Quick fixes and pantry swaps
- When mixture feels crumbly, splash in a teaspoon of melted coconut oil and stir well.
- DUMPED too much nut butter? Reduce the quantity or add more oats to balance moisture.
- Over-melted chocolate causes brittle bites—re-melt in short bursts, stirring often to avoid seize-up.
- If chocolate isn’t smooth, re-melt briefly in the microwave, stirring in between, until silky.
- heading:
Prep, store, and reheat tips
- Prepare the mixture and scoop into bites up to 24 hours ahead; keep covered in the fridge for a fresh, slightly softer texture.
- Store the bites in an airtight container layered with parchment paper; they stay good for up to a week in the fridge, maintaining chewy richness.
- For longer storage, freeze the bites for up to a month; let thaw for 10 minutes at room temperature before eating, for a firmer, chilled bite.
- Refrigerated bites will develop a more intense chocolate aroma over time; reheat briefly at room temp for a softer, melt-in-your-mouth experience—just a few seconds in your hand or on a plate.
- Avoid leaving them out in warm environments; they can soften too much or melt, especially in humid weather, so keep them chilled until serving.
Frequently Asked Questions
1. Can I use milk chocolate instead?
Yes, you can swap dark chocolate for milk chocolate, but expect a sweeter, less intense flavor and a softer bite.
2. Can I substitute different nut butters?
Absolutely, using natural peanut butter or almond butter works well. Just remember, natural nut butters might need a bit more mixing to combine.
3. What if my mixture is too dry?
If the mixture feels too dry or crumbly, add a teaspoon of melted coconut oil and stir until it binds better.
4. Are these vegan-friendly?
To keep these bites vegan, use dairy-free chocolate and maple syrup instead of honey.
5. How long do they last?
Storing in an airtight container in the fridge keeps them fresh for up to a week. For longer, freeze them and thaw for a chewy treat anytime.
6. How long should I chill them?
Chilling the bites for at least 30 minutes helps them set fully and develop that satisfying chewy texture.
7. Can I add other ingredients?
Yes, adding chopped nuts or dried fruit before forming the balls adds texture and bursts of flavor. Just fold them in with the oats.
8. What if my chocolate seizes?
If your chocolate seizes or turns grainy, re-melt it briefly in the microwave in short bursts, stirring each time.
9. How can I shape the bites easily?
Use a small ice cream scoop or two spoons to portion out the mixture neatly and keep the bites uniform.
10. Can I prepare the mixture ahead?
Yes, you can store the mixture in the fridge for up to 24 hours before rolling into balls, which makes assembly quicker.
These no-bake chocolate oat bites are a simple way to satisfy a sweet craving without turning on the oven. They’re quick to make, honest, and flexible enough to customize with whatever you have on hand. Plus, they bring back that nostalgic, homemade treat feeling that we all need sometimes.
Whenever I need a little boost or a small moment of calm, these bites come through. They’re not perfect, but that’s part of the charm—messy, honest, and just right for a busy day or a lazy weekend afternoon.

Hi, I’m Grace Morgan, and welcome to my kitchen. This is a space shaped by family meals, curious hands reaching for snacks, paws under the table, and recipes that come together in the middle of real life. I’m a food blogger, a mother, and a passionate pet keeper. Most days, I’m cooking with one eye on the stove and the other on someone who needs me, whether that’s a child asking for a taste or a dog hoping something might fall.


