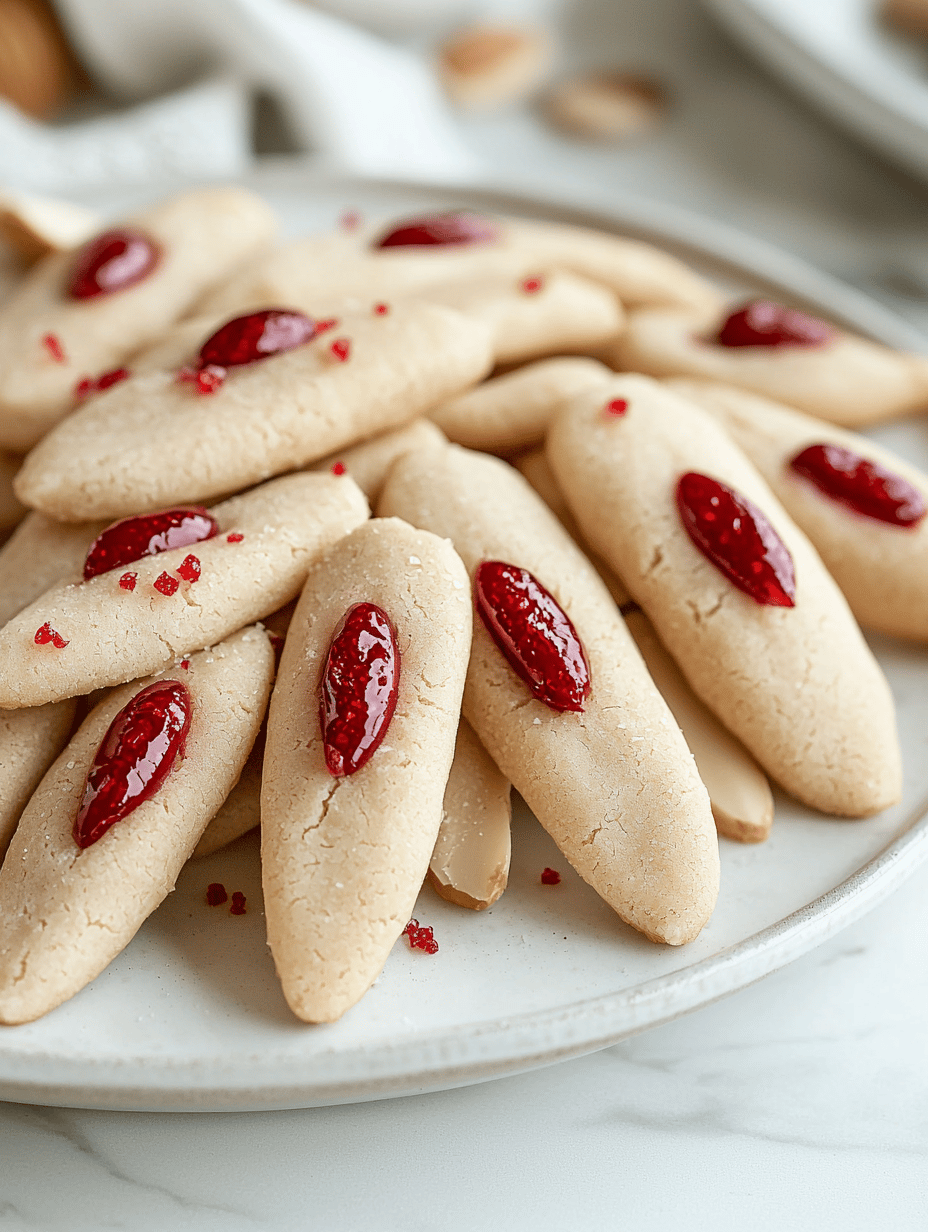
Halloween baking is all about transforming the ordinary into the extraordinary, and this year, I decided to craft something truly spooktacular—Witch Finger Cookies. These creepy treats look just like tiny, gnarled witch fingers, with wrinkled skin and a hauntingly realistic almond nail. They’re as much fun to make as they are to scare friends and family with at the little pumpkin party.
The secret is in the details: a slightly crumbly cookie base topped with a dusty, almost rotten-looking red hue, finished with an almond for that perfect nail. The scent of vanilla and almond wafts through the kitchen as you shape each finger, turning simple ingredients into a mysterious Halloween spectacle. Perfect for parties, or just a wickedly fun baking project to get into the spirit of the season.
Witch Finger Cookies
Ingredients
Equipment
Method
- Preheat your oven to 350°F (175°C) and line a baking sheet with parchment paper.
- In a large mixing bowl, beat the softened butter and granulated sugar together until the mixture is light, fluffy, and pale, about 2-3 minutes. This creates a creamy base for your cookies.
- Stir in the vanilla extract until fully incorporated, then gradually add the all-purpose flour and almond meal. Mix until a soft, cohesive dough forms.
- Divide the dough into 12 equal portions and roll each into a slender, finger-like shape about 4 inches long. Slightly taper the ends to resemble knuckles and skin wrinkles.
- Place the shaped cookies onto the prepared baking sheet, spacing them out to allow for slight spreading.
- Bake the cookies in the preheated oven for about 12-15 minutes, or until they are lightly golden and slightly cracked to resemble wrinkled skin.
- Allow the cookies to cool on the baking sheet for a few minutes before transferring to a wire rack to cool completely.
- In a small bowl, mix the powdered sugar with a few drops of red food coloring to create a dusty, blood-like hue. Lightly dust the cooled cookies with this mixture for a spooky effect.
- Pick up one cookie and gently press a whole almond in the middle of the top to resemble a fingernail, pressing it in firmly but naturally.
- Optionally, use a bit of the red dust or a little red food coloring directly to add tiny 'scars' or 'wrinkles' around the knuckles for extra realism.
- Once all the nails are attached and details added, your Witch Finger Cookies are ready to serve—perfectly creepy and whimsically delicious for Halloween! Enjoy their crumbly texture and spooky appearance.
These witch finger cookies aren’t just a treat—they’re a little piece of Halloween magic that sparks giggles and awe. The best part is how quickly they come together, transforming a simple baking session into a spooky adventure. Perfect for making new holiday traditions with a dash of chaos.
As the season deepens, these macabre morsels remind us to keep the magic playful. They bring a touch of whimsy and fright into our kitchens, turning good ingredients into wildly memorable moments. Nothing beats the joy of pulling out these creepy little fingers right before the house fills with ghostly giggles.

Hi, I’m Grace Morgan, and welcome to my kitchen. This is a space shaped by family meals, curious hands reaching for snacks, paws under the table, and recipes that come together in the middle of real life. I’m a food blogger, a mother, and a passionate pet keeper. Most days, I’m cooking with one eye on the stove and the other on someone who needs me, whether that’s a child asking for a taste or a dog hoping something might fall.


