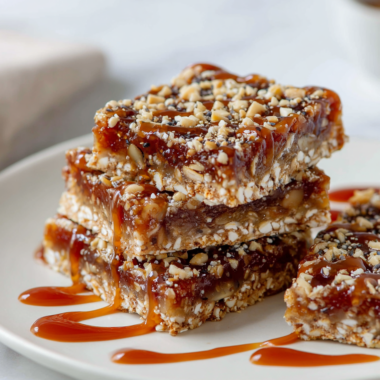
Blog

  • Pumpkin Whoopie Pies: A Cozy Fall Concoction with a Twist

    Pumpkin Whoopie Pies: A Cozy Fall Concoction with a Twist

    Pumpkin whoopie pies are a little nostalgic, a little playful. I love how the pumpkin adds moisture and a subtle sweetness that’s unlike any other cookie. They’re perfect for pumpkin season, when everything feels a little more cozy and intentional. Plus, making the filling from scratch transforms these from simple cookies to a real treat.

    Why These Pumpkin Whoopie Pies Are a Staple

    They’re a warm hug in pastry form, perfect for chilly afternoons. Baking these feels like a ritual, a slow savoring of fall’s quiet charm. Plus, they’re endlessly customizable—more spice, less sugar, a drizzle of dark chocolate. Every batch reminds me that simple ingredients, combined with care, make the sweetest memories.

    Breaking Down the Pumpkin Pie Magic

    • Canned pumpkin: The star ingredient — adds moisture and a gentle sweetness. Use the plain variety, not spiced.
    • Brown sugar: Gives warmth and a molasses note, balancing the spices.
    • Cinnamon: The warm backbone, but feel free to add a pinch of nutmeg or ginger for depth.
    • Butter: Creamy, rich, helps the filling stay smooth. Swap with coconut oil for a dairy-free version.
    • Egg: Provides structure and stability to the cookie dough.
    • All-purpose flour: Keeps the cookies tender but sturdy enough to hold the filling.
    • Baking soda: Leavening agent that helps cookies rise just enough, giving a slight chew.

    Tools of the Pumpkin Pie Trail

    • Mixing bowls: To combine dry and wet ingredients separately.
    • Electric mixer or whisk: To beat butter and sugar until fluffy.
    • Cookie scoop: To portion dough evenly.
    • Baking sheets: To hold the cookies during baking.
    • Wire rack: To cool cookies evenly.

    Crafting the Perfect Pumpkin Whoopie Pie

    Step 1: Preheat your oven to 180°C (350°F). Line two baking sheets with parchment paper.

    Step 2: In a large bowl, whisk together 1 1/2 cups of all-purpose flour, 1 tsp baking soda, 1/2 tsp salt, and 1 tsp cinnamon.

    Step 3: In another bowl, beat 1/2 cup softened butter with 1 cup brown sugar until creamy. Add 1 cup pureed pumpkin and 1 large egg, mix well.

    Step 4: Gradually add dry ingredients to wet, stirring just until combined. The batter will be thick but scoopable.

    Step 5: Using a tablespoon or cookie scoop, dollop rounds onto prepared baking sheets, leaving space to spread.

    Step 6: Bake for 12-15 minutes, edges should turn golden and a toothpick inserted in the center comes out clean.

    Step 7: Cool the cookies on a wire rack for at least 15 minutes before filling.

    Cooking Cues & Tips for Pumpkin Whoopie Pies

    • The cookies should be golden around the edges but soft inside.
    • If they spread too thin, chill the dough for 10 minutes before baking.
    • The filling should be smooth and spreadable, not runny.
    • Listen for a slight crackle when the cookies are done.

    Troubleshooting Pumpkin Whoopie Pie Mishaps

    • Dough is too wet and spread excessively.? Incorporate a little more flour if the dough is too sticky.
    • Cookies spread into thin disks.? Chill dough for 10 minutes if cookies spread too much.
    • Over-baked or burnt edges.? Reduce oven temperature slightly if edges brown too fast.
    • Filling melts or slides off.? Let cookies cool completely before filling.

    Pumpkin Whoopie Pies

    Pumpkin whoopie pies are soft, moist cookies filled with a creamy pumpkin-flavored filling. The cookies are made with pumpkin puree, warm spices, and a hint of molasses, resulting in a tender, slightly chewy texture. Once assembled, they resemble small sandwiches, perfect for cozy fall afternoons.
    Prep Time 15 minutes
    Cook Time 15 minutes
    Total Time 30 minutes
    Servings: 12
    Course: Main Course
    Cuisine: American
    Calories: 180

    Ingredients
      

    • 1 1/2 cups all-purpose flour
    • 1 tsp baking soda
    • 1/2 tsp salt
    • 1 tsp cinnamon
    • 1/2 cup butter softened
    • 1 cup brown sugar
    • 1 cup pureed pumpkin plain, not spiced
    • 1 large egg
    • 1 cup unsalted butter for filling
    • 2 cups powdered sugar for filling
    • 1/2 tsp cinnamon for filling
    • 1/4 tsp nutmeg optional, for filling

    Equipment

    • Mixing bowls
    • electric mixer or whisk
    • Cookie scoop
    • Baking sheets
    • Parchment paper
    • Wire rack

    Method
     

    1. Preheat your oven to 180°C (350°F) and line two baking sheets with parchment paper.
    2. In a large bowl, whisk together the flour, baking soda, salt, and cinnamon until well combined. This helps evenly distribute the spices and leavening agents.
    3. In another bowl, beat the softened butter and brown sugar with an electric mixer until the mixture is fluffy, light, and creamy, about 2-3 minutes. The sugar should be slightly dissolved, and the mixture should smell warm and inviting.
    4. Add the pureed pumpkin and egg to the butter mixture, beating until the ingredients are thoroughly combined and the mixture looks smooth and slightly thickened.
    5. Gradually add the dry ingredients to the wet mixture, mixing just until the flour is incorporated. The dough will be thick and slightly sticky, but scoopable.
    6. Using a cookie scoop or tablespoon, portion the dough onto the prepared baking sheets, leaving about 2 inches between each dollop to allow for spreading.
    7. Bake in the preheated oven for 12-15 minutes, until the edges turn golden and the tops are set. You’ll hear a gentle crackle when they are done.
    8. Remove the cookies from the oven and let them cool on the baking sheets for 5 minutes before transferring them to a wire rack to cool completely. This prevents them from breaking apart while still warm.
    9. While the cookies cool, prepare the filling by beating softened butter, powdered sugar, cinnamon, and nutmeg until smooth and fluffy. The filling should be creamy and easy to spread.
    10. Once the cookies are completely cooled, spread a generous dollop of filling on the flat side of one cookie, then sandwich with a second cookie to form a small sandwich.
    11. Repeat with the remaining cookies and filling. Serve these tender, flavorful pumpkin whoopie pies at room temperature and enjoy the cozy fall flavors.

    Notes

    Chill the dough for 10 minutes if the cookies spread too much during baking. For a dairy-free version, substitute coconut oil for butter in the dough and filling.
    These pumpkin whoopie pies are best enjoyed slightly chilled, with that soft, chewy cookie melting into a sweet, spiced filling. They’re a reminder that baking can be a quiet act of kindness, especially when the air turns crisp and the leaves start to fall. Feel free to tweak the spices or add a touch of ginger or nutmeg—make it your own. Nothing beats biting into one of these with a cup of tea, feeling that warm spice hit your tongue.

  • Pumpkin Whoopie Pies: A Cozy Fall Concoction with a Twist

    Pumpkin Whoopie Pies: A Cozy Fall Concoction with a Twist

    Pumpkin whoopie pies are a little nostalgic, a little playful. I love how the pumpkin adds moisture and a subtle sweetness that’s unlike any other cookie. They’re perfect for pumpkin season, when everything feels a little more cozy and intentional. Plus, making the filling from scratch transforms these from simple cookies to a real treat.

    Why These Pumpkin Whoopie Pies Are a Staple

    They’re a warm hug in pastry form, perfect for chilly afternoons. Baking these feels like a ritual, a slow savoring of fall’s quiet charm. Plus, they’re endlessly customizable—more spice, less sugar, a drizzle of dark chocolate. Every batch reminds me that simple ingredients, combined with care, make the sweetest memories.

    Breaking Down the Pumpkin Pie Magic

    • Canned pumpkin: The star ingredient — adds moisture and a gentle sweetness. Use the plain variety, not spiced.
    • Brown sugar: Gives warmth and a molasses note, balancing the spices.
    • Cinnamon: The warm backbone, but feel free to add a pinch of nutmeg or ginger for depth.
    • Butter: Creamy, rich, helps the filling stay smooth. Swap with coconut oil for a dairy-free version.
    • Egg: Provides structure and stability to the cookie dough.
    • All-purpose flour: Keeps the cookies tender but sturdy enough to hold the filling.
    • Baking soda: Leavening agent that helps cookies rise just enough, giving a slight chew.

    Tools of the Pumpkin Pie Trail

    • Mixing bowls: To combine dry and wet ingredients separately.
    • Electric mixer or whisk: To beat butter and sugar until fluffy.
    • Cookie scoop: To portion dough evenly.
    • Baking sheets: To hold the cookies during baking.
    • Wire rack: To cool cookies evenly.

    Crafting the Perfect Pumpkin Whoopie Pie

    Step 1: Preheat your oven to 180°C (350°F). Line two baking sheets with parchment paper.

    Step 2: In a large bowl, whisk together 1 1/2 cups of all-purpose flour, 1 tsp baking soda, 1/2 tsp salt, and 1 tsp cinnamon.

    Step 3: In another bowl, beat 1/2 cup softened butter with 1 cup brown sugar until creamy. Add 1 cup pureed pumpkin and 1 large egg, mix well.

    Step 4: Gradually add dry ingredients to wet, stirring just until combined. The batter will be thick but scoopable.

    Step 5: Using a tablespoon or cookie scoop, dollop rounds onto prepared baking sheets, leaving space to spread.

    Step 6: Bake for 12-15 minutes, edges should turn golden and a toothpick inserted in the center comes out clean.

    Step 7: Cool the cookies on a wire rack for at least 15 minutes before filling.

    Cooking Cues & Tips for Pumpkin Whoopie Pies

    • The cookies should be golden around the edges but soft inside.
    • If they spread too thin, chill the dough for 10 minutes before baking.
    • The filling should be smooth and spreadable, not runny.
    • Listen for a slight crackle when the cookies are done.

    Troubleshooting Pumpkin Whoopie Pie Mishaps

    • Dough is too wet and spread excessively.? Incorporate a little more flour if the dough is too sticky.
    • Cookies spread into thin disks.? Chill dough for 10 minutes if cookies spread too much.
    • Over-baked or burnt edges.? Reduce oven temperature slightly if edges brown too fast.
    • Filling melts or slides off.? Let cookies cool completely before filling.

    Pumpkin Whoopie Pies

    Pumpkin whoopie pies are soft, moist cookies filled with a creamy pumpkin-flavored filling, perfect for cozy fall afternoons. The cookies are made with pumpkin puree, warm spices, and a tender crumb, while the filling is smooth and flavorful. Their charming, sandwich-like appearance makes them as delightful to look at as they are to enjoy.
    Prep Time 20 minutes
    Cook Time 15 minutes
    Total Time 35 minutes
    Servings: 12
    Course: Main Course
    Cuisine: American
    Calories: 220

    Ingredients
      

    • 1 1/2 cups all-purpose flour
    • 1 tsp baking soda
    • 1/2 tsp salt
    • 1 tsp cinnamon
    • 1/2 cup unsalted butter softened
    • 1 cup brown sugar
    • 1 cup pureed pumpkin plain, not spiced
    • 1 large egg

    Equipment

    • Mixing bowls
    • electric mixer or whisk
    • Cookie scoop
    • Baking sheets
    • Parchment paper
    • Wire rack

    Method
     

    1. Preheat your oven to 180°C (350°F) and line two baking sheets with parchment paper to prevent sticking.
    2. In a large mixing bowl, whisk together the flour, baking soda, salt, and cinnamon until evenly combined. This creates a flavorful dry base for the cookies.
    3. In a separate bowl, beat the softened butter and brown sugar together using an electric mixer or whisk until the mixture is light, fluffy, and creamy, about 2-3 minutes. The sound should be a gentle whir, and the texture airy.
    4. Add the pureed pumpkin to the butter mixture and beat until well incorporated, then mix in the egg until the batter is smooth and slightly thickened.
    5. Gradually fold the dry ingredients into the wet mixture, stirring just until combined. The dough will be thick and sticky, resembling a soft cookie dough.
    6. Scoop tablespoon-sized portions of dough onto the prepared baking sheets, spacing them about 2 inches apart to allow for spreading. Use a cookie scoop for even size and shape.
    7. Bake the cookies in the preheated oven for 12-15 minutes, until the edges turn golden and the centers look set but still soft. You’ll hear a slight crackle when they’re ready.
    8. Remove the baking sheets from the oven and let the cookies cool on a wire rack for at least 15 minutes. This helps them set and makes handling easier.
    9. Once cooled, gently spread a generous layer of pumpkin-flavored filling between pairs of cookies to assemble the whoopie pies.
    10. Press the cookies together gently to create a sandwich, ensuring the filling reaches the edges for a perfect look.
    11. Serve the pumpkin whoopie pies at room temperature, enjoying their soft texture and warm spices with every bite.
    These pumpkin whoopie pies are best enjoyed slightly chilled, with that soft, chewy cookie melting into a sweet, spiced filling. They’re a reminder that baking can be a quiet act of kindness, especially when the air turns crisp and the leaves start to fall. Feel free to tweak the spices or add a touch of ginger or nutmeg—make it your own. Nothing beats biting into one of these with a cup of tea, feeling that warm spice hit your tongue.

  • Pumpkin Whoopie Pies: A Cozy Fall Concoction with a Twist

    Pumpkin Whoopie Pies: A Cozy Fall Concoction with a Twist

    Pumpkin whoopie pies are a little nostalgic, a little playful. I love how the pumpkin adds moisture and a subtle sweetness that’s unlike any other cookie. They’re perfect for pumpkin season, when everything feels a little more cozy and intentional. Plus, making the filling from scratch transforms these from simple cookies to a real treat.

    Why These Pumpkin Whoopie Pies Are a Staple

    They’re a warm hug in pastry form, perfect for chilly afternoons. Baking these feels like a ritual, a slow savoring of fall’s quiet charm. Plus, they’re endlessly customizable—more spice, less sugar, a drizzle of dark chocolate. Every batch reminds me that simple ingredients, combined with care, make the sweetest memories.

    Breaking Down the Pumpkin Pie Magic

    • Canned pumpkin: The star ingredient — adds moisture and a gentle sweetness. Use the plain variety, not spiced.
    • Brown sugar: Gives warmth and a molasses note, balancing the spices.
    • Cinnamon: The warm backbone, but feel free to add a pinch of nutmeg or ginger for depth.
    • Butter: Creamy, rich, helps the filling stay smooth. Swap with coconut oil for a dairy-free version.
    • Egg: Provides structure and stability to the cookie dough.
    • All-purpose flour: Keeps the cookies tender but sturdy enough to hold the filling.
    • Baking soda: Leavening agent that helps cookies rise just enough, giving a slight chew.

    Tools of the Pumpkin Pie Trail

    • Mixing bowls: To combine dry and wet ingredients separately.
    • Electric mixer or whisk: To beat butter and sugar until fluffy.
    • Cookie scoop: To portion dough evenly.
    • Baking sheets: To hold the cookies during baking.
    • Wire rack: To cool cookies evenly.

    Crafting the Perfect Pumpkin Whoopie Pie

    Step 1: Preheat your oven to 180°C (350°F). Line two baking sheets with parchment paper.

    Step 2: In a large bowl, whisk together 1 1/2 cups of all-purpose flour, 1 tsp baking soda, 1/2 tsp salt, and 1 tsp cinnamon.

    Step 3: In another bowl, beat 1/2 cup softened butter with 1 cup brown sugar until creamy. Add 1 cup pureed pumpkin and 1 large egg, mix well.

    Step 4: Gradually add dry ingredients to wet, stirring just until combined. The batter will be thick but scoopable.

    Step 5: Using a tablespoon or cookie scoop, dollop rounds onto prepared baking sheets, leaving space to spread.

    Step 6: Bake for 12-15 minutes, edges should turn golden and a toothpick inserted in the center comes out clean.

    Step 7: Cool the cookies on a wire rack for at least 15 minutes before filling.

    Cooking Cues & Tips for Pumpkin Whoopie Pies

    • The cookies should be golden around the edges but soft inside.
    • If they spread too thin, chill the dough for 10 minutes before baking.
    • The filling should be smooth and spreadable, not runny.
    • Listen for a slight crackle when the cookies are done.

    Troubleshooting Pumpkin Whoopie Pie Mishaps

    • Dough is too wet and spread excessively.? Incorporate a little more flour if the dough is too sticky.
    • Cookies spread into thin disks.? Chill dough for 10 minutes if cookies spread too much.
    • Over-baked or burnt edges.? Reduce oven temperature slightly if edges brown too fast.
    • Filling melts or slides off.? Let cookies cool completely before filling.

    Pumpkin Whoopie Pies

    Pumpkin whoopie pies are soft, moist cookies filled with a creamy pumpkin-flavored filling, perfect for cozy fall afternoons. The cookies are made with pumpkin puree, spices, and a touch of molasses-like richness, while the filling is smooth and luscious. Their tender texture and warm spices make them a delightful seasonal treat.
    Prep Time 20 minutes
    Cook Time 15 minutes
    Total Time 35 minutes
    Servings: 12
    Course: Main Course
    Cuisine: American
    Calories: 250

    Ingredients
      

    • 1 1/2 cups all-purpose flour
    • 1 tsp baking soda
    • 1/2 tsp salt
    • 1 tsp cinnamon
    • 1/2 cup unsalted butter, softened
    • 1 cup brown sugar
    • 1 cup canned pumpkin puree plain, not spiced
    • 1 large egg
    • 1 1/2 cups powdered sugar for filling
    • 4 oz cream cheese softened
    • 1 tsp vanilla extract

    Equipment

    • Mixing bowls
    • electric mixer or whisk
    • Cookie scoop
    • Baking sheets
    • Parchment paper
    • Wire rack

    Method
     

    1. Preheat your oven to 180°C (350°F) and line two baking sheets with parchment paper. Gather your ingredients and prepare to mix.
    2. In a large bowl, whisk together the flour, baking soda, salt, and cinnamon until evenly combined. This creates your dry mixture.
    3. In another bowl, beat the softened butter and brown sugar with an electric mixer until the mixture is light, fluffy, and fragrant—about 2-3 minutes.
    4. Add the pumpkin puree and egg to the butter mixture, beating until well incorporated and smooth.
    5. Gradually add the dry ingredients to the wet, mixing on low speed or folding until just combined. The dough will be thick and slightly sticky.
    6. Using a cookie scoop or tablespoon, portion the dough onto the prepared baking sheets, spacing them about 2 inches apart to allow for spreading.
    7. Bake in the preheated oven for 12-15 minutes, or until the edges turn golden and a toothpick inserted into the center comes out clean. The cookies will feel firm but slightly soft when pressed.
    8. Remove the cookies from the oven and let them cool on the baking sheets for 5 minutes, then transfer them to a wire rack to cool completely. The cookies should be tender and moist, with a slight bounce when pressed.
    9. While the cookies cool, prepare the filling by beating the softened cream cheese, powdered sugar, and vanilla together until smooth and creamy, about 2 minutes.
    10. Once the cookies are fully cooled, spread a generous dollop of the pumpkin cream filling onto the flat side of one cookie and top with another to form a sandwich. Repeat with remaining cookies.
    11. Serve your pumpkin whoopie pies immediately or refrigerate them for an hour to set the filling. Enjoy these soft, moist, and warmly spiced treats!

    Notes

    For an extra touch, drizzle melted dark chocolate over the assembled pies or dust with a little cinnamon before serving.
    These pumpkin whoopie pies are best enjoyed slightly chilled, with that soft, chewy cookie melting into a sweet, spiced filling. They’re a reminder that baking can be a quiet act of kindness, especially when the air turns crisp and the leaves start to fall. Feel free to tweak the spices or add a touch of ginger or nutmeg—make it your own. Nothing beats biting into one of these with a cup of tea, feeling that warm spice hit your tongue.

  • Pumpkin Whoopie Pies: A Cozy Fall Concoction with a Twist

    Pumpkin Whoopie Pies: A Cozy Fall Concoction with a Twist

    Pumpkin whoopie pies are a little nostalgic, a little playful. I love how the pumpkin adds moisture and a subtle sweetness that’s unlike any other cookie. They’re perfect for pumpkin season, when everything feels a little more cozy and intentional. Plus, making the filling from scratch transforms these from simple cookies to a real treat.

    Why These Pumpkin Whoopie Pies Are a Staple

    They’re a warm hug in pastry form, perfect for chilly afternoons. Baking these feels like a ritual, a slow savoring of fall’s quiet charm. Plus, they’re endlessly customizable—more spice, less sugar, a drizzle of dark chocolate. Every batch reminds me that simple ingredients, combined with care, make the sweetest memories.

    Breaking Down the Pumpkin Pie Magic

    • Canned pumpkin: The star ingredient — adds moisture and a gentle sweetness. Use the plain variety, not spiced.
    • Brown sugar: Gives warmth and a molasses note, balancing the spices.
    • Cinnamon: The warm backbone, but feel free to add a pinch of nutmeg or ginger for depth.
    • Butter: Creamy, rich, helps the filling stay smooth. Swap with coconut oil for a dairy-free version.
    • Egg: Provides structure and stability to the cookie dough.
    • All-purpose flour: Keeps the cookies tender but sturdy enough to hold the filling.
    • Baking soda: Leavening agent that helps cookies rise just enough, giving a slight chew.

    Tools of the Pumpkin Pie Trail

    • Mixing bowls: To combine dry and wet ingredients separately.
    • Electric mixer or whisk: To beat butter and sugar until fluffy.
    • Cookie scoop: To portion dough evenly.
    • Baking sheets: To hold the cookies during baking.
    • Wire rack: To cool cookies evenly.

    Crafting the Perfect Pumpkin Whoopie Pie

    Step 1: Preheat your oven to 180°C (350°F). Line two baking sheets with parchment paper.

    Step 2: In a large bowl, whisk together 1 1/2 cups of all-purpose flour, 1 tsp baking soda, 1/2 tsp salt, and 1 tsp cinnamon.

    Step 3: In another bowl, beat 1/2 cup softened butter with 1 cup brown sugar until creamy. Add 1 cup pureed pumpkin and 1 large egg, mix well.

    Step 4: Gradually add dry ingredients to wet, stirring just until combined. The batter will be thick but scoopable.

    Step 5: Using a tablespoon or cookie scoop, dollop rounds onto prepared baking sheets, leaving space to spread.

    Step 6: Bake for 12-15 minutes, edges should turn golden and a toothpick inserted in the center comes out clean.

    Step 7: Cool the cookies on a wire rack for at least 15 minutes before filling.

    Cooking Cues & Tips for Pumpkin Whoopie Pies

    • The cookies should be golden around the edges but soft inside.
    • If they spread too thin, chill the dough for 10 minutes before baking.
    • The filling should be smooth and spreadable, not runny.
    • Listen for a slight crackle when the cookies are done.

    Troubleshooting Pumpkin Whoopie Pie Mishaps

    • Dough is too wet and spread excessively.? Incorporate a little more flour if the dough is too sticky.
    • Cookies spread into thin disks.? Chill dough for 10 minutes if cookies spread too much.
    • Over-baked or burnt edges.? Reduce oven temperature slightly if edges brown too fast.
    • Filling melts or slides off.? Let cookies cool completely before filling.

    Pumpkin Whoopie Pies

    Pumpkin whoopie pies are soft, moist cookies filled with a creamy pumpkin-flavored filling. The cookies are made with pumpkin puree, warm spices, and a touch of brown sugar, resulting in a tender, slightly chewy texture. The homemade filling adds a rich, smooth contrast, creating a cozy fall treat perfect for festive occasions.
    Prep Time 20 minutes
    Cook Time 15 minutes
    Total Time 35 minutes
    Servings: 12
    Course: Main Course
    Cuisine: American
    Calories: 250

    Ingredients
      

    • 1 1/2 cups all-purpose flour
    • 1 tsp baking soda
    • 1/2 tsp salt
    • 1 tsp cinnamon
    • 1/2 cup unsalted butter, softened
    • 1 cup brown sugar
    • 1 cup pureed pumpkin plain variety, not spiced
    • 1 large egg
    • 1 cup unsalted butter, softened (for filling)
    • 2 cups powdered sugar for the filling
    • 1/2 tsp cinnamon for the filling

    Equipment

    • Mixing bowls
    • electric mixer or whisk
    • Cookie scoop
    • Baking sheets
    • Parchment paper
    • Wire rack

    Method
     

    1. Preheat your oven to 180°C (350°F) and line two baking sheets with parchment paper. In a large bowl, whisk together the flour, baking soda, salt, and cinnamon until evenly combined.
    2. In another bowl, beat the softened butter and brown sugar together with an electric mixer until the mixture is light, fluffy, and fragrant, about 2-3 minutes.
    3. Add the pumpkin puree and egg to the butter mixture, beating until well incorporated and smooth. The mixture should look slightly thick and uniform.
    4. Gradually fold the dry ingredients into the wet mixture using a spatula or low-speed mixer, just until combined. The dough will be thick and scoopable.
    5. Using a cookie scoop or tablespoon, portion the dough onto the prepared baking sheets, spacing them about 2 inches apart to allow for spreading.
    6. Bake in the preheated oven for 12-15 minutes, until the edges are golden and the cookies feel set but still soft to the touch. A toothpick inserted in the center should come out clean.
    7. Remove the cookies from the oven and let them cool on the baking sheet for 5 minutes, then transfer them to a wire rack to cool completely. This helps prevent breaking and makes filling easier.
    8. While the cookies cool, prepare the filling by beating softened butter, powdered sugar, and cinnamon together until smooth and fluffy, about 2-3 minutes.
    9. Spread or pipe a generous dollop of the pumpkin filling onto the flat side of one cookie, then top with another cookie to make a sandwich. Repeat with remaining cookies and filling.
    10. Once assembled, let the pumpkin whoopie pies sit for about 15 minutes to allow the filling to set slightly. Serve and enjoy this cozy fall treat!

    Notes

    Chill the dough for 10 minutes if cookies spread too much during baking. Feel free to add a drizzle of dark chocolate or extra spices for customization.
    These pumpkin whoopie pies are best enjoyed slightly chilled, with that soft, chewy cookie melting into a sweet, spiced filling. They’re a reminder that baking can be a quiet act of kindness, especially when the air turns crisp and the leaves start to fall. Feel free to tweak the spices or add a touch of ginger or nutmeg—make it your own. Nothing beats biting into one of these with a cup of tea, feeling that warm spice hit your tongue.

  • Black Velvet Cupcakes: A Deep Dive into Rich Cocoa and Velvet Touch

    Black Velvet Cupcakes: A Deep Dive into Rich Cocoa and Velvet Touch

    Black velvet cupcakes aren’t just about the striking color—they’re a celebration of cocoa’s deep, smoky notes. I love how the dark hue makes them feel a little more decadent, a little more daring. It’s a cake that feels like a treat, but also a way to indulge without going overboard.

    Baking these feels like a quiet rebellion—simple ingredients transformed into something striking. There’s a thrill in pulling a batch from the oven, watching the rich batter turn matte and crack as they bake. They’re perfect for when you want dessert that’s a little more understated but no less special.

    Why These Cupcakes Keep Calling Me Back

    They’re simple but elegant, a reminder that chocolate’s richness is best kept minimal. Each batch feels like a small victory, especially when the batter turns dark and glossy. Baking these always sparks a memory of cozy, chaotic kitchens and quiet moments of pride. No matter how often I make them, they’re a guaranteed way to satisfy a sweet craving with a touch of sophistication.

    Diving into Ingredients: What Makes These Cupcakes Sing

    • Dark cocoa powder: The backbone of flavor—adds smoky richness. Use Dutch-processed for a smoother, less acidic bite.
    • Buttermilk: Gives moisture and tang; swap with sour cream if you prefer a denser crumb.
    • Butter: Creamed well, it creates that tender, velvety crumb. Salted or unsalted, your call.
    • Granulated sugar: Sweetens and tenderizes; adjust for sweetness or to balance bitterness.
    • Eggs: Bind everything together; room temp eggs blend better, making for a smoother batter.
    • Vanilla extract: Brightens cocoa’s depth; a splash enhances complexity.
    • Cake flour: Keeps the crumb soft; all-purpose works in a pinch but adds a denser feel.

    Tools of the Trade for Velvet Cupcakes

    • Mixing bowls: For combining dry and wet ingredients separately.
    • Electric mixer: To cream butter and sugar thoroughly for a light texture.
    • Sifter: To aerate cocoa and flour, avoiding lumps in the batter.
    • Muffin tin & paper liners: To shape and contain the cupcakes during baking.
    • Toothpick or cake tester: To check doneness without disturbing the cupcake tops.

    Crafting the Perfect Black Velvet Cupcake

    Step 1: Preheat your oven to 180°C (350°F). Line a muffin tin with paper liners.

    Step 2: Sift together the flour, cocoa powder, and baking soda. Set aside.

    Step 3: Cream butter and sugar until fluffy, about 3-4 minutes. Add eggs one at a time.

    Step 4: Alternate adding dry ingredients and buttermilk, starting and ending with dry. Mix until just combined.

    Step 5: Fill cupcake liners about 2/3 full. Bake for 18-20 minutes, until a toothpick comes out clean.

    Step 6: Let cupcakes cool in the tin for 5 minutes, then transfer to a wire rack. Cool completely before frosting.

    Cooking Checkpoints & Tips for Black Velvet Cupcakes

    • The batter should be smooth and glossy, not over-mixed or lumpy.
    • Cupcake tops should crack slightly and have a matte finish, not shiny or wet.
    • Use a toothpick to test—center should be moist but not wet, and come out clean.

    Common Mistakes & How to Fix Them

    • Cupcake tops are flat or sunken.? Ensure not to overmix batter; mix just until ingredients combine to keep cupcakes tender.
    • Dry, crumbly cupcakes.? Check oven temperature with an independent thermometer; too hot can cause sinking.
    • Frosting sliding off or melting.? Don’t overbake; start checking at 18 minutes, edges should be set but not dried out.
    • Cupcakes crack unevenly.? Cool cupcakes completely before frosting; room temperature prevents melting.

    Black Velvet Cupcakes

    Black velvet cupcakes showcase a striking deep black hue and rich cocoa flavor, achieved through a simple baking process that transforms basic ingredients into decadent treats. The batter is smooth and glossy, baking into tender cupcakes with a matte finish and slight crack on top, perfect for a sophisticated dessert presentation. These cupcakes balance bold chocolate notes with a moist, velvety crumb, making them a visually stunning and indulgent sweet.
    Prep Time 15 minutes
    Cook Time 20 minutes
    Total Time 35 minutes
    Servings: 12
    Course: Main Course
    Cuisine: American
    Calories: 250

    Ingredients
      

    • 1 1/2 cups cake flour sifted
    • 1/2 cup Dutch-processed cocoa powder sifted
    • 1 teaspoon baking soda
    • 1/2 cup unsalted butter softened
    • 1 cup granulated sugar
    • 2 large eggs room temperature
    • 3/4 cup buttermilk or sour cream
    • 1 1/2 teaspoons vanilla extract
    • 1 1/2 cups dark cocoa powder Dutch-processed, sifted

    Equipment

    • Mixing bowls
    • Electric mixer
    • Sifter
    • Muffin tin
    • Paper liners
    • Toothpick or cake tester

    Method
     

    1. Preheat your oven to 180°C (350°F) and line a muffin tin with paper liners, ready to house your batter.
    2. Sift together the cake flour, Dutch-processed cocoa powder, and baking soda into a large mixing bowl to ensure a smooth, lump-free batter.
    3. In a separate bowl, cream the softened butter and granulated sugar using an electric mixer until the mixture is light, fluffy, and fragrant, about 3-4 minutes.
    4. Add the eggs one at a time to the creamed mixture, beating well after each addition until the batter is smooth and glossy.
    5. Alternately add the dry sifted ingredients and buttermilk to the wet mixture, starting and ending with the dry, mixing just until combined after each addition to keep the batter tender.
    6. Stir in the vanilla extract and the sifted dark cocoa powder until the batter turns deep, glossy, and smooth, with a rich color.
    7. Divide the batter evenly among the prepared paper liners, filling each about two-thirds full for a nice dome as they bake.
    8. Bake in the preheated oven for 18-20 minutes, or until a toothpick inserted into the center comes out clean and the tops crack slightly with a matte finish.
    9. Remove the cupcakes from the oven and let them cool in the tin for about 5 minutes, then transfer them to a wire rack to cool completely.
    10. Once cooled, the cupcakes will have a velvety, matte surface with a slight crack on top, ready to be frosted or enjoyed on their own.

    Notes

    For an extra decadent touch, top these cupcakes with a rich chocolate frosting or a dollop of whipped cream. To enhance the black hue, use activated charcoal powder sparingly in the frosting if desired.
    These cupcakes, with their intense cocoa flavor and tender crumb, remind me of childhood baking chaos. Every batch feels like a little victory, especially when the tops crack just right and the aroma fills the kitchen. They’re simple but special—perfect for a cozy night or unexpected guest. Once cooled, slather them with a smooth, tangy cream cheese frosting for that classic contrast. Dive in, and don’t be shy about tweaking the sweetness or cocoa intensity to match your mood.

  • Black Velvet Cupcakes: A Deep Dive into Rich Cocoa and Velvet Touch

    Black Velvet Cupcakes: A Deep Dive into Rich Cocoa and Velvet Touch

    Black velvet cupcakes aren’t just about the striking color—they’re a celebration of cocoa’s deep, smoky notes. I love how the dark hue makes them feel a little more decadent, a little more daring. It’s a cake that feels like a treat, but also a way to indulge without going overboard.

    Baking these feels like a quiet rebellion—simple ingredients transformed into something striking. There’s a thrill in pulling a batch from the oven, watching the rich batter turn matte and crack as they bake. They’re perfect for when you want dessert that’s a little more understated but no less special.

    Why These Cupcakes Keep Calling Me Back

    They’re simple but elegant, a reminder that chocolate’s richness is best kept minimal. Each batch feels like a small victory, especially when the batter turns dark and glossy. Baking these always sparks a memory of cozy, chaotic kitchens and quiet moments of pride. No matter how often I make them, they’re a guaranteed way to satisfy a sweet craving with a touch of sophistication.

    Diving into Ingredients: What Makes These Cupcakes Sing

    • Dark cocoa powder: The backbone of flavor—adds smoky richness. Use Dutch-processed for a smoother, less acidic bite.
    • Buttermilk: Gives moisture and tang; swap with sour cream if you prefer a denser crumb.
    • Butter: Creamed well, it creates that tender, velvety crumb. Salted or unsalted, your call.
    • Granulated sugar: Sweetens and tenderizes; adjust for sweetness or to balance bitterness.
    • Eggs: Bind everything together; room temp eggs blend better, making for a smoother batter.
    • Vanilla extract: Brightens cocoa’s depth; a splash enhances complexity.
    • Cake flour: Keeps the crumb soft; all-purpose works in a pinch but adds a denser feel.

    Tools of the Trade for Velvet Cupcakes

    • Mixing bowls: For combining dry and wet ingredients separately.
    • Electric mixer: To cream butter and sugar thoroughly for a light texture.
    • Sifter: To aerate cocoa and flour, avoiding lumps in the batter.
    • Muffin tin & paper liners: To shape and contain the cupcakes during baking.
    • Toothpick or cake tester: To check doneness without disturbing the cupcake tops.

    Crafting the Perfect Black Velvet Cupcake

    Step 1: Preheat your oven to 180°C (350°F). Line a muffin tin with paper liners.

    Step 2: Sift together the flour, cocoa powder, and baking soda. Set aside.

    Step 3: Cream butter and sugar until fluffy, about 3-4 minutes. Add eggs one at a time.

    Step 4: Alternate adding dry ingredients and buttermilk, starting and ending with dry. Mix until just combined.

    Step 5: Fill cupcake liners about 2/3 full. Bake for 18-20 minutes, until a toothpick comes out clean.

    Step 6: Let cupcakes cool in the tin for 5 minutes, then transfer to a wire rack. Cool completely before frosting.

    Cooking Checkpoints & Tips for Black Velvet Cupcakes

    • The batter should be smooth and glossy, not over-mixed or lumpy.
    • Cupcake tops should crack slightly and have a matte finish, not shiny or wet.
    • Use a toothpick to test—center should be moist but not wet, and come out clean.

    Common Mistakes & How to Fix Them

    • Cupcake tops are flat or sunken.? Ensure not to overmix batter; mix just until ingredients combine to keep cupcakes tender.
    • Dry, crumbly cupcakes.? Check oven temperature with an independent thermometer; too hot can cause sinking.
    • Frosting sliding off or melting.? Don’t overbake; start checking at 18 minutes, edges should be set but not dried out.
    • Cupcakes crack unevenly.? Cool cupcakes completely before frosting; room temperature prevents melting.

    Black Velvet Cupcakes

    Black velvet cupcakes are striking treats with a rich, smoky cocoa flavor and a velvety crumb. The deep black hue and matte cracked tops create a decadent yet understated dessert, perfect for special occasions or a sophisticated sweet fix. They’re baked using simple ingredients that transform into beautifully dark, glossy batter, resulting in moist, tender cupcakes with a striking appearance.
    Prep Time 15 minutes
    Cook Time 20 minutes
    Total Time 35 minutes
    Servings: 12
    Course: Main Course
    Cuisine: American
    Calories: 220

    Ingredients
      

    • 1 1/2 cups cake flour
    • 1/2 cup unsweetened dark cocoa powder Dutch-processed preferred
    • 1 1/4 teaspoons baking soda
    • 1/2 teaspoon salt
    • 1/2 cup unsalted butter softened
    • 1 cup granulated sugar
    • 2 large eggs room temperature
    • 1 cup buttermilk or sour cream as a substitute
    • 1 1/2 teaspoons vanilla extract
    • 12 paper liners cupcake liners

    Equipment

    • Mixing bowls
    • Electric mixer
    • Sifter
    • Muffin tin & paper liners
    • Toothpick or cake tester

    Method
     

    1. Preheat your oven to 180°C (350°F) and line a muffin tin with paper liners, ready for the batter.
    2. Sift together the cake flour, cocoa powder, baking soda, and salt into a large mixing bowl. This aerates the dry ingredients and ensures a smooth batter.
    3. In a separate bowl, cream the softened butter and granulated sugar with an electric mixer on medium speed until the mixture is light and fluffy, about 3-4 minutes. You’ll notice the color lightening and the mixture feeling airy.
    4. Add eggs one at a time, beating well after each addition. The batter will become smoother and more cohesive as each egg is incorporated.
    5. Reduce the mixer speed and alternately add dry ingredients and buttermilk to the creamed mixture, starting and ending with dry ingredients. Mix just until combined—be careful not to overmix, as this keeps the cupcakes tender.
    6. Stir in vanilla extract for a fragrant boost of flavor. The batter should be smooth, glossy, and dark in color.
    7. Divide the batter evenly among the cupcake liners, filling each about two-thirds full. The batter should be thick but pourable and glossy.
    8. Bake in the preheated oven for 18-20 minutes. The cupcakes will crack slightly on top and have a matte finish when done. Use a toothpick inserted into the center—if it comes out clean, they’re ready.
    9. Remove the cupcakes from the oven and let them cool in the tin for about 5 minutes. Then, transfer them to a wire rack and cool completely before frosting or serving. The tops should be firm and matte, with a slight crack.
    10. Once cooled, you can frost them with your favorite chocolate or vanilla frosting, or enjoy them on their own to savor their rich cocoa flavor and velvety crumb.

    Notes

    For a more intense black color, add a few drops of black gel food coloring to the batter before baking. Ensure not to overmix to keep the cupcakes tender. Cool completely before frosting to prevent melting or sliding frosting.
    These cupcakes, with their intense cocoa flavor and tender crumb, remind me of childhood baking chaos. Every batch feels like a little victory, especially when the tops crack just right and the aroma fills the kitchen. They’re simple but special—perfect for a cozy night or unexpected guest. Once cooled, slather them with a smooth, tangy cream cheese frosting for that classic contrast. Dive in, and don’t be shy about tweaking the sweetness or cocoa intensity to match your mood.

  • Black Velvet Cupcakes: A Deep Dive into Rich Cocoa and Velvet Touch

    Black Velvet Cupcakes: A Deep Dive into Rich Cocoa and Velvet Touch

    Black velvet cupcakes aren’t just about the striking color—they’re a celebration of cocoa’s deep, smoky notes. I love how the dark hue makes them feel a little more decadent, a little more daring. It’s a cake that feels like a treat, but also a way to indulge without going overboard.

    Baking these feels like a quiet rebellion—simple ingredients transformed into something striking. There’s a thrill in pulling a batch from the oven, watching the rich batter turn matte and crack as they bake. They’re perfect for when you want dessert that’s a little more understated but no less special.

    Why These Cupcakes Keep Calling Me Back

    They’re simple but elegant, a reminder that chocolate’s richness is best kept minimal. Each batch feels like a small victory, especially when the batter turns dark and glossy. Baking these always sparks a memory of cozy, chaotic kitchens and quiet moments of pride. No matter how often I make them, they’re a guaranteed way to satisfy a sweet craving with a touch of sophistication.

    Diving into Ingredients: What Makes These Cupcakes Sing

    • Dark cocoa powder: The backbone of flavor—adds smoky richness. Use Dutch-processed for a smoother, less acidic bite.
    • Buttermilk: Gives moisture and tang; swap with sour cream if you prefer a denser crumb.
    • Butter: Creamed well, it creates that tender, velvety crumb. Salted or unsalted, your call.
    • Granulated sugar: Sweetens and tenderizes; adjust for sweetness or to balance bitterness.
    • Eggs: Bind everything together; room temp eggs blend better, making for a smoother batter.
    • Vanilla extract: Brightens cocoa’s depth; a splash enhances complexity.
    • Cake flour: Keeps the crumb soft; all-purpose works in a pinch but adds a denser feel.

    Tools of the Trade for Velvet Cupcakes

    • Mixing bowls: For combining dry and wet ingredients separately.
    • Electric mixer: To cream butter and sugar thoroughly for a light texture.
    • Sifter: To aerate cocoa and flour, avoiding lumps in the batter.
    • Muffin tin & paper liners: To shape and contain the cupcakes during baking.
    • Toothpick or cake tester: To check doneness without disturbing the cupcake tops.

    Crafting the Perfect Black Velvet Cupcake

    Step 1: Preheat your oven to 180°C (350°F). Line a muffin tin with paper liners.

    Step 2: Sift together the flour, cocoa powder, and baking soda. Set aside.

    Step 3: Cream butter and sugar until fluffy, about 3-4 minutes. Add eggs one at a time.

    Step 4: Alternate adding dry ingredients and buttermilk, starting and ending with dry. Mix until just combined.

    Step 5: Fill cupcake liners about 2/3 full. Bake for 18-20 minutes, until a toothpick comes out clean.

    Step 6: Let cupcakes cool in the tin for 5 minutes, then transfer to a wire rack. Cool completely before frosting.

    Cooking Checkpoints & Tips for Black Velvet Cupcakes

    • The batter should be smooth and glossy, not over-mixed or lumpy.
    • Cupcake tops should crack slightly and have a matte finish, not shiny or wet.
    • Use a toothpick to test—center should be moist but not wet, and come out clean.

    Common Mistakes & How to Fix Them

    • Cupcake tops are flat or sunken.? Ensure not to overmix batter; mix just until ingredients combine to keep cupcakes tender.
    • Dry, crumbly cupcakes.? Check oven temperature with an independent thermometer; too hot can cause sinking.
    • Frosting sliding off or melting.? Don’t overbake; start checking at 18 minutes, edges should be set but not dried out.
    • Cupcakes crack unevenly.? Cool cupcakes completely before frosting; room temperature prevents melting.

    Black Velvet Cupcakes

    Black velvet cupcakes are a visually striking treat characterized by their deep, matte black color and rich cocoa flavor. The recipe involves mixing dry and wet ingredients, baking until cracked on top, and achieving a tender, moist crumb with a slightly crackled surface. They’re perfect for when you want a decadent, yet understated dessert with a glossy, velvety appearance.
    Prep Time 20 minutes
    Cook Time 20 minutes
    Total Time 40 minutes
    Servings: 12
    Course: Main Course
    Cuisine: American
    Calories: 250

    Ingredients
      

    • 1 3/4 cups cake flour
    • 1/2 cup Dutch-processed cocoa powder sifted
    • 1 teaspoon baking soda baking soda
    • 1/2 cup unsalted butter softened
    • 1 1/4 cups granulated sugar
    • 2 large eggs room temperature

    Equipment

    • Mixing bowls
    • Electric mixer
    • Sifter
    • Muffin tin & paper liners
    • Toothpick or cake tester

    Method
     

    1. Preheat your oven to 180°C (350°F). Line a muffin tin with paper liners and set aside.
    2. Sift together the cake flour, cocoa powder, and baking soda into a large mixing bowl. This aerates the dry ingredients and removes lumps.
    3. In a separate bowl, cream the softened butter and granulated sugar with an electric mixer on medium speed until the mixture is light, fluffy, and slightly pale, about 3-4 minutes. You should hear a gentle whir and see the mixture increase in volume.
    4. Add eggs one at a time to the creamed mixture, beating well after each addition. The batter will become smooth and glossy.
    5. Alternate adding the dry ingredients and buttermilk to the wet mixture, starting and ending with the dry. Use low speed to mix until just combined, avoiding overmixing to keep the cupcakes tender.
    6. Fill each cupcake liner about two-thirds full with the batter. You can use an ice cream scoop for even portions.
    7. Bake the cupcakes for 18-20 minutes, or until the tops crack slightly and a toothpick inserted into the center comes out clean. The tops should be matte and slightly cracked, with a rich aroma filling your kitchen.
    8. Remove the cupcakes from the oven and allow them to cool in the tin for about 5 minutes. Then transfer them to a wire rack to cool completely; they should feel firm to the touch but still moist inside.
    9. Once cooled, they’re ready to be frosted or enjoyed as is. The rich cocoa flavor and tender crumb make them an elegant treat for any occasion.

    Notes

    For an extra touch, top with a dark chocolate ganache or a swirl of whipped cream. Store in an airtight container for up to 2 days for best freshness.
    These cupcakes, with their intense cocoa flavor and tender crumb, remind me of childhood baking chaos. Every batch feels like a little victory, especially when the tops crack just right and the aroma fills the kitchen. They’re simple but special—perfect for a cozy night or unexpected guest. Once cooled, slather them with a smooth, tangy cream cheese frosting for that classic contrast. Dive in, and don’t be shy about tweaking the sweetness or cocoa intensity to match your mood.

  • Spine-Chilling Halloween Deviled Egg Eyeballs!

    Spine-Chilling Halloween Deviled Egg Eyeballs!

    Every October, I crave a touch of the bizarre in my holiday spread. These Halloween Deviled Egg Eyeballs turn a classic appetizer into a spooky spectacle. They look hauntingly real, with bloodshot veins and glassy eyes that startle even the bravest guests.

    The fun part? These creepy treats are surprisingly simple to assemble. The blend of creamy yolk filling and striking red accents makes them both disgustingly fun and delicious. They’re perfect for a party where everyone loves a dash of edible horror.

    Halloween Deviled Egg Eyeballs

    These deviled eggs are crafted to resemble sinister eyeballs, with creamy yolk filling shaped into small spheres. Red accents and bloodshot veins are added for a spooky, realistic look, resulting in a creepy yet delicious appetizer. The final presentation is both haunting and appetizing, perfect for Halloween parties.
    Prep Time 20 minutes
    Cook Time 10 minutes
    Total Time 30 minutes
    Servings: 12
    Course: Main Course
    Cuisine: Halloween
    Calories: 70

    Ingredients
      

    • 6 pieces large eggs hard-boiled and peeled
    • 1/4 cup mayo
    • 1 tsp yellow mustard
    • to taste salt and pepper
    • 1 small red food coloring or ketchup for bloodshot effect
    • 1 small black or dark brown edible marker or dark food coloring for veins

    Equipment

    • Large pot
    • Mixing bowl
    • Piping bag or plastic bag
    • Toothpick or fine tip squeeze bottle
    • Small spoon

    Method
     

    1. Cook the eggs in a large pot of boiling water until hard-boiled, about 10 minutes. Then, transfer them to cold water and peel carefully, setting aside to cool completely.
    2. Cut the cooled eggs in half lengthwise and carefully remove the yolks, placing them in a mixing bowl. Arrange the egg whites on a serving platter for filling.
    3. Mash the yolks with a fork until smooth, then stir in mayonnaise, mustard, salt, and pepper until the mixture is creamy and well combined.
    4. Fill a piping bag or a plastic sandwich bag with the yolk mixture, then pipe the filling into the cavities of the egg whites, shaping them into small rounded eyeballs.
    5. Use a small spoon or toothpick dipped in red food coloring or ketchup to add bloodshot veins radiating outward on each egg, creating a creepy, bloodshot eye effect.
    6. Carefully add a tiny dot of black or dark brown edible marker or food coloring to the center of each egg to resemble the dilated pupil or a glassy eye.
    7. Optionally, lightly tint the bloodshot veins with a small brush or toothpick dipped in red food coloring to enhance the creepy appearance.
    8. Chill the assembled eggs in the refrigerator for at least 15 minutes to set the appearance and flavors.
    9. Serve the Halloween deviled egg eyeballs chilled, making sure each is decorated with veins and a central eye pupil before serving.

    Notes

    Use a fine-tipped toothpick or edible marker for precise veins. For more realistic eyes, consider adding a small dab of food-safe gelatin or using edible gel for a glossy appearance.

    These eyeball deviled eggs are a little twisted, a little spooky, and just the right amount of gross. They turn any Halloween gathering into a memorable, giggle-filled event. Plus, their straightforward assembly leaves plenty of room for adding personal bloodshot details or creepy accessories.

    As the season deepens, I find myself craving these odd little bites more each year—part art project, part snack. They remind me of childhood thrills and the joy of creating something unexpected. Come October, they’re the perfect playful twist to the haunting season.

  • Sun-Kissed Butternut Squash Soup with a Ginger Zing

    Sun-Kissed Butternut Squash Soup with a Ginger Zing

    As autumn leaves swirl around the kitchen window, I find myself craving more than just the usual pumpkin fare. Instead, I reach for a vibrant butternut squash, its bright orange hue promising warmth and comfort. This soup isn’t just about flavor; it’s about capturing the essence of fall landscapes with every spoonful.

    The secret ingredient that transforms this humble soup into something extraordinary? Fresh ginger. Its spicy, zesty kick balances the sweet earthiness of the squash, creating a flavor dance that’s both surprising and divinely satisfying. Plus, the aroma—oh, the aroma—fills my home with a cozy, spicy-sweet scent that whispers fall all year round.

    This recipe is my go-to for quick weeknight dinners and enchanting brunch starters. It’s also perfect for chilly mornings when you need a warm hug in a bowl, yet simple enough for a lazy Sunday afternoon project. Every swirl of this soup feels like a small celebration of seasonal ingredients turned magical.

    #WHY I LOVE THIS RECIPE?

    Butternut Squash and Ginger Soup

    This soup features roasted butternut squash blended into a smooth, velvety purée with fresh ginger, creating a warm and comforting dish. The method involves roasting, sautéing, and blending, resulting in a vibrant orange, thickened soup with a silky texture and a hint of spicy zest.
    Prep Time 10 minutes
    Cook Time 40 minutes
    Total Time 50 minutes
    Servings: 4
    Course: Main Course
    Cuisine: Autumn
    Calories: 150

    Ingredients
      

    • 1 large butternut squash peeled, seeded, and cut into chunks
    • 2 thumb-sized fresh ginger peeled and minced
    • 1 tablespoon olive oil for roasting and sautéing
    • 1 small onion diced
    • 4 cups vegetable broth or chicken broth
    • to taste salt and pepper for seasoning

    Equipment

    • Baking sheet
    • Large Soup Pot
    • Immersion blender or regular blender
    • Knife
    • Cutting board

    Method
     

    1. Preheat the oven to 400°F (200°C). Spread the chunks of butternut squash on a baking sheet, drizzle with olive oil, and toss to coat. Roast in the oven until tender and slightly caramelized, about 25-30 minutes.
    2. While the squash roasts, heat a tablespoon of olive oil in a large soup pot over medium heat. Add the diced onion and cook until translucent and fragrant, about 5 minutes. Stir occasionally to prevent burning.
    3. Add the minced ginger to the onions and cook for another minute, allowing the aroma to deepen and the ginger to soften.
    4. Once the roasted squash has cooled slightly, transfer the chunks into the soup pot. Pour in the vegetable broth and bring to a gentle simmer.
    5. Simmer the mixture for about 10 minutes, allowing flavors to meld and the squash to soften further.
    6. Use an immersion blender to carefully blend the soup until perfectly smooth and creamy, or transfer in batches to a blender and purée until smooth.
    7. Taste the soup and season with salt and pepper as needed, then give it a final stir to incorporate.
    8. Serve the soup hot, garnished with a swirl of cream or a sprinkle of fresh herbs if desired. Enjoy the warm, velvety texture and vibrant color with every spoonful.

    This butternut squash soup with ginger is more than just comfort food; it’s a celebration of seasonal bounty and simple pleasures. The way it balances sweetness with a zing of spice makes it a versatile dish that can brighten any day.

    Cooking this soup reminds me that the best flavors often come from a few bold ingredients working in harmony. Whether you’re warming up after a walk or offering a thoughtful starter, this recipe invites slow savoring and hearty smiles. It’s one of those dishes that leaves you eager to make it again, season after season.

  • The Peach Slushie Revival: A Cool Spin on Summer Nostalgia

    The Peach Slushie Revival: A Cool Spin on Summer Nostalgia

    Imagine biting into a perfectly ripe peach on a scorching summer day, then blending that burst of sunshine into a glass. That’s exactly what this peach slushie captures—a taste of summer’s sweetest moments, frozen in time. It’s the kind of treat that turns ordinary afternoons into mini celebrations.

    But what makes this recipe stand out isn’t just its refreshing nature. It’s the twist of adding a subtle hint of ginger, cutting through the sweetness with a zing that surprises every sip. Plus, it’s so simple you’ll want to whip it up every day when peaches are at their peak.

    WHY I LOVE THIS RECIPE?

    • The vibrant color reminds me of childhood summer fairs. Bright, cheerful, irresistibly inviting.
    • I adore how a dash of fresh ginger heightens the peach’s natural aroma, awakening every sense.
    • Using frozen peaches means I get that icy texture without needing ice cubes, keeping it perfectly smooth.
    • This recipe demands minimal effort but feels fancy enough to serve at a brunch or a lazy afternoon.

    AVOID MY DISASTER (You’re Welcome)

    • FORGOT to pit the peaches—ended up with a seed crunch I didn’t want. Blended again, seed-free!
    • DUMPED too much sugar—made it overly sweet. Next time, I tasted and adjusted accordingly.
    • OVER-TORCHED the syrup—smelled burnt. I bought fresh ginger and kept a close eye.
    • IGNORED the consistency—grainy from ice. Switched to frozen peaches, everything shifted smoothly.

    QUICK FIXES THAT SAVE YOUR DAY

    • When the slushie is too thick, splash in a little cold water, and blend again. Shimmering texture restored.
    • Patched a lack of sweetness by adding a splash of honey or agave. Fragrant and sweet with a floral note.
    • Shield against melting mess—serve immediately after blending or keep in the freezer for 10 minutes.
    • When the peach flavor is muted, sprinkle a pinch of salt or a squeeze of lemon for brightness.
    • When the blender stalls, add a splash of juice—apple or orange—boosts flavor and gets everything moving.

    This peach slushie isn’t just a cooling drink; it’s a memory in a glass, a fleeting taste of summer’s bounty. As the seasons shift, holding onto that sweet, fuzzy-peach aroma feels like a small rebellion against the chilly winds.

    Whether you’re reminiscing about childhood or just looking for a quick way to beat the heat, this recipe will brighten your day with each frosty sip. It’s a simple pleasure that reminds you that sometimes, the best things are the easiest to make.

    Peach Ginger Slushie

    This peach ginger slushie combines ripe, frozen peaches blended with fresh ginger to create a bright, icy beverage. The mixture results in a smooth, vibrant pink drink with a refreshing texture and a hint of warming spiciness from the ginger.
    Prep Time 10 minutes
    Total Time 10 minutes
    Servings: 2
    Course: Main Course
    Cuisine: Summer
    Calories: 150

    Ingredients
      

    • 2 cups frozen peaches peaches should be pitted and frozen in advance
    • 1 inch fresh ginger peeled and grated
    • 1 tablespoon honey or agave syrup optional, for sweetness
    • 0.5 cup cold water to help blend smoothly

    Equipment

    • Blender
    • Measuring cups and spoons

    Method
     

    1. Place the frozen peaches into the blender.
    2. Add the freshly grated ginger on top of the peaches.
    3. Pour in the honey or agave syrup if you prefer a sweeter slushie, then add the cold water to assist blending.
    4. Secure the lid on the blender and blend on high until the mixture is smooth and icy, about 30-45 seconds. You should see a vibrant pink color and a thick, slushy texture.
    5. Taste the slushie and adjust sweetness if needed by adding more honey or agave, then blend briefly again to incorporate.
    6. Pour the chilled peach ginger slushie into glasses, ensuring equal portions for a refreshing presentation.
    7. Enjoy immediately with a straw or a garnish of fresh peach slices or a sprig of mint for extra appeal.

    Enjoy this refreshing take on a classic summer favorite. The bright flavors and icy texture make it an instant escape, even in the busiest moments. It’s a small celebration of seasonal fruit, captured in one glass.

    Whenever peaches are in season, I find myself reaching for this simple recipe. It’s become my go-to for lazy mornings or spontaneous gatherings. A little sweetness, a hint of spice, and a chill—precisely what I need to savor the fleeting joys of summer.