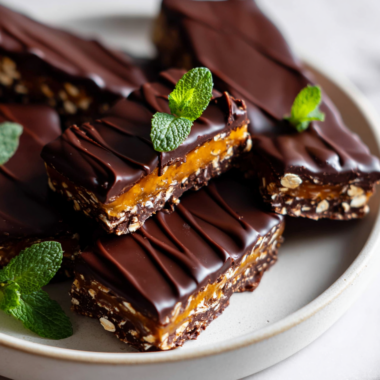
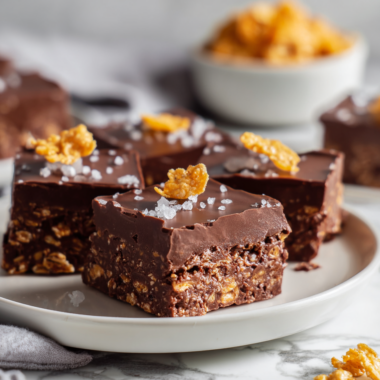
Blog

  • Monster Rice Krispie Treats: A Crunchy, Chewy Monster of a Snack

    Monster Rice Krispie Treats: A Crunchy, Chewy Monster of a Snack

    These monster Rice Krispie treats are born from a kitchen experiment gone delightfully wild. I wanted something big, bold, and a little chaotic, perfect for sharing at a party or just because. They’re a reminder that sometimes, the messiest snacks make the best memories.

    The secret lies in the ratio of gooey marshmallow to crispy cereal—more marshmallow for that sticky, chewy bite. Plus, adding in extras like chocolate chips or candy eyes turns these into a playful, edible monster. They’re not neat, they’re not refined, but they’re definitely worth making.

    Why I Keep Coming Back to Monster Krispies

    They’re chaotic, fun, and forgiving—a perfect way to unleash creativity without a mess of rules. Every batch feels like a small kitchen adventure, with surprises hidden in every bite. Plus, the nostalgic crunch transports me back to carefree childhood afternoons. These treats remind me that sometimes, the best moments are the ones made with a little chaos and a lot of flavor.

    Monster-Size Ingredient Breakdown

    • Marshmallows: The gooey glue binding the cereal—use fresh for maximum stretch and sweetness.
    • Butter: Rich and creamy, helps melt everything smoothly—skip the salt for a cleaner taste.
    • Cereal: Crunchy rice cereal is classic, but try cocoa or multigrain for a twist.
    • Add-ins: Chocolate chips, candies, or sprinkles—go wild to craft your monster’s personality.
    • Decorations: Eyes, fangs, or sprinkles—make your monster come alive with edible details.
    • Oil or butter spray: Lightly spray your pan or tools to prevent sticking, especially with sticky mixtures.
    • Food coloring: Optional—add a splash for a colorful, creature-like appearance.

    Tools of the Monster Krispie Trade

    • Large saucepan: For melting butter and marshmallows evenly.
    • Spatula: To fold the mixture gently and press into the pan.
    • 9×13 inch pan: To shape and cool the treats.
    • Wax paper or spatula: To flatten and compact the mixture smoothly.
    • Knife or pizza cutter: For cleanly slicing into monster-sized squares.

    Making Monster Krispies: Step-by-Step

    Step 1: Gather your ingredients: marshmallows, butter, cereal, and your favorite add-ins.

    Step 2: Melt butter in a large pan over low heat, stirring constantly to prevent burning.

    Step 3: Add marshmallows, stirring until smooth and gooey, then remove from heat.

    Step 4: Pour marshmallow mixture over the cereal in a big bowl, gently folding until evenly coated.

    Step 5: Press the mixture into a greased pan, using a spatula or wax paper to flatten and compact.

    Step 6: Let the treats cool at room temperature for at least 30 minutes to set.

    Step 7: Cut into monster-sized squares, and enjoy the crispy-chewy bites.

    Crucial Checkpoints for Monster Krispies

    • Ensure marshmallows are fully melted and smooth before mixing in cereal.
    • Press mixture into the pan firmly, but don’t over-pack—keep it light for easier slicing.
    • Look for a golden hue on the edges of the cooled treats—indicates perfect setting.
    • The treats should hold together when pressed but still be chewy and slightly sticky.

    Avoid These Krispie Crumbles: Mistakes & Fixes

    • Too high heat melts marshmallows unevenly.? Use low heat to prevent marshmallows from burning or becoming stringy.
    • Over-pressing makes treats dense and hard.? Don’t press too hard when packing the mixture; keep it loose for easier cutting.
    • Mixture sticking to tools.? Add a little butter or oil to your spatula if sticking becomes an issue.
    • Chilling too quickly causes condensation.? Cool the treats at room temperature, not in the fridge, to avoid sweating.

    Monster Rice Krispie Treats

    These playful, chaotic Rice Krispie treats are made by melting butter and marshmallows until gooey, then folding in crispy cereal and fun add-ins like chocolate chips or candies. Once pressed into a pan and cooled, they form large, chewy, crunchy squares with a sticky, colorful appearance perfect for sharing or parties.
    Prep Time 15 minutes
    Cook Time 15 minutes
    Total Time 30 minutes
    Servings: 12
    Course: Main Course
    Cuisine: American
    Calories: 150

    Ingredients
      

    • 4 cups marshmallows preferably fresh and soft
    • 1/4 cup butter unsalted, for melting
    • 6 cups rice cereal classic or your favorite flavor
    • 1/2 cup chocolate chips optional, for added fun
    • as needed edible decorations (eyes, fangs, sprinkles) to bring your monster to life

    Equipment

    • Large saucepan
    • Spatula
    • 9×13 inch pan
    • Wax paper or spatula
    • Knife or pizza cutter

    Method
     

    1. Gather your ingredients: marshmallows, butter, cereal, and any fun add-ins you want to include.
    2. Melt the butter in a large saucepan over low heat, stirring gently until it becomes shiny and smooth, filling your kitchen with a rich, buttery aroma.
    3. Add the marshmallows to the melted butter, stirring constantly until they melt completely and the mixture is gooey and bubbly, with a sweet, marshmallow scent wafting through the air.
    4. Remove the pan from heat once the marshmallow mixture is smooth and bubbling, ready to be folded into the cereal.
    5. Pour the marshmallow mixture over the rice cereal in a big bowl, then gently fold everything together with your spatula until the cereal is evenly coated and sticky.
    6. If desired, sprinkle in chocolate chips or candies now, folding lightly to distribute them throughout the mixture.
    7. Grease your 9×13 inch pan lightly with butter or spray, then transfer the mixture into it, pressing down firmly with a spatula or wax paper to create a packed, even surface.
    8. Allow the treats to cool at room temperature for about 30 minutes, during which they will firm up and set into big, chewy squares with crispy edges.
    9. Once cooled, use a knife or pizza cutter to slice the treats into monster-sized squares, revealing their sticky, crunchy texture and colorful mix-ins.
    10. Decorate your monster Krispies with edible eyes, fangs, or sprinkles to bring your playful creature to life—get creative and have fun!
    11. Serve your monster Krispies on a plate, enjoy the crunchy-chewy bites, and share the chaos and fun with friends or family!
    These monster Rice Krispie treats are more than just a sweet snack—they’re a chaotic burst of childhood nostalgia with a crunchy twist. Each bite offers that perfect balance of sticky marshmallow and crispy cereal, making them impossible to resist. Feel free to customize with your favorite mix-ins or decorations to make them truly your own. Just don’t forget to share—they’re big enough to feed a small crowd or keep as a monstrous leftover.

  • Bloody Beet Gnocchi: A Rustic Twist on a Classic Pasta

    Bloody Beet Gnocchi: A Rustic Twist on a Classic Pasta

    Beets are often relegated to salads or roasted sides, but I love turning them into something unexpected—bright, playful gnocchi. It’s a way to celebrate their earthy sweetness in a form that’s both comforting and vibrant. Plus, the process of transforming a root vegetable into tender dumplings feels a little rebellious in the kitchen.

    Why I Keep Making Bloody Beet Gnocchi

    Its bold color and earthy flavor make me smile every time. It’s a reminder that simple ingredients, when handled with care, can surprise you. Plus, it’s a playful dish that sparks conversations and makes the table lively. I love how adaptable it is—serve it with a simple herb butter or a tangy vinaigrette.

    Getting to Know Your Beet Gnocchi Ingredients

    • Beets: Vivid, earthy, and sweet—use fresh, firm beets for the brightest flavor.
    • Flour: All-purpose is fine; add gradually until dough feels just right—starchy and tender.
    • Egg: Acts as a binder, giving the gnocchi structure and a slight richness.
    • Salt: Enhances all the natural flavors and balances the sweetness.
    • Olive oil or butter: For finishing—adds a glossy shine and a savory touch.
    • Herbs (optional): Fresh thyme or parsley can lift the dish with herbal brightness.
    • Vinegar or lemon (optional): A splash brightens the flavor—keep it subtle, just enough to zing.

    Tools of the Beet Gnocchi Trade

    • Oven or grill: Roast the beets for smoky sweetness.
    • Food processor or blender: Puree the cooled beets into a smooth, uniform mash.
    • Pot for boiling: Cook the gnocchi quickly and evenly.
    • Slotted spoon: Retrieve gnocchi from boiling water without breaking them.
    • Knife and cutting board: Shape and portion the gnocchi.

    Crafting the Vibrant Beet Gnocchi

    Step 1: Start by roasting the beets—wrap them in foil, 200°C (390°F), for about 50 minutes until tender and smoky-sweet.

    Step 2: Peel the beets while still warm; their vivid red flesh is a sign you’re on the right track.

    Step 3: Puree the roasted beets until smooth, then let cool while you prepare the dough.

    Step 4: Mix the beet puree with flour, egg, and a pinch of salt; knead gently into a soft, slightly sticky dough.

    Cooking with Eye and Nose: Key Checkpoints

    • Gnocchi should be tender but hold their shape when boiled—test one in simmering water.
    • The dough should be soft but not sticky—add flour sparingly if needed.
    • Beet purée should be bright, smooth, and oozy—don’t rush the cooling process.
    • Watch for a slight crackle or puffing sound when boiling—signs they’re cooked through.

    Troubleshooting the Beet Gnocchi

    • Dough feels greasy or overly sticky.? Add a little more flour if the dough is too sticky.
    • Gnocchi are tough or chewy.? Don’t overwork the dough, or gnocchi will be dense.
    • Gnocchi disintegrate in water.? Reduce boiling time slightly if gnocchi fall apart.
    • Puree is too hot, making dough sticky.? Ensure beets are cooled enough before blending.

    Vibrant Beet Gnocchi

    Beet gnocchi are tender, colorful dumplings made by blending roasted beets into a smooth mash and folding them into a soft dough with flour and egg. The dish features a bright red hue and earthy sweetness, with a delicate, melt-in-your-mouth texture once boiled and finished with a drizzle of olive oil or butter. It’s a playful, visually striking twist on traditional gnocchi that’s both comforting and lively.
    Prep Time 20 minutes
    Cook Time 1 hour
    Total Time 1 hour 20 minutes
    Servings: 4
    Course: Main Course
    Cuisine: Italian
    Calories: 220

    Ingredients
      

    • 4 medium fresh beets firm and unblemished
    • 1 cup all-purpose flour plus more if needed
    • 1 large egg beaten
    • 1/2 teaspoon salt to enhance flavor
    • 2 tablespoons olive oil or butter for serving

    Equipment

    • Oven or grill
    • Food processor or blender
    • Pot for boiling
    • Slotted spoon
    • Knife and cutting board

    Method
     

    1. Wrap the beets tightly in aluminum foil and roast in a preheated 200°C (390°F) oven for about 50 minutes until they are tender and release a sweet, earthy aroma.
    2. Carefully remove the beets from the oven, unwrap, and let them cool slightly until they’re easy to handle but still warm.
    3. Peel the beets using your fingers or a small knife, revealing their bright red flesh. This process helps prevent staining your hands and keeps the flesh vibrant.
    4. Place the peeled beets into a food processor or blender and pulse until you get a smooth, velvety puree. Let the puree cool slightly to prevent it from making the dough sticky.
    5. Transfer the cooled beet puree into a mixing bowl and create a well in the center. Crack the egg into the well and sprinkle with salt.
    6. Gradually add the flour to the beet mixture, mixing gently with your hands or a spoon until a soft, slightly sticky dough forms. Add more flour if needed to achieve the right consistency.
    7. Divide the dough into 4 portions and roll each into a long, thin rope about 1 inch in diameter. Cut each rope into 1-inch pieces to form individual gnocchi.
    8. Bring a large pot of salted water to a gentle boil. Carefully drop the gnocchi into the water, working in batches if necessary.
    9. Cook the gnocchi until they float to the surface, about 2-3 minutes. Use a slotted spoon to gently lift them out and transfer to a serving dish.
    10. Drizzle the hot gnocchi with olive oil or melted butter, and toss gently to coat. Add fresh herbs if desired for extra flavor and brightness.
    11. Serve immediately, enjoying the vibrant color and tender texture of these playful beet gnocchi, perfect as a main course or a lively side dish.

    Notes

    For an extra touch, sprinkle with grated Parmesan or garnish with fresh herbs before serving.
    This gnocchi isn’t just a pretty plate. It’s a reminder that a simple vegetable can shine in unexpected ways, especially when roasted and mashed into tender pillows. Each bite is a burst of earthy sweetness and a splash of color that makes serving dinner feel like an event. Feel free to toss them in browned butter, sprinkle with fresh herbs, or keep it minimalist to let the beets do all the talking.

  • Monster Meatloaf: A Hearty Twist for the Bold at Heart

    Monster Meatloaf: A Hearty Twist for the Bold at Heart

    This monster meatloaf started as a silly idea in my kitchen—something to make the kids laugh and the adults nostalgic. It’s a way to turn a humble dish into a centerpiece that’s both fun and comforting. The secret’s in the spice blend and the shape, which makes every slice feel like a little adventure.

    Why You’ll Keep Coming Back to This Monster

    It’s a dish that invites chaos and creativity, perfect for lazy weekends or game days. The odd shape makes it a fun centerpiece that sparks conversation. Plus, the smoky, savory flavors hold up through leftovers, making it a comfort that sticks around.

    Breaking Down the Monster’s Ingredients

    • Ground beef: I use 80/20 for juiciness—swap with turkey for leaner, or lamb for a richer flavor.: Adds a hearty, beefy base with enough fat to keep it tender.
    • Ground pork: I love the fatty punch—skip if you want it leaner, but it keeps everything moist.: Gives richness and a slight sweetness.
    • Crackers: I prefer plain saltines—crushed for binding, but Ritz can add a buttery note.: Creates a tender, cohesive loaf.
    • Tomato sauce: I go for smoky, sweet canned sauce—sub with ketchup mixed with smoked paprika.: Adds moisture and a tangy, sweet contrast.
    • Onion & garlic: Aromatic staples—use shallots or leek for a milder twist.: Builds depth and flavor.
    • Smoked paprika: For that smoky, slightly spicy flavor—adjust to taste.: Gives a subtle, smoky kick.
    • Spices & herbs: Thyme, black pepper, a pinch of cayenne—tweak to your heat preference.: Layered flavor that complements the meats.

    Tools & Equipment for the Monster

    • Mixing bowls: Combine all ingredients evenly.
    • Loaf pan or baking sheet: Shape and bake the meatloaf.
    • Meat thermometer: Check internal temperature for doneness.
    • Basting brush: Apply sauces and keep the top moist.
    • Cooling rack: Rest the meatloaf to retain juices.

    Step-by-Step: Crafting the Monster

    Step 1: Preheat your oven to 175°C (350°F).

    Step 2: In a large mixing bowl, combine 1 lb ground beef, 1/2 lb ground pork, and 1 cup crushed crackers.

    Step 3: Add 1 small can of tomato sauce, 1 chopped onion, 2 cloves minced garlic, and a splash of smoked paprika.

    Step 4: Mix everything until just combined—don’t overdo it, or the loaf gets dense.

    Step 5: Shape into a rough monster shape on a greased baking sheet or loaf pan.

    Step 6: Bake for about 60 minutes, until the edges are crispy and the internal temp hits 70°C (160°F).

    Step 7: Let it rest for 10 minutes before slicing. This keeps it juicy and less crumbly.

    Step 8: Finish with a drizzle of homemade ketchup or a smear of smoky BBQ sauce.

    Cooking Checkpoints & Tips

    • The top should be golden and slightly crispy, not burnt.
    • Internal temperature should reach 70°C (160°F) — no guessing.
    • Juices run clear when you pierce the thickest part.
    • The shape should hold together without falling apart.

    Common Mistakes & How to Fix Them

    • Overmixing the meat.? Too dense? Don’t overmix—just enough to combine ingredients.
    • Not enough moisture.? Dry meatloaf? Add a splash of beef broth or a beaten egg.
    • Burnt edges.? Surface burning? Cover loosely with foil after 45 minutes.
    • Cutting too soon.? Crumbled slices? Let it rest longer before cutting.

    Monster Meatloaf

    This fun and hearty meatloaf is shaped into a whimsical monster, combining ground beef and pork for a juicy, flavorful centerpiece. The dish is baked until golden and crispy on top, with a tender, moist interior that slices easily, perfect for game days or casual gatherings. The secret lies in the smoky spice blend and playful shape that sparks joy at the table.
    Prep Time 20 minutes
    Cook Time 1 hour
    Total Time 1 hour 20 minutes
    Servings: 4
    Course: Main Course
    Cuisine: American
    Calories: 350

    Ingredients
      

    • 1 lb ground beef 80/20 for juiciness
    • 0.5 lb ground pork adds moisture and richness
    • 1 cup crushed saltine crackers binds the loaf together
    • 1 small can tomato sauce smoky, sweet canned sauce or ketchup with smoked paprika
    • 1 small onion chopped
    • 2 cloves garlic minced
    • 1 teaspoon smoked paprika adjust to taste
    • 1 pinch cayenne pepper for heat
    • 1 teaspoon thyme dried or fresh
    • Black pepper to taste

    Equipment

    • Mixing bowls
    • Baking sheet or loaf pan
    • Meat thermometer
    • Basting brush
    • Cooling rack

    Method
     

    1. Preheat your oven to 175°C (350°F).
    2. In a large mixing bowl, combine the ground beef, ground pork, and crushed saltine crackers. Use your hands or a spoon to gently mix until evenly distributed.
    3. Add the chopped onion, minced garlic, tomato sauce, smoked paprika, cayenne, thyme, and black pepper. Mix everything just until combined—avoid overmixing to keep the meatloaf tender.
    4. Shape the mixture into a playful monster shape on a greased baking sheet or place it into a loaf pan for a more traditional look. Feel free to add extra features like eyes or teeth with small bits of cheese or sliced vegetables for fun.
    5. Bake the meatloaf in the oven for about 60 minutes, until the edges are crispy and golden brown. Use a meat thermometer to check that the internal temperature reaches 70°C (160°F).
    6. Once baked, remove the meatloaf from the oven and carefully transfer it to a cooling rack. Let it rest for 10 minutes to allow the juices to settle, making it easier to slice.
    7. Slice the monster meatloaf into thick, even pieces, revealing its juicy interior. Serve with a drizzle of smoky barbecue sauce or a dollop of ketchup for extra flavor.

    Notes

    For added fun, decorate your monster with cheese eyes or veggie features before baking. Cover loosely with foil if edges brown too quickly during baking.
    Once out of the oven, the smell of roasted meat and smoky spices fills the air, promising something satisfying. This isn’t just about feeding a crowd—it’s about embracing a bit of chaos and fun in your cooking. Play with the shapes, add your favorite toppings, and make it your own. Enjoy every bite, knowing you’ve turned a simple meal into a memorable experience.

  • Spooky Stuffed Peppers: A Nighttime Bites Adventure

    Spooky Stuffed Peppers: A Nighttime Bites Adventure

    Stuffed peppers have a way of feeling like comfort wrapped in a bit of mischief. But this version leans into the thrill of the unknown—spooky, savory, and a little unexpected. It’s a dish that celebrates the chaos of flavors and textures, perfect for an autumn evening or any night that needs a bit of extra punch.

    Why I Keep Coming Back to This Dish

    It’s a reminder that simple ingredients can turn into something unexpectedly thrilling. The smoky aroma when baking, the ooze of melted cheese, that slight char—this dish hits all the right notes after a long day. It’s customizable, forgiving, and always a little wild.

    Inside the Ingredients for Spooky Stuffed Peppers

    • Bell peppers: Large, sturdy peppers with a sweet, smoky flavor. Swap for poblano for a spicier, earthier bite.
    • Ground meat or lentils: Adds hearty richness. Lentils are great for a vegetarian spin, and soak up spices nicely.
    • Cooked rice: Feeds the filling and adds a mild, chewy texture. Quinoa can be a good alternative for nuttiness.
    • Chopped tomatoes: Juicy and bright, they give moisture. Canned tomatoes work perfectly, fresh during summer.
    • Spices (cumin, paprika, chili powder): Build smoky, warm layers. Adjust to your heat preference.
    • Cheese (cheddar, Monterey Jack): Melts into a gooey topping. Use vegan cheese if you want dairy-free.
    • Onion & garlic: Base flavor builders, fragrant and essential for depth.

    Tools of the Trade for Spooky Stuffed Peppers

    • Oven: To bake the peppers until tender and slightly charred.
    • Skillet: To sauté the filling ingredients and build flavor.
    • Spoon: To scoop out seeds and stuff the peppers.
    • Baking dish: To hold the stuffed peppers during baking.
    • Aluminum foil: To cover peppers for even cooking.

    Step-by-Step to Spooky Perfection

    Step 1: Preheat your oven to 180°C (350°F).

    Step 2: Slice the tops off the peppers and scoop out seeds and membranes.

    Step 3: In a skillet, heat olive oil over medium. Sauté chopped onions and garlic until fragrant, about 3 minutes.

    Step 4: Add ground meat or lentils, cook until browned, about 8 minutes.

    Step 5: Mix in cooked rice, chopped tomatoes, and spices. Season with salt and pepper.

    Step 6: Stuff the peppers with the filling, pressing down lightly.

    Step 7: Place stuffed peppers in a baking dish, cover with foil.

    Step 8: Bake for 30-35 minutes, until peppers are tender and filling is bubbling.

    Step 9: Remove foil, sprinkle cheese on top, and broil for 2-3 minutes until golden.

    Step 10: Let rest for 5 minutes before serving.

    Cooking Tips & Checkpoints

    • Peppers should be tender and slightly charred around the edges.
    • Filling should be hot and bubbling when you remove it from the oven.
    • Cheese on top should be melted and golden, not burnt.
    • Use a thermometer to check that the filling’s internal temp hits 75°C (165°F).

    Common Mistakes & How to Fix Them

    • Peppers are getting too dark before cooking through.? Add a splash of water or broth when peppers start to burn.
    • Filling is drying out or burning.? Reduce oven temperature to 160°C (320°F).
    • Cheese on top burns before peppers are tender.? Cover with foil if cheese is browning too quickly.
    • Peppers remain too firm after baking.? Use a sharp knife to gently check if peppers are soft.

    Spooky Stuffed Peppers

    This dish features bell peppers filled with a savory mixture of ground meat or lentils, rice, tomatoes, and spices, then baked until tender with a bubbly, golden cheese topping. The peppers develop a slight char and the filling becomes rich and flavorful, creating a comforting yet exciting main course with a play of smoky and cheesy textures.
    Prep Time 20 minutes
    Cook Time 40 minutes
    Total Time 1 hour
    Servings: 4
    Course: Main Course
    Cuisine: American
    Calories: 350

    Ingredients
      

    • 4 large bell peppers sturdy, sweet peppers that can hold filling
    • 1 lb ground meat or lentils for hearty filling, choose vegetarian or meat as preference
    • 1 cup cooked rice or substitute with quinoa for nuttiness
    • 1 cup chopped tomatoes canned or fresh during summer
    • 1 teaspoon cumin adds smoky warmth
    • 1 teaspoon paprika for depth of flavor
    • 1/2 teaspoon chili powder adjust for heat preference
    • 1 cup shredded cheese cheddar or Monterey Jack
    • 1 small onion finely chopped
    • 2 cloves garlic minced
    • 2 tablespoons olive oil for sautéing
    • to taste salt and pepper seasoning

    Equipment

    • Oven
    • Skillet
    • Spoon
    • Baking dish
    • Aluminum foil

    Method
     

    1. Preheat your oven to 180°C (350°F). Slice off the tops of the peppers and scoop out the seeds and membranes with a spoon, creating a hollow cavity.
    2. Heat olive oil in a skillet over medium heat. Sauté the chopped onion and minced garlic until fragrant, about 3 minutes, until they soften and become translucent.
    3. Add the ground meat or lentils to the skillet. Cook until browned and cooked through, about 8 minutes, breaking apart the meat as it cooks.
    4. Stir in the cooked rice, chopped tomatoes, cumin, paprika, chili powder, salt, and pepper. Mix well and cook for another 5 minutes, allowing the flavors to meld and the mixture to heat thoroughly.
    5. Using a spoon, stuff each hollowed-out pepper with the filling, pressing down lightly to pack it in.
    6. Place the stuffed peppers upright into a baking dish. Cover the dish with aluminum foil to help them cook evenly and retain moisture.
    7. Bake in the preheated oven for 30-35 minutes, until the peppers are tender and slightly charred around the edges, and the filling is bubbling.
    8. Remove the foil and sprinkle shredded cheese evenly over the tops of the peppers. Return to the oven and broil for 2-3 minutes until the cheese is melted and golden brown.
    9. Take the peppers out of the oven and let them rest for 5 minutes. The cheese should be gooey and the peppers tender, with a smoky aroma filling your kitchen.

    Notes

    Ensure peppers are tender and slightly charred for the best flavor and texture. Feel free to customize the filling with your favorite spices or proteins.
    These peppers are a wild card in my kitchen. The smoky, oozy filling paired with the tender, charred pepper skins creates a dance of textures. It’s a dish that feels like a small celebration of the season, perfect for sharing. Make it your own with different fillings or toppings, and enjoy the warm chaos of it all.

  • Witch Hat Cupcakes: A Spellbinding Treat for All Ages

    Witch Hat Cupcakes: A Spellbinding Treat for All Ages

    There’s something endlessly charming about dressing up baked goods. These witch hat cupcakes aren’t just sweet treats—they’re tiny costumes, ready to cast a spell at your next party. I love how they combine the joy of baking with a dash of creativity and a pinch of nostalgia.

    Why I keep baking these little witches

    They remind me of childhood Halloweens, full of mischief and magic. The process is forgiving enough for my rushed mornings but still yields impressive results. Seeing others’ faces light up when they see these tiny hats is always a sweet reward. Plus, they let me play with decorating—no rules, just fun.

    What’s in the spell book?

    • All-purpose flour: The backbone of your cupcakes, gives structure and rise.
    • Cocoa powder: Adds rich chocolate depth, smell of roasted cocoa fills the kitchen.
    • Butter: Creamy and rich, makes frosting smooth and flavorful.
    • Black food coloring: For that dark, mysterious hue in your frosting—use sparingly.
    • Chocolate cookies or waffle cones: Crunchy, slightly sweet, perfect for the hat’s brim and point.
    • Vanilla extract: A touch of warmth and aroma in both cake and frosting.
    • Powdered sugar: Sweetens and thickens the frosting, gives that velvety finish.

    Tools of the magic trade

    • Muffin tin & paper liners: To shape and bake the cupcakes evenly.
    • Mixing bowls: For blending batter and frosting.
    • Electric mixer or whisk: To get fluffy frosting and well-mixed batter.
    • Piping bag & tips: For decorating the cupcakes smoothly.
    • Chocolate cookies or waffle cones: To craft the witch hats’ brims and peaks.

    Step-by-step magic to bring your witch hats to life

    Step 1: Preheat your oven to 180°C (350°F).

    Step 2: Line a muffin tin with paper liners.

    Step 3: Make your cupcake batter: mix flour, sugar, cocoa, baking powder, and salt.

    Step 4: In a separate bowl, beat eggs with milk, oil, and vanilla.

    Step 5: Combine wet and dry ingredients until just blended.

    Step 6: Fill cupcake liners about 2/3 full.

    Step 7: Bake for 18-20 minutes or until a toothpick comes out clean.

    Step 8: Let cupcakes cool in the tin for 5 minutes, then transfer to a wire rack.

    Step 9: Prepare your frosting: beat butter, powdered sugar, and vanilla until fluffy.

    Step 10: Color the frosting with a touch of black food coloring for a moody vibe.

    Step 11: Frost the cooled cupcakes generously.

    Step 12: Use chocolate cookies or waffle cones to create the hat’s brim and point.

    Step 13: Assemble the hats: place the cone on top of the cupcake, secure with frosting.

    Step 14: Add edible decorations like sprinkles or tiny candies for extra charm.

    How to tell if your witch hats are perfect

    • Cupcakes are evenly risen and golden around the edges.
    • Toothpick inserted in the center comes out clean.
    • Frosting is smooth, not melting or sliding off.
    • The cone stands firm without wobbling when placed on top.

    Avoid these common pitfalls

    • Batter is lumpy or uneven.? Use room temperature ingredients for smoother blending.
    • The cone wobbles or slides off.? Chill the cone slightly before placing on cupcake.
    • Frosting tastes flat or overly sweet.? Add a tiny pinch of salt to frosting for depth.
    • Cupcakes are gooey or underdone.? Bake cupcakes until a toothpick comes out clean.

    Witch Hat Cupcakes

    These adorable witch hat cupcakes combine moist chocolate cupcakes with rich, black frosting and crunchy cone-shaped hats made from cookies or waffle cones. The process involves baking the cupcakes, preparing a smooth frosting, and assembling the hats for a charming, spooky treat perfect for Halloween parties. The final result is a delightful, visually striking dessert with a soft, chocolaty crumb and whimsical decorations.
    Prep Time 30 minutes
    Cook Time 20 minutes
    Total Time 50 minutes
    Servings: 12
    Course: Main Course
    Cuisine: Halloween
    Calories: 250

    Ingredients
      

    • 1 3/4 cups all-purpose flour sifted
    • 1/2 cup cocoa powder unsweetened
    • 1 cup granulated sugar
    • 1 tsp baking powder
    • 1/2 tsp salt
    • 2 large eggs room temperature
    • 1/2 cup milk whole or 2%
    • 1/2 cup vegetable oil
    • 2 tsp vanilla extract
    • 1 cup unsalted butter softened
    • 3-4 cups powdered sugar sifted
    • a few drops black food coloring adjust as needed
    • 12 chocolate cookies or waffle cones for hats

    Equipment

    • Muffin tin & paper liners
    • Mixing bowls
    • electric mixer or whisk
    • Piping bag & tips
    • Cooling wire rack

    Method
     

    1. Preheat your oven to 180°C (350°F) and line a muffin tin with paper liners.
    2. In a large bowl, sift together the flour, cocoa powder, baking powder, salt, and sugar to combine evenly.
    3. In a separate bowl, beat the eggs, milk, oil, and vanilla extract until well blended and slightly frothy.
    4. Pour the wet mixture into the dry ingredients and gently fold until just combined, avoiding overmixing.
    5. Divide the batter evenly among the cupcake liners, filling each about two-thirds full.
    6. Bake for 18-20 minutes, or until a toothpick inserted into the center comes out clean. Let the cupcakes cool in the tin for 5 minutes, then transfer to a wire rack to cool completely.
    7. In a mixing bowl, beat the softened butter until creamy, then gradually add sifted powdered sugar, one cup at a time, until the mixture is fluffy. Mix in vanilla extract.
    8. Add a few drops of black food coloring to the frosting and mix until the color is evenly distributed and the frosting is dark enough.
    9. Frost the cooled cupcakes generously with the black frosting using a piping bag for a smooth finish.
    10. Break the chocolate cookies or waffle cones into small pieces to form the brim and point of the witch hats.
    11. Place a cone or cookie piece on top of each frosted cupcake, securing with a dab of frosting at the base.
    12. Decorate with additional sprinkles or tiny candies if desired, then serve and enjoy your charming witch hat cupcakes!

    Notes

    For extra spooky effect, add edible glitter or tiny candy eyes to the hats. Chill the assembled cupcakes briefly to help the hats stay in place.
    These cupcakes aren’t just for Halloween; they’re a whimsical way to bring a little magic into any gathering. The process is straightforward, but the results look like you spent ages on detail. Feel free to tweak the colors or decorations—make them your own charms. Enjoy the baking, and watch as everyone’s faces light up when they see these little spells sitting on your table.

  • Spooky Shepherd’s Pie: A Dark Twist on Comfort Food

    Spooky Shepherd’s Pie: A Dark Twist on Comfort Food

    Shepherd’s pie is comfort food with a soul, but I’ve always wondered how to give it a little edge without losing its heart. This spooky twist came from late-night cravings for something familiar yet different, a bit more daring. It’s perfect for those nights when you want a hearty, satisfying meal that also whispers secrets from the dark.

    Why I keep coming back to this recipe

    The dark, smoky flavors make it feel like a warm secret, perfect for chilly nights. It’s a dish that comforts yet surprises, with every bite revealing something deeper. Plus, it’s simple enough to throw together when chaos is just outside the door, but hearty enough to slow down and savor.

    Breaking down the ingredients

    • Ground beef: The backbone of the dish, juicy and savory, but swap for lentils if you want vegetarian.
    • Potatoes: Creamy, fluffy, the classic topping. Sweet potatoes can add a subtle sweetness.
    • Onions & garlic: Builds flavor with a fragrant, warm aroma. Shallots work well too.
    • Carrots & celery: Add crunch and sweetness, but parsnips can be a good substitute.
    • Beef broth & Worcestershire sauce: Deepens the flavor, smoky and umami-rich, or use mushroom broth for a vegetarian version.
    • Smoked paprika: Adds a smoky depth, brightens with a touch of lemon juice if you like.
    • Butter & cream: Make the mash extra rich and velvety, but olive oil can be a lighter alternative.

    Tools you’ll need for a spooky night in

    • Large skillet: To brown the meat and cook vegetables
    • Mixing bowl: To mash and prepare the potato topping
    • Baking dish: To assemble and bake the shepherd’s pie
    • Wooden spoon: To stir and combine ingredients
    • Oven: To bake and achieve that golden crust

    Step-by-step to a hauntingly good shepherd’s pie

    Step 1: Preheat your oven to 200°C (390°F).

    Step 2: In a large skillet, heat a tablespoon of oil over medium heat.

    Step 3: Add chopped onions and garlic, cook until translucent, about 5 minutes.

    Step 4: Stir in ground beef, cook until browned and fragrant, about 8 minutes.

    Step 5: Drain excess fat, then add chopped carrots and celery, cook for another 5 minutes.

    Step 6: Pour in beef broth, add a splash of Worcestershire sauce, simmer until slightly thickened, about 10 minutes.

    Step 7: Season with salt, pepper, and a pinch of smoked paprika for depth.

    Step 8: Transfer the meat mixture to a baking dish, spread evenly.

    Step 9: Top with mashed potatoes, smoothing out the surface.

    Step 10: Bake in the oven for 25-30 minutes or until the topping is golden and bubbly.

    Step 11: Let sit for 5 minutes before serving.

    Cooking checkpoints to watch for

    • Ensure the beef is browned evenly without burning, which develops flavor and prevents a bitter taste.
    • When simmering the meat mixture, it should thicken slightly and develop a rich aroma, not be watery.
    • The mashed potato topping should be smooth and creamy, not lumpy or runny.
    • The topping should turn a deep golden brown, indicating it’s baked through and caramelized on top.

    Avoid these common pitfalls

    • Adding too much broth at once.? Too watery? Let the filling simmer longer to thicken.
    • Unevenly cooked meat.? Use a spatula to scrape the sides of the pan for even browning.
    • Under-cooked potato topping.? Bake a few extra minutes if the top isn’t golden enough.
    • Burnt topping.? If it’s over-browned, tent with foil and lower oven temp.

    Spooky Smoky Shepherd’s Pie

    This twist on classic shepherd’s pie uses smoky paprika and rich beef broth to deepen its flavor, while the creamy mashed potato topping provides a comforting crown. The dish features a savory meat and vegetable filling finished with a golden, bubbly crust, perfect for a hearty and slightly daring meal. Its layered textures and dark, smoky aroma make it both an inviting and mysterious dinner option.
    Prep Time 15 minutes
    Cook Time 40 minutes
    Total Time 55 minutes
    Servings: 4
    Course: Main Course
    Cuisine: Comfort Food
    Calories: 550

    Ingredients
      

    • 1 lb ground beef or lentils for vegetarian
    • 4 large potatoes for mash, or sweet potatoes
    • 1 large onion chopped
    • 3 cloves garlic minced
    • 2 carrots carrots diced
    • 2 stalks celery diced
    • 1 cup beef broth or mushroom broth for vegetarian
    • 1 dash Worcestershire sauce
    • 1 tsp smoked paprika adds smoky depth
    • 2 tbsp butter for mash
    • 1/4 cup cream for mash, optional
    • Salt and pepper to taste

    Equipment

    • Large skillet
    • Mixing bowl
    • Baking dish
    • Wooden spoon
    • Oven

    Method
     

    1. Peel and chop the potatoes into even chunks. Boil them in salted water until they are soft and easily pierced with a fork, about 15 minutes. Drain and set aside.
    2. While the potatoes are cooking, heat a large skillet over medium heat and add a tablespoon of oil. Once shimmering, add chopped onions and minced garlic, sautéing until fragrant and translucent, about 5 minutes. The aroma should fill the kitchen with a warm, savory scent.
    3. Add the ground beef to the skillet, breaking it apart with a wooden spoon. Cook until browned and fragrant, about 8 minutes, until no pink remains and the meat develops a rich aroma.
    4. Stir in diced carrots and celery, cooking for another 5 minutes until vegetables soften slightly and the mixture becomes fragrant and darker in color.
    5. Pour in beef broth, add a splash of Worcestershire sauce, and stir in smoked paprika. Let it simmer gently for about 10 minutes until the mixture thickens and the flavors meld, releasing a smoky, savory aroma.
    6. While the filling simmers, mash the cooked potatoes with butter, cream, and a pinch of salt and pepper until smooth, creamy, and fluffy. This step creates a velvety topping that contrasts beautifully with the dark filling.
    7. Transfer the meat and vegetable filling into a baking dish, spreading it out evenly. Smooth the mashed potatoes over the top, creating a gentle layer that covers the filling completely.
    8. Bake in a preheated oven at 200°C (390°F) for 25-30 minutes, until the top is golden brown and bubbling around the edges. The aroma will shift to a deep, smoky scent as the top crisps and caramelizes.
    9. Remove from oven and let sit for about 5 minutes to set. The top should be a rich, deep golden color, and the filling underneath hot and steamy. Serve slices with a sprinkle of fresh herbs if desired.

    Notes

    For extra smoky flavor, sprinkle a little more smoked paprika on top before baking. To make it vegetarian, substitute lentils for the beef and mushroom broth for the beef broth.
    This version of shepherd’s pie feels like wrapping your hands around a warm mug on a chilly night, but with a twist that makes it feel a little mysterious. I love how the smoky paprika and savory broth create a dark, rich base, while the fluffy mashed potatoes add a comforting finish. Feel free to add a dash of hot sauce or a sprinkle of herbs to make it your own. It’s a dish that invites you to cozy up and settle in, no matter how spooky the season gets.

  • Black Bean Burgers with a Twist: A Cozy, Unexpected Spin

    Black Bean Burgers with a Twist: A Cozy, Unexpected Spin

    Black bean burgers often get a bad rap for being bland or mushy, but I’ve found that with a few tweaks, they can be deeply satisfying. The secret is in the texture and that smoky, roasted flavor that makes them crave-worthy. This recipe is about transforming humble beans into something you want to hold in your hand, bite after bite.

    Why this recipe keeps calling me back

    It’s the kind of comfort food that surprises with its depth. I love how versatile it is—toppings, buns, even salads. Plus, it’s a reminder that simple pantry staples can become something memorable with a little care and heat.

    Inside the ingredient lineup

    • Canned black beans: Rich, earthy base; I prefer organic for that extra oomph, but dried works too.
    • Onion and garlic: Bring a sweet, savory warmth; sauté until translucent and fragrant.
    • Breadcrumbs: Help hold the burger together; go for panko for extra crunch.
    • Egg: Acts as a binder; skip if vegan and replace with flaxseed meal.
    • Smoked paprika and cumin: Add a smoky, warm depth; they make the flavor sing.
    • Olive oil: For frying; use enough to get a nice crust but not greasy.
    • Toppings like lettuce, tomato, and spicy mustard: Finish with fresh, bright flavors that cut through the richness.

    Tools of the trade for perfect black bean burgers

    • Large mixing bowl: To combine all ingredients comfortably without spilling.
    • Fork or potato masher: To mash the beans to the right texture.
    • Non-stick skillet or cast iron pan: To get a crispy crust without sticking.
    • Spatula: To flip the burgers gently without breaking.
    • Measuring spoons and cups: To keep ingredients balanced.

    Step-by-step guide to smoky, satisfying black bean burgers

    Step 1: Mash the beans until chunky but cohesive. Use a fork or potato masher, leaving some texture.

    Step 2: Sauté onions, garlic, and spices until fragrant, about 5 minutes. The smell should be warm and inviting.

    Step 3: Mix beans, sautéed aromatics, breadcrumbs, and an egg in a big bowl. Stir until combined but not overworked.

    Step 4: Shape into patties, about 3-4 inches wide. Keep them firm but not dense.

    Step 5: Heat a splash of oil in a non-stick pan over medium heat (around 160°C/320°F).

    Step 6: Cook patties for 4-5 minutes each side, until golden and slightly crispy.

    Step 7: Rest on a paper towel for a minute. They firm up as they cool.

    Step 8: Serve on toasted buns, with your favorite toppings. Press slightly to ensure they hold.

    Step 9: Check for doneness: golden crust, firm but not hard, and a fragrant, smoky aroma.

    Cooking checkpoints and tips to keep in mind

    • Ensure the oil is heated enough before adding the patties—listen for a slight crackle.
    • The patties should be golden and slightly crispy on the outside, not burnt.
    • When pressing down, you should see a gentle sizzle and smell toasty beans—don’t rush the flip.

    Common pitfalls and how to fix them

    • Over-mashed beans turn into a paste.? Use a gentle hand when mashing beans; over-mashing makes them mushy.
    • Burgers falling apart during cooking.? Don’t skip resting time; it helps the burgers hold together.
    • Too high heat causing blackened outsides.? Adjust heat if they burn too fast.
    • Mixture is too sticky and won’t shape.? Add a touch more breadcrumbs if mixture feels too loose.

    Smoky Black Bean Burgers

    These black bean burgers are transformed from humble pantry staples into hearty, satisfying patties with a crispy exterior and a tender, flavorful interior. They are seasoned with smoked paprika and cumin, then pan-fried until golden, offering a deliciously smoky and textured vegetarian option. Topped with fresh toppings and served on toasted buns, they make for a comforting, versatile meal.
    Prep Time 15 minutes
    Cook Time 10 minutes
    Total Time 25 minutes
    Servings: 4
    Course: Main Course
    Cuisine: American
    Calories: 350

    Ingredients
      

    • 2 cups canned black beans drained and rinsed
    • 1/2 cup breadcrumbs panko preferred for crunch
    • 1 egg or flaxseed meal for vegan
    • 1/2 cup onion finely chopped
    • 2 cloves garlic minced
    • 1 teaspoon smoked paprika
    • 1/2 teaspoon cumin
    • 2 tablespoons olive oil for frying
    • to taste Toppings lettuce, tomato, spicy mustard, etc.

    Equipment

    • Large mixing bowl
    • Fork or potato masher
    • Non-stick skillet or cast iron pan
    • Spatula
    • Measuring spoons and cups

    Method
     

    1. Place the drained black beans in a large mixing bowl and mash them with a fork or potato masher until chunky but cohesive, leaving some texture for the burgers.
    2. Heat a splash of olive oil in a skillet over medium heat, then add the chopped onion and minced garlic. Sauté for about 5 minutes until fragrant, soft, and translucent, filling your kitchen with warm aromas.
    3. Add the sautéed onion and garlic, smoked paprika, and cumin to the mashed beans. Stir well to combine the smoky spices evenly through the mixture.
    4. Mix in the breadcrumbs and egg (or flaxseed meal), stirring gently until everything is just combined. The mixture should be sticky but manageable; add more breadcrumbs if it feels too loose.
    5. Divide the mixture into four equal portions and shape each into a patty about 3-4 inches wide, pressing firmly to help them hold together.
    6. Heat a tablespoon of olive oil in a non-stick skillet over medium heat until shimmering and beginning to ripple, indicating the right temperature for frying.
    7. Carefully place the patties in the hot skillet, cooking for about 4-5 minutes on each side until they develop a golden-brown, crispy crust and smell smoky and inviting.
    8. Transfer the cooked burgers to a paper towel-lined plate and let them rest for a minute to firm up and finish crisping.
    9. While the burgers rest, toast your buns until golden and ready for stacking.
    10. Assemble the burgers by placing the crispy patties on the toasted buns, then topping with fresh lettuce, tomato slices, spicy mustard, or your favorite toppings.
    11. Press down gently on the burgers to help them hold together, then serve immediately and enjoy the smoky, hearty flavors.

    Notes

    For vegan options, replace the egg with flaxseed meal and water. Adjust spice levels to your taste, and feel free to add cheese or other toppings for variety.
    These burgers are a reminder that a little improvisation can turn simple ingredients into something memorable. They’re perfect for lazy weekends or when you need comfort food that’s hearty but not heavy. Feel free to tweak the spices or toppings—this is your canvas. Enjoy the process and the cozy, smoky bites that follow.

  • Blood-Red Velvet Cake: A Deep Dive into Its Heart and Soul

    Blood-Red Velvet Cake: A Deep Dive into Its Heart and Soul

    Blood-red velvet cake is not your average dessert. It’s rooted in a history of daring color and subtle cocoa, a bit theatrical, a little nostalgic. This version is a little rough around the edges, but deeply satisfying, especially when you’re craving something bold and a little rebellious. It’s about embracing the imperfect beauty of a homemade cake that’s as striking as it is comforting.

    Why This Cake Calls You Back

    Its deep red hue and complex cocoa flavor evoke childhood memories of mischievous baking sessions. The process is simple enough to repeat, yet each bake feels like a small triumph. Plus, the frosting’s tang and the moist crumb make every slice a lingering, satisfying moment. It’s a cake you want to share, to show off, or just keep in the fridge for sneaky bites—whenever the mood strikes.

    Inside the Red Velvet: Ingredient Secrets

    • All-purpose flour: Foundation of the cake—gives structure without weight.
    • Cocoa powder: Adds a subtle richness; use natural for authenticity, Dutch-processed for smoother flavor.
    • Red food coloring: Vivid, almost luminous—use gel for intensity without excess liquid.
    • Buttermilk: Tenderizes and adds a slight tang—swap with milk + lemon if needed.
    • Vinegar: Activates baking soda; gives lift and helps with the velvety crumb.
    • Vegetable oil: Keeps the cake moist and tender—can substitute with melted butter for richer flavor.
    • Cream cheese frosting: Creamy, tangy, and balances the sweetness—go full-fat for best texture.

    Tools of the Trade for a Velvet Masterpiece

    • Mixing bowls: For combining dry and wet ingredients separately.
    • Electric mixer or whisk: To cream butter and sugar thoroughly.
    • Rubber spatula: To fold ingredients gently and scrape down bowls.
    • Cake pan (23cm/9-inch round): The vessel for your cake, shape, and bake.
    • Cooling rack: To cool the cake evenly without sogginess.
    • Toothpick or cake tester: To check doneness in the oven.

    Step-by-Step Guide to Crafting the Perfect Blood-Red Velvet Cake

    Step 1: Preheat your oven to 180°C (350°F). Grease and line a 23cm (9-inch) round cake pan with parchment paper.

    Step 2: In a large bowl, sift together 2 ½ cups (310g) all-purpose flour, 1 teaspoon baking soda, 1 teaspoon cocoa powder, and a pinch of salt.

    Step 3: In another bowl, cream 1 cup (200g) sugar with ½ cup (120ml) vegetable oil until light and fluffy, about 3-4 minutes.

    Step 4: Add 2 large eggs one at a time, beating well after each addition. Mix in 1 teaspoon vanilla extract.

    Step 5: In a small bowl, combine 1 cup (240ml) buttermilk with 2 tablespoons (30ml) white vinegar. Add to creamed mixture alternately with dry ingredients, starting and ending with dry.

    Step 6: Stir in 2 tablespoons (30ml) red food coloring until fully integrated and vivid.

    Step 7: Pour the batter into the prepared pan, smoothing the top.

    Step 8: Bake for 25-30 minutes, or until a toothpick inserted into the center comes out clean.

    Step 9: Let the cake cool in the pan for 10 minutes, then transfer to a wire rack to cool completely.

    Cooking Checks and Tips for the Blood-Red Velvet Cake

    • The cake’s surface should be firm, not cracked, with a deep, even red hue.
    • A toothpick inserted in the center should come out clean—no wet batter.
    • The edges will slightly pull away from the pan when done—look for that visual cue.
    • Ensure the cake is fully cooled before frosting to prevent melting and sliding.

    Common Pitfalls and How to Fix Them

    • Tough, dense crumb.? OVER-MIXING BATTER → Mix just until ingredients are combined to keep the cake tender.
    • Cake sinking or cracking.? BAKING AT WRONG TEMP → Always double-check your oven’s calibration.
    • Frosting melting or sliding.? NOT COOLING CAKE COMPLETELY → Let the cake cool fully to avoid frosting sliding off.
    • Runny or uneven frosting.? FROSTING TOO THIN → Chill the frosting slightly before applying for better texture.

    Blood-Red Velvet Cake

    Blood-red velvet cake is a striking dessert characterized by its deep crimson hue and soft, moist crumb. Made with cocoa powder, buttermilk, and vibrant red food coloring, it features a tender texture and a subtle cocoa flavor, finished with tangy cream cheese frosting. The process involves simple mixing, baking, and decorating, resulting in a bold, nostalgic treat perfect for special occasions or indulgent moments.
    Prep Time 20 minutes
    Cook Time 30 minutes
    Total Time 50 minutes
    Servings: 8
    Course: Main Course
    Cuisine: American
    Calories: 450

    Ingredients
      

    • 2 ½ cups all-purpose flour sifted
    • 1 teaspoon baking soda
    • 1 teaspoon cocoa powder natural preferred
    • pinch salt
    • 1 cup sugar
    • ½ cup vegetable oil
    • 2 large eggs
    • 1 teaspoon vanilla extract
    • 1 cup buttermilk
    • 2 tablespoons white vinegar
    • 2 tablespoons red food coloring gel preferred for vivid color
    • 8oz cream cheese softened
    • ½ cup unsalted butter softened
    • 3-4 cups powdered sugar sifted
    • 1 teaspoon vanilla extract

    Equipment

    • Mixing bowls
    • electric mixer or whisk
    • Rubber spatula
    • Cake pan (23cm/9-inch round)
    • Cooling rack
    • Toothpick or cake tester

    Method
     

    1. Preheat your oven to 180°C (350°F). Grease your cake pan and line it with parchment paper for easy removal.
    2. In a large bowl, sift together the flour, baking soda, cocoa powder, and a pinch of salt. This ensures even distribution and a light batter.
    3. In a separate bowl, combine sugar and vegetable oil, then beat with an electric mixer until the mixture is light and fluffy, about 3-4 minutes. You’ll notice it becomes pale and slightly thickened.
    4. Add eggs one at a time, beating well after each addition. Mix in vanilla extract. The batter should become smooth and slightly glossy.
    5. In a small bowl, whisk together buttermilk and vinegar. Gradually add this to the wet mixture, alternating with the dry ingredients, starting and ending with dry. Mix gently after each addition until just combined.
    6. Stir in the red food coloring until the batter is vividly red and uniform in color. This gives the cake its signature hue.
    7. Pour the batter into the prepared pan, smoothing the top with a spatula. Tap the pan gently on the counter to remove air bubbles.
    8. Bake the cake for 25-30 minutes, or until a toothpick inserted into the center comes out clean. The edges should slightly pull away from the pan, and the surface will be firm to the touch.
    9. Allow the cake to cool in the pan for about 10 minutes, then transfer it to a wire rack to cool completely. Cooling fully prevents frosting from melting.
    10. While the cake cools, beat the softened cream cheese and butter together until creamy and smooth. Gradually add powdered sugar and vanilla, beating until fluffy and spreadable.
    11. Once the cake is completely cooled, spread the cream cheese frosting evenly over the top and sides, creating a smooth or decorative finish as desired.

    Notes

    Ensure the cake is fully cooled before frosting to prevent sliding, and use gel food coloring for vibrant, true-red color without thinning the batter.
    This cake isn’t just about its striking color; it’s about the quiet chaos of mixing, the rich aroma filling your kitchen, and the perfect crumb that’s both tender and moist. Every slice feels like a quiet celebration, a little rebellion against the mundane. Enjoy it as is, or splash it with a dollop of cream cheese frosting—either way, it’s a moment worth savoring.

  • Haunted House Cookies: A Spooky Twist on a Classic Treat

    Haunted House Cookies: A Spooky Twist on a Classic Treat

    I’ve always loved the contrast of crispy edges and chewy centers in cookies. But these haunted house cookies? They turn that love into a playful, spooky experience. They’re perfect for Halloween, or any night you want to turn a simple treat into a little bit of magic.

    Why I Keep Baking Haunted House Cookies

    They’re messy, chaotic, and imperfect—just like Halloween itself. Each batch feels like a little adventure, a chance to get creative with spooky decorations. Plus, nothing beats the sight of kids’ faces lighting up at the sight of their haunted houses.

    Haunted House Cookie Ingredients & Their Secrets

    • Butter: Gives cookies their richness and crisp edges. Swap with margarine if needed.
    • Sugar: Sweetens and helps with spreading. Brown sugar adds a caramel note.
    • Eggs: Bind everything together. For a vegan version, try applesauce or flaxseed.
    • Flour: The base structure. Bread flour will give a chewier texture.
    • Vanilla extract: Adds depth and warmth. Lemon or almond extract can be fun substitutes.
    • Decorations (icing, candies): Bring your haunted house to life with spooky details.

    Tools of the Spooky Trade

    • Rolling pin: To flatten the dough evenly.
    • Cookie cutters or sharp knife: To shape your haunted houses and spooky figures.
    • Baking sheet: To hold the cookies during baking.
    • Parchment paper: To prevent sticking and make cleanup easier.
    • Cooling rack: To cool cookies evenly and prevent sogginess.

    Step-by-Step to Spooky Sweetness

    Step 1: Preheat your oven to 180°C (350°F).

    Step 2: Line a baking sheet with parchment paper.

    Step 3: In a large bowl, cream together 1 cup of softened butter and 1 cup of sugar for about 2 minutes until fluffy.

    Step 4: Add 1 egg and 1 teaspoon vanilla extract. Mix until combined.

    Step 5: In a separate bowl, whisk together 2 ½ cups of all-purpose flour, ½ teaspoon baking soda, and ¼ teaspoon salt.

    Step 6: Gradually add dry ingredients to the wet mixture, stirring until just combined.

    Step 7: Divide dough into two balls. Wrap in plastic and chill for 30 minutes.

    Step 8: On a floured surface, roll out one dough ball to about ¼ inch thick.

    Step 9: Cut into spooky shapes with cookie cutters or freehand with a knife.

    Step 10: Place on prepared baking sheet and bake for 10-12 minutes, until edges are golden.

    Step 11: Let cookies cool on a rack for 10 minutes before decorating.

    Step 12: Decorate with icing, candies, or melted chocolate to create haunted house windows, ghosts, or creepy trees.

    How to Keep Your Haunted Cookies Perfect

    • Cookies should be pale golden around the edges, not dark or burnt.
    • The dough should be firm but pliable, not sticky or crumbly.
    • Decorations should set within 30 minutes to avoid smudging or melting.

    Common Haunted House Cookie Mistakes & How to Fix Them

    • Dough cracks when rolling out.? Use too much flour? Add a teaspoon of milk to loosen the dough.
    • Edges burnt or dark.? Cookies spread too much? Chill the dough 15 minutes longer.
    • Decorations melting or bleeding.? Bake at 160°C (320°F) for 2 minutes less.
    • Cookies sticking to the baking sheet.? Use less icing or let cookies cool completely before decorating.

    Haunted House Cookies

    These playful haunted house cookies combine a crispy edge with a chewy center, crafted through simple baking techniques. The dough is flavored with vanilla and shaped into spooky structures, then decorated with icing and candies for a whimsical Halloween treat. Their imperfect, chaotic appearance adds to the spooky charm and fun of decorating them.
    Prep Time 45 minutes
    Cook Time 12 minutes
    Total Time 57 minutes
    Servings: 12
    Course: Main Course
    Cuisine: American
    Calories: 150

    Ingredients
      

    • 1 cup unsalted butter softened
    • 1 cup granulated sugar
    • 1 large egg at room temperature
    • 1 teaspoon vanilla extract
    • 2.5 cups all-purpose flour
    • ½ teaspoon baking soda
    • ¼ teaspoon salt
    • decorations icing, candies, melted chocolate for decorating

    Equipment

    • Mixing bowls
    • Rolling pin
    • Cookie cutters or sharp knife
    • Baking sheet
    • Parchment paper
    • Cooling rack

    Method
     

    1. Preheat your oven to 180°C (350°F) and line a baking sheet with parchment paper.
    2. In a large mixing bowl, beat the softened butter and sugar together using a hand or stand mixer until the mixture is light, fluffy, and fragrant, about 2 minutes.
    3. Add the egg and vanilla extract to the wet mixture and beat until well combined, ensuring the mixture is smooth and slightly glossy.
    4. In a separate bowl, whisk together the flour, baking soda, and salt to evenly distribute the leavening agents.
    5. Gradually add the dry ingredients to the wet mixture, mixing on low speed or folding gently until just combined. The dough will be soft but manageable.
    6. Divide the dough into two equal parts, shape each into a flat disc, wrap in plastic wrap, and chill in the refrigerator for about 30 minutes to relax the gluten and firm up the dough.
    7. Remove one dough disc from the fridge and place it on a floured surface. Use a rolling pin to roll out the dough to about ¼ inch thickness, keeping it even.
    8. Cut out haunted house shapes or spooky figures using cookie cutters or a sharp knife, then transfer them carefully onto the prepared baking sheet.
    9. Bake the cookies in the preheated oven for 10-12 minutes, or until the edges turn a light golden brown and the cookies are set.
    10. Once baked, transfer the cookies to a cooling rack and let them cool completely for about 10 minutes, which helps prevent smudging decorations later.
    11. Decorate the cooled cookies with icing, candies, or melted chocolate to create spooky windows, ghosts, or creepy trees, adding your personal spooky touch.
    12. Allow the decorations to set for about 30 minutes so they don’t smudge or slide off. Then enjoy your playful, spooky haunted house cookies!

    Notes

    For best results, keep decorations simple and let the cookies cool completely before decorating. Feel free to get creative with your spooky details!
    These haunted house cookies are more than just a treat; they’re a chance to get a little creative and a lot spooky. The aroma of baked dough, mingling with hints of vanilla and sugar, makes the whole house feel like a Halloween scene. Feel free to personalize your haunted houses with different colors and decorations—each one tells its own ghostly story. Don’t rush the decorating part; that’s when the magic really happens.

  • Creepy Stuffed Shells: A Sinister Twist on Comfort Food

    Creepy Stuffed Shells: A Sinister Twist on Comfort Food

    Stuffed shells are a classic for a reason, but I like to twist mine into something a little darker, a little more daring. Think smoky cheese, a hint of heat, and an almost sinister visual appeal. This dish is perfect for when you want comfort but also a little surprise on your plate. It’s my go-to for cozy nights that need a touch of the unexpected.

    Why I keep coming back to this recipe.

    The gooey cheese, the smoky depth of the sauce, and that slightly eerie presentation make it a memorable dish. It’s perfect when I want comfort but also a little edge. Plus, I love how versatile it is—tweaking spices or adding extra herbs keeps it feeling fresh.

    Breaking down the creepy stuffed shells ingredients.

    • Ricotta cheese: Creamy and mild, it binds the filling together, adding richness.
    • Mozzarella cheese: Oozy and stretchy, gives that gooey texture and golden top.
    • Spinach: Wilted and chopped, adds a pop of green and earthy flavor.
    • Garlic: Pungent and aromatic, it’s the backbone of the savory flavor.
    • Red pepper flakes: A little heat to keep things interesting, just enough to spark.
    • Marinara sauce: Tangy and tomatoey, it’s the flavor base that keeps it saucy.
    • Fresh basil or oregano: Bright and fragrant, sprinkled on top for freshness.

    Tools of the trade for creepy stuffed shells.

    • Large pot: Boiling shells and cooking the pasta.
    • Mixing bowl: Combining cheese, herbs, and seasonings.
    • Spoon or piping bag: Filling the shells neatly.
    • Baking dish: Holding the assembled shells for baking.
    • Oven: Getting everything hot and bubbly.

    Step-by-step guide to assembling and baking your creepy stuffed shells.

    Step 1: Preheat your oven to 180°C (350°F).

    Step 2: Cook the shells in boiling salted water until just al dente, about 8 minutes. Drain and set aside.

    Step 3: Make the filling: combine ricotta, shredded mozzarella, chopped spinach, minced garlic, and a pinch of red pepper flakes.

    Step 4: Stuff each shell generously with the cheese mixture, then arrange in a greased baking dish.

    Step 5: Top with marinara sauce and sprinkle with more mozzarella.

    Step 6: Bake uncovered for about 25 minutes until bubbly and golden.

    Step 7: Let cool for 5 minutes before serving to avoid burning your tongue.

    Step 8: Finish with a sprinkle of chopped basil or oregano for that final punch.

    Cooking checkpoints and tips for creepy stuffed shells.

    • Shells should be just tender but not falling apart.
    • Cheese filling should be creamy and slightly stretchy.
    • Baking should produce a bubbly, golden top.

    Common pitfalls and how to fix them.

    • Overstuffed shells collapse or burst.? Use a smaller or larger shell if stuffing feels too tight or loose.
    • Dried-out cheese or sauce.? Add a splash more marinara if filling dries out during baking.
    • Shells turning too dark or cheese burning.? Bake at 180°C (350°F) for the right amount of time—avoid overcooking.
    • Uneven browning or dry edges.? Cover loosely with foil if cheese browns too quickly.

    Smoky Creepy Stuffed Shells

    This dish features large pasta shells filled with a creamy mixture of ricotta, mozzarella, spinach, and garlic, all baked in a smoky marinara sauce until bubbly and golden. The final presentation offers a gooey, slightly charred appearance that’s both comforting and daring, perfect for cozy nights with a twist.
    Prep Time 15 minutes
    Cook Time 30 minutes
    Total Time 45 minutes
    Servings: 4
    Course: Main Course
    Cuisine: Italian-American
    Calories: 450

    Ingredients
      

    • 12 large pasta shells uncooked
    • 1 cup ricotta cheese room temperature
    • 1 cup mozzarella cheese shredded
    • 2 cups fresh spinach chopped and wilted
    • 3 cloves garlic minced
    • 0.5 teaspoon red pepper flakes optional
    • 2 cups marinara sauce
    • 0.25 cup fresh basil or oregano chopped, for garnish

    Equipment

    • Large pot
    • Mixing bowl
    • Spoon or piping bag
    • Baking dish
    • Oven

    Method
     

    1. Bring a large pot of salted water to a boil, then add the shells and cook until just al dente, about 8 minutes. Drain and set aside.
    2. In a mixing bowl, combine ricotta, half of the shredded mozzarella, chopped spinach, minced garlic, and red pepper flakes. Mix until well blended and creamy.
    3. Spoon the cheese mixture into a piping bag or use a small spoon to fill each shell generously, pressing gently to pack the filling inside.
    4. Preheat your oven to 180°C (350°F). Lightly grease a baking dish with a bit of sauce or oil.
    5. Arrange the stuffed shells in the baking dish, open side up, and evenly pour marinara sauce over them. Sprinkle the remaining mozzarella on top.
    6. Bake uncovered for about 25 minutes, or until the sauce is bubbling and the cheese is golden and melted.
    7. Remove from the oven and let sit for 5 minutes. This helps the cheese set slightly and makes serving easier.
    8. Garnish with chopped fresh basil or oregano for a fragrant, fresh finish. Serve hot and enjoy the gooey, smoky, and slightly sinister presentation.

    Notes

    For extra smoky flavor, consider adding a dash of smoked paprika to the cheese filling. To make it spicier, increase the red pepper flakes or add a dash of hot sauce to the marinara.
    Once out of the oven, these shells should be oozy and browned at the edges, with a fragrant basil aroma wafting up. Though they look a little spooky, they’re deeply comforting, with cheesy warmth that melts in your mouth. Feel free to add a dash of chili flakes or a squeeze of lemon to brighten the richness. They’re best enjoyed hot, with a side of crusty bread or a crisp salad to balance the gooey richness.