This no bake chocolate nut slice became my unexpected quick comfort for those busy weekends when time is tight but I still crave something sweet and satisfying. There’s something about the chewy, crunchy mix of nuts and rich chocolate that hits just right, especially when I need a little nostalgia to brighten up my day.
I love how simple it is to throw together—no oven needed, just a good spoon and a bit of patience while it sets. It’s a no fuss, no mess treat that always tastes like a little moment of indulgence, no matter how hectic things get. Sometimes, those easy recipes turn out to be the best kind of therapy.
Focusing on how this no bake chocolate nut slice became my unexpected go-to for quick comfort during hectic weekends, blending nostalgia and practicality in every chewy, crunchy bite.
The story behind this recipe
This recipe was born out of a chaotic weekend when I needed something quick, satisfying, and foolproof. I remember rummaging through my pantry, grabbing handfuls of nuts and a bar of dark chocolate, thinking, why not? The mix of textures and the rich aroma of melting chocolate instantly brought back childhood afternoons spent in my grandmother’s kitchen. It’s become a go-to for whenever I crave a little nostalgic comfort without fussing over the oven.
Ingredient breakdown: key components
- Dark chocolate: I prefer a rich, slightly bitter bar that melts smoothly, giving that deep cocoa aroma. Swap for milk chocolate if you want a sweeter, creamier flavor.
- Mixed nuts: I love a crunchy combo—almonds, walnuts, and a splash of saltiness. You can use only almonds or cashews, but don’t skip the salt to enhance flavor.
- Butter: I use unsalted butter for a clean, creamy base that melts easily. Margarine can work in a pinch but loses that rich, silky feel.
- Honey or golden syrup: Adds a touch of sweetness and helps everything stick together. Swap with maple syrup if you want a more floral note, but expect a different aroma.
- Vanilla extract: Just a teaspoon for warmth and depth. Skip it if you’re out, but it really rounds the flavor nicely.
- Sea salt: A pinch brightens the chocolate and nuts, making each bite pop. Use coarse salt if you want a more noticeable crunch.
- Optional dried fruits: I toss in some cranberries or apricots for a chewy burst of tang. Dried cherries work well, but avoid overly sticky ones that can make the slice soggy.
Spotlight on key ingredients
Dark chocolate:
- I prefer a rich, slightly bitter bar that melts smoothly, giving that deep cocoa aroma. Swap for milk chocolate if you want a sweeter, creamier flavor.
- Mixed nuts: I love a crunchy combo—almonds, walnuts, and a splash of saltiness. You can use only almonds or cashews, but don’t skip the salt to enhance flavor.
- Butter: I use unsalted butter for a clean, creamy base that melts easily. Margarine can work in a pinch but loses that rich, silky feel.
Mixed nuts:
- I love a crunchy combo—almonds, walnuts, and a splash of saltiness. You can use only almonds or cashews, but don’t skip the salt to enhance flavor.
- Butter: I use unsalted butter for a clean, creamy base that melts easily. Margarine can work in a pinch but loses that rich, silky feel.
Notes for ingredient swaps
- Dairy-Free: Swap regular butter for coconut oil or a neutral plant-based butter. It might add a subtle coconut aroma or slightly softer texture.
- Chocolate Alternatives: Use dark chocolate with at least 70% cocoa for a rich flavor, or try carob chips for a caffeine-free version with a different sweetness profile.
- Sweeteners: Replace honey with maple syrup or agave nectar. Expect a slightly different aroma—more floral or caramel-like, respectively.
- Nuts: Use roasted, salted almonds or pecans for extra crunch and flavor. For a nut-free version, try toasted sunflower or pumpkin seeds.
- Add-ins: Dried cranberries or chopped dried apricots bring tang and chewiness. For more intense fruitiness, try dried cherries, but watch for stickiness.
- Binder: Instead of honey, use glucose syrup or golden syrup for a smoother, less viscous texture that still helps everything stick.
- Flavor Boost: A splash of espresso or coffee extract can deepen the chocolate flavor—use sparingly to avoid overpowering the nuts.
Equipment & Tools
- Medium mixing bowl: To hold and mix ingredients.
- Saucepan: To melt butter and chocolate gently.
- Spatula: For stirring and spreading the mixture.
- Parchment paper: To line the tray for easy removal.
- Baking tray (20x20cm): To hold the mixture as it sets.
- Knife: To cut the set slice into pieces.
Step-by-step guide to no bake slice
- Gather your equipment: a medium mixing bowl, a saucepan, a spatula, and a baking tray (about 20x20cm or 8x8in).
- Line the tray with parchment paper for easy removal and clean-up.
- Chop the dark chocolate into small pieces to help it melt evenly. Measure out a cup of mixed nuts—whatever combo you like best.
- In the saucepan, melt 100g (about 3.5 oz) of butter over low heat, stirring until just melted and starting to foam slightly. This takes about 2 minutes. Keep an eye on it, don’t let it brown.
- Add 200g (about 7 oz) of chopped chocolate to the melted butter. Stir gently until smooth and glossy, about 3 minutes. Smell that rich cocoa aroma filling your kitchen.
- Stir in 2 tablespoons of honey or golden syrup for a bit of stickiness and sweetness. Keep stirring until fully incorporated and the mixture is shiny.
- Remove from heat. Quickly fold in the nuts—about 1.5 cups—making sure they’re evenly coated with the chocolate mixture. This step is messy but fun.
- Pour the mixture into your prepared tray. Use the spatula to spread it out evenly, pressing gently to compact everything.
- Let it sit at room temperature for 10 minutes, then transfer to the fridge. Chill for at least 2 hours, or until firm. The mixture should be hard enough to cut cleanly.
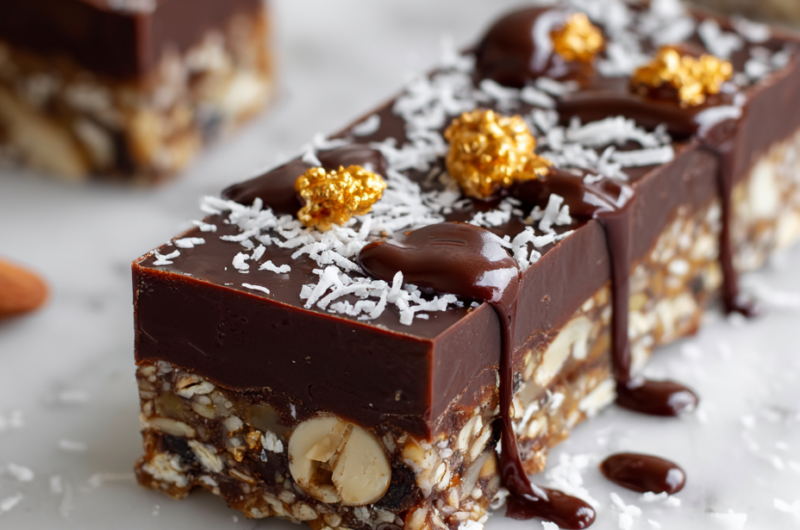
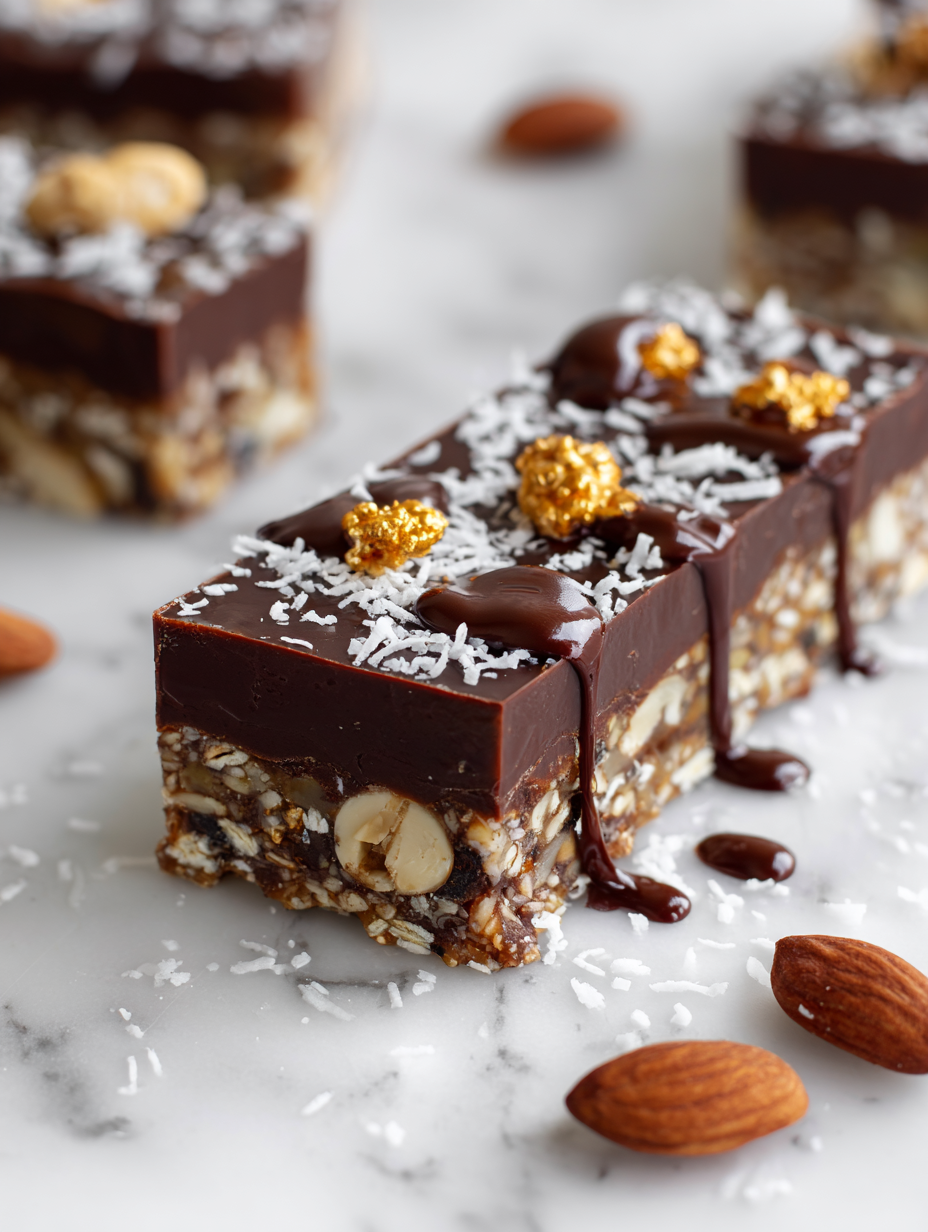
- Once set, lift the slice out using the parchment paper. Place on a cutting board and slice into squares or rectangles as you prefer. Keep in mind, it’s best enjoyed slightly chilled for that chewy, crunchy texture.
- For a clean cut, wipe your knife with a warm damp cloth between slices. This prevents sticking and keeps your edges sharp.
- Serve and enjoy—it’s almost effortless, but the flavor and texture feel like you spent ages perfecting it.
Chill the slice in the fridge for at least 2 hours until firm. Once set, lift out with parchment paper, cut into squares, and serve. Keep refrigerated to maintain texture.
How to Know It’s Done
- Chocolate mixture is glossy and smooth after melting.
- Nuts are evenly coated and visible through the mixture.
- Slice is firm and holds its shape when cut—no sticky or soft edges.
No Bake Chocolate Nut Slice
Ingredients
Equipment
Method
- Line your baking tray with parchment paper to make removal easier later.
- Chop the dark chocolate into small pieces, which helps it melt evenly and smoothly.
- In a saucepan over low heat, melt the butter gently until it’s just starting to foam, about 2 minutes. Keep the heat low to avoid browning.
- Add the chopped dark chocolate to the melted butter and stir gently until completely melted and glossy, about 3 minutes. Your kitchen should fill with a rich cocoa aroma.
- Stir in the honey (or golden syrup) and vanilla extract, mixing until the mixture is shiny and smooth.
- Remove the pan from heat and gently fold in the mixed nuts, ensuring they’re evenly coated with the chocolate mixture.
- Pour the mixture into your prepared tray, spreading it out evenly with a spatula and pressing gently to compact it.
- Let the mixture sit at room temperature for about 10 minutes, then transfer the tray to the fridge to chill for at least 2 hours until firm.
- Once set, lift the firm slice out of the tray using the parchment paper and place it on a cutting board.
- Cut into squares or rectangles with a sharp knife, wiping the blade with a warm cloth between cuts for clean edges.
- Enjoy your no bake chocolate nut slice, best served slightly chilled to keep that chewy and crunchy texture perfect.
Pro tips for perfect texture
- Bolded mini-head: Use finely chopped chocolate for even melting and a velvety texture.
- Bolded mini-head: Warm the butter and chocolate mixture gently to prevent seizing or burning.
- Bolded mini-head: Incorporate nuts while mixture is still warm for better adhesion and crunch.
- Bolded mini-head: Chill the slice at least 2 hours; patience ensures a clean, firm cut.
- Bolded mini-head: Wipe your knife with a warm cloth between cuts for smooth, sharp edges.
Common mistakes and how to fix them
- FORGOT to add salt: Salt enhances flavor, add a pinch to balance sweetness and chocolate.
- DUMPED too much butter: Use precise measurements to prevent a greasy texture—stick to 100g.
- OVER-TORCHED chocolate: Melt gently over low heat, stir constantly, and remove just as it’s smooth.
- MISSED stirring nuts: Coat nuts evenly with chocolate mixture to prevent sinking or uneven texture.
Quick fixes and pantry swaps
- If chocolate seizes, splash in a teaspoon of hot water and stir until smooth.
- When nuts sink, fold in an extra handful at the end for crunch.
- Splash with a bit more honey if the mixture feels too dry and crumbly.
- Patch melted chocolate with a pinch of coconut oil for extra smoothness and shine.
- Shield delicate slices from moisture by wrapping tightly; shimmer of condensation can soften them.
Prep, store, and reheat tips
- Prepare the mixture and pour it into the tray ahead of time; it can be kept covered in the fridge overnight, which allows the flavors to meld and makes slicing easier.
- Store the sliced pieces in an airtight container in the fridge for up to one week, maintaining their chewy and crunchy texture with a slight chocolate aroma.
- For longer storage, freeze the slices for up to a month; let them thaw at room temperature for a few minutes before serving for optimal texture.
- Reheat gently in the fridge or at room temperature; avoid microwaving to prevent melting the chocolate and losing the firm, chewy consistency. If needed, let it sit at room temperature to soften slightly, releasing that rich, cocoa scent.
Top questions about no bake slice
1. Can I use milk chocolate instead of dark?
Use high-quality dark chocolate for a richer flavor and smoother melt, which makes the slice more indulgent.
2. Will milk chocolate work in this recipe?
Yes, milk chocolate will make it sweeter and creamier, but it might be less intense in cocoa aroma.
3. How do I know when it’s set enough to cut?
Chill the slice for at least two hours until firm enough to cut cleanly, and check that it’s solid but not hard.
4. What if the mixture is too dry?
If the mixture seems too dry or crumbly, add a teaspoon of warm honey or golden syrup to help it bind better.
5. How can I get neat, clean slices?
Use a sharp, warm knife to get clean cuts. Wipe between slices for a tidy finish and avoid sticking.
6. How long can I store the slice?
Storing in an airtight container in the fridge keeps it fresh for up to a week, maintaining chewy and crunchy textures.
7. Can I freeze the slice?
Yes, you can freeze it for up to a month. Let it thaw at room temperature for a few minutes before slicing.
8. What if the chocolate mixture hardens or seizes?
If the chocolate seizes or hardens unevenly, gently warm the mixture over low heat and stir until smooth.
9. Why do nuts sometimes sink in the mixture?
To prevent nuts from sinking, fold in a few extra nuts at the end or sprinkle some on top before chilling.
10. Should I add salt to this sweet treat?
Add a pinch of sea salt to enhance flavor and bring out the richness of the chocolate and nuts.
This no bake chocolate nut slice is a reminder that simple ingredients can create something truly satisfying. It’s a treat I turn to when I need a quick moment of comfort that’s both nostalgic and straightforward.
Sharing it with friends or family makes those hectic weekends a little sweeter, and honestly, it’s the kind of recipe that keeps calling me back, no matter how busy life gets. Sometimes, the best moments are the easiest to make.

Hi, I’m Grace Morgan, and welcome to my kitchen. This is a space shaped by family meals, curious hands reaching for snacks, paws under the table, and recipes that come together in the middle of real life. I’m a food blogger, a mother, and a passionate pet keeper. Most days, I’m cooking with one eye on the stove and the other on someone who needs me, whether that’s a child asking for a taste or a dog hoping something might fall.


