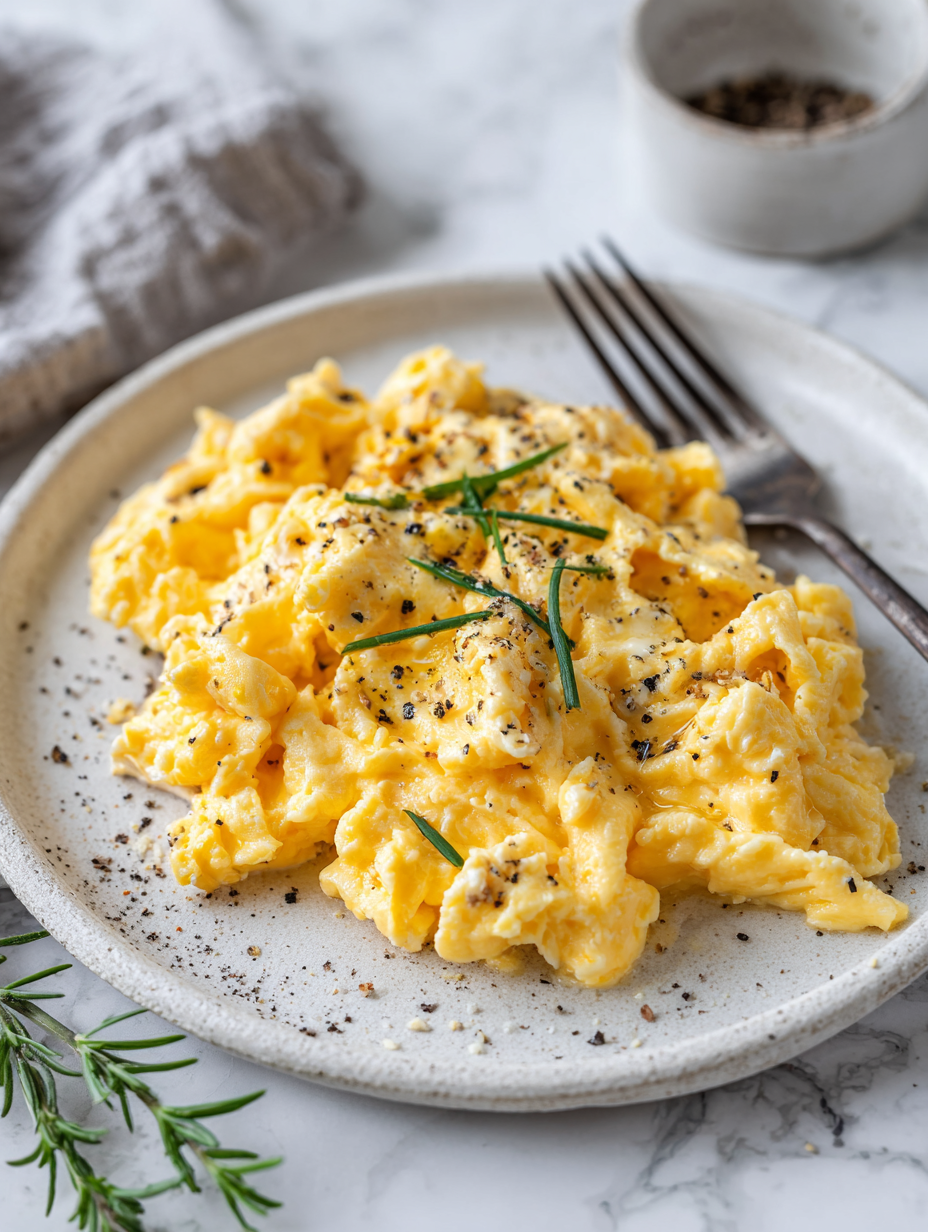
Category: Main Course

  • Monster Burgers to Spook Your Taste Buds!

    Monster Burgers to Spook Your Taste Buds!

    Every October, I love turning the usual burger into a spooky masterpiece that kids and adults alike will rave about. These Halloween Monster Burgers are not just fun—they7re a statement on your table, blending playful creativity with satisfying flavors. The kitchen smells of toasted buns and sizzling patties, punctuated by a hint of spooky decorations.

    What makes these burgers stand out is their quirky monster design, complete with funny eyes and gnarly teeth. It7s a perfect activity for a Halloween party or a themed family dinner. Each bite combines the smoky richness of grilled beef with the cheesy-y snacky accents reminiscent of childhood costumes and candy hunts.

    **WHY I LOVE THIS RECIPE?**

    • Creates hilarious edible art that sparks joy and chaos at the dinner table.
    • Transforms a simple meal into a memorable Halloween tradition.
    • Allows playful experimentation with toppings and faces—no rules, just fun!
    • Perfect for involving kids in the kitchen with little monster faces.
    • Quick to assemble, giving you more time for spooky movie marathons later.

    **AVOID MY DISASTER (You7re Welcome)**

    • FORGOT to preheat the grill; burger stuck, fix by oiling the grates to prevent sticking.
    • DUMPED too much ketchup; overflowed and spoiled the look. Use a small spoon for neat designs.
    • OVER-TORCHED cheese; melted into a crispy mess. Cover promptly with foil to stop burning.
    • SPILLED toppings on the floor; the chaos distracted kids and spoiled the fun. Keep toppings ready on a tray.

    **QUICK FIXES THAT SAVE YOUR DAY**

    • When buns are soggy, splash with a little crisped-up butter to refresh texture.
    • Patch over a burger with a fresh bun slice if the top gets too smushed.
    • Shield your design from the grill’s heat with foil if it starts to burn.
    • When cheese overflows, quickly smear it back with a spatula for a tidy look.
    • If burnt, quickly scrape off char and add a fresh layer of cheese or toppings.

    Halloween Monster Burgers

    Halloween Monster Burgers are fun, creatively decorated beef patties served on toasted buns, topped with cheese, vegetables, and playful toppings to resemble silly monsters. The burgers are grilled until smoky and juicy, with detailed edible faces adding a whimsical touch. Final presentation features colorful eyes, gnarly teeth, and quirky expressions that make the dish both eye-catching and satisfying.
    Prep Time 20 minutes
    Cook Time 15 minutes
    Total Time 35 minutes
    Servings: 4
    Course: Main Course
    Cuisine: American
    Calories: 650

    Ingredients
      

    • 1 lb ground beef preferably 80/20 for flavor
    • 4 pieces burger buns scored for toasting
    • 4 slices cheddar cheese cut into fun shapes if desired
    • 1 cup lettuce shredded
    • 1 large tomato sliced into rounds
    • 1/2 cup onion sliced or diced
    • 2 pieces eggs for decorating eyes
    • 4 pieces black olives sliced for pupils
    • 4 slices pickles cut into teeth shapes
    • to taste salt and pepper for seasoning

    Equipment

    • Grill or stovetop pan
    • Tongues or spatula
    • Cooking brush
    • Knife
    • Cutting board
    • Baking sheet (for buns)

    Method
     

    1. Preheat your grill or stovetop pan over medium-high heat. Lightly oil the grates or pan to prevent sticking. Form the ground beef into four evenly-sized patties, handling gently to keep them tender.
    2. Place the patties on the grill or pan. Cook for about 4–5 minutes per side, until they develop a good sear and reach your preferred level of doneness. During the last minute, place a slice of cheese on each patty to melt.
    3. While the burgers cook, slice the burger buns in half and toast them lightly on a baking sheet or on the grill until golden and crispy. Remove and set aside.
    4. Slice the tomato, shred the lettuce, and prepare the onions. Set all toppings nearby for easy assembly. Slice the eggs and olives for decorating the eyes, and cut pickles into fun shaped teeth.
    5. Assemble each burger by placing a lettuce leaf on the bottom bun, followed by the grilled beef patty with melted cheese. Top with tomato slices and onions, then add playful features such as eyes made from sliced eggs with olives as pupils, and teeth cut from pickles.
    6. Place the decorated patties onto the toasted buns. Add extra toppings or creative faces if desired, using additional ingredients like ketchup or mustard for fun details. Cover with the top bun and press slightly to set the design.
    7. Serve the Halloween Monster Burgers immediately with sides of your choice. They are ready to impress both kids and adults with their spooky and playful appearance.

    Notes

    Use small spoons for neat placement of eyes and small toppings. Feel free to get creative with facial expressions and monster features for extra fun!
    These Halloween Monster Burgers are a delightful way to add a little playful chaos to your festive table. They remind us that cooking can be a creative escape, especially during the spooky season when fantasy becomes reality. With just a few tricks and treats, your table transforms into a Halloween scene everyone will remember.

  • Eggplant Parmesan Reimagined: A Culinary Nostalgia with a Twist

    Eggplant Parmesan Reimagined: A Culinary Nostalgia with a Twist

    Imagine biting into a crispy, golden crust that gives way to tender, flavorful eggplant slices layered with melting cheese. This dish transports you to family kitchens where every bite sparks memories of comfort and chaos alike. Today, I’m sharing a version that swaps traditional frying for a baked approach, making it lighter without losing the soul of the classic.

    Baking eggplant Parmesan might seem mundane, but it’s packed with surprises. The aroma of roasting garlic and the crunch of seasoned breadcrumbs create a symphony of smells and textures. It’s a dish that balances nostalgia with innovation, perfect for those craving a hearty, satisfying meal that doesn’t weigh heavy.

    Baked Eggplant Parmesan

    This dish features slices of eggplant coated in seasoned breadcrumbs and baked until crispy, layered with marinara sauce and melted cheese. The result is a golden, tender, and flavorful casserole with a satisfying crunchy top and gooey interior.
    Prep Time 20 minutes
    Cook Time 30 minutes
    Total Time 50 minutes
    Servings: 4
    Course: Main Course
    Cuisine: Italian
    Calories: 320

    Ingredients
      

    • 2 medium eggplants sliced into 1/4-inch rounds
    • 1 cup breadcrumbs plain or Italian-seasoned
    • 1/2 cup grated Parmesan cheese
    • 2 cups marinara sauce preferably chunky or smooth
    • 1 cup shredded mozzarella cheese
    • 2 cloves garlic minced
    • to taste salt and pepper
    • 2 tablespoons olive oil for coating and drizzling

    Equipment

    • Baking sheet
    • Shallow dish for breadcrumbs
    • Mixing bowls
    • Kitchen tongs or spatula

    Method
     

    1. Preheat your oven to 400°F (200°C). Line a baking sheet with parchment paper. Slice the eggplants into 1/4-inch rounds and season with salt and pepper on both sides.
    2. Mix the breadcrumbs with grated Parmesan and minced garlic in a shallow dish. Drizzle olive oil over the eggplant slices to help them crisp up during baking.
    3. Dip each eggplant slice into the breadcrumb mixture, pressing lightly to adhere, then place them on the prepared baking sheet.
    4. Bake the eggplant slices in the preheated oven for about 20 minutes, until golden brown and crispy around the edges.
    5. Spread a layer of marinara sauce over the bottom of a baking dish. Arrange the baked eggplant slices in a single layer over the sauce.
    6. Spoon remaining marinara sauce evenly over the eggplant slices, then sprinkle shredded mozzarella cheese on top.
    7. Bake the assembled dish for an additional 10-15 minutes, until the cheese is melted, bubbling, and slightly browned.
    8. Remove from the oven and let it sit for a few minutes. Garnish with fresh basil or herbs if desired, then slice and serve hot.

    Notes

    For a lighter version, skip the cheese or use plant-based alternatives. Pair with a side salad for a complete meal.
    This eggplant Parmesan is more than just a weeknight dinner. It’s a reminder that comfort food can evolve without losing its roots. As the layers meld in the oven, the kitchen fills with a richness that makes the wait worthwhile.

    Sharing this dish feels like carrying forward a kitchen secret—simple, warm, and deeply satisfying. It’s the kind of meal that gathers everyone around the table, inviting stories and laughter to follow each bite.

  • Unexpected Comfort: Reinventing Taco Soup with a Twist

    Unexpected Comfort: Reinventing Taco Soup with a Twist

    As the leaves start turning and the air grows crisper, I find myself craving cozy, hearty dishes that carry a hint of nostalgia. Taco soup, with its vibrant spices and rich textures, is my go-to comfort on demanding days when only bold flavors will do. But today, I want to explore a less conventional take—adding a smoky chipotle kick that transforms this simple dish into an unexpected smoky symphony.

    This recipe isn’t just about filling bellies; it’s about elevating a humble bowl into something memorable with a handful of pantry treasures. The scent of cumin and smoked paprika mingling with simmering tomatoes makes the kitchen feel like a warm hug, perfect for chilly evenings. It’s a celebration of flavors, both familiar and daring, that turns ordinary into extraordinary.

    Smoky Chipotle Taco Soup

    This hearty taco soup combines ground meat, tomatoes, beans, and spices to create a thick, flavorful broth. Incorporating smoky chipotle peppers adds a depth of heat and richness, resulting in a comforting and visually vibrant dish with a slightly spicy, chunky texture.
    Prep Time 15 minutes
    Cook Time 30 minutes
    Total Time 45 minutes
    Servings: 6
    Course: Main Course
    Cuisine: Tex-Mex
    Calories: 350

    Ingredients
      

    • 1 lb ground beef or turkey or preferred ground meat
    • 1 medium onion diced
    • 3 cloves garlic minced
    • 1 can (14 oz) diced tomatoes with juices
    • 1 can (15 oz) black beans drained and rinsed
    • 1 cup corn kernels frozen or canned
    • 2 tbsp olive oil
    • 1 tbsp chili powder
    • 1 tsp smoked paprika ground smoked paprika
    • 1 chipotle pepper in adobo chipotle pepper finely chopped
    • 2 cups beef or chicken broth
    • to taste salt and pepper

    Equipment

    • Large Soup Pot
    • Wooden spoon
    • Chef’s Knife
    • Cutting board

    Method
     

    1. Heat the olive oil in a large soup pot over medium heat until shimmering. Add the diced onion and cook, stirring occasionally, until translucent and fragrant, about 3-5 minutes.
    2. Add the ground meat to the pot and cook, breaking it apart with a wooden spoon, until browned and cooked through, about 5-7 minutes. Drain excess fat if necessary.
    3. Stir in the minced garlic, chili powder, smoked paprika, and chopped chipotle pepper, cooking for another minute until aromatic and the spices coat the meat and onions evenly.
    4. Pour in the diced tomatoes with their juices and the broth. Bring the mixture to a gentle simmer, allowing flavors to meld for about 10 minutes.
    5. Add the drained black beans and corn to the pot, stirring to combine. Continue simmering for another 10 minutes until heated through and slightly thickened.
    6. Taste the soup and season with salt and pepper as needed, adjusting the spice levels to your preference.
    7. Serve the smoky chipotle taco soup hot, garnished with your favorite toppings like shredded cheese, sour cream, or fresh cilantro if desired.
    Once you’ve got your bowl of this smoky taco soup, it’s hard to go back to the original. The blend of spices and the tender beans make it a standout, even among other comfort foods. It’s a reminder that good food doesn’t need to be complicated to be deeply satisfying.

    Gather your ingredients, crank up the spice, and let this soup bring some bold warmth to your table. In the midst of busy days, it’s these simple, flavorful moments that truly hit the spot. The best part? It’s easily customizable, so you can make it your own every time you cook.

  • Spooktacular Jack-o’-Lantern Stuffed Peppers with a Twist

    Spooktacular Jack-o’-Lantern Stuffed Peppers with a Twist

    Every October, I find myself irresistibly drawn to the playful chaos of Halloween. This year, I decided to blend that festive spirit with my love of hearty, healthy food—resulting in these Halloween Jack-o’-Lantern Stuffed Peppers. They look adorable, but what’s better is how surprisingly satisfying they are, with a hint of smoky sweetness from the roasted peppers.

    What makes this recipe stand out is its exquisite balance of visual fun and culinary comfort. Carving the peppers like tiny jack-o’-lanterns is as enjoyable as stuffing and roasting them. Plus, the flavors of seasoned rice, melted cheese, and crisp vegetables bring a warmth that’s perfect for crisp fall evenings.

    Halloween Jack-o’-Lantern Stuffed Peppers

    This dish features bell peppers carved into miniature jack-o’-lanterns, which are then stuffed with a seasoned mixture of rice, vegetables, and melted cheese. After roasting, the peppers develop a smoky sweetness and a tender, flavorful filling with a charming festive appearance.
    Prep Time 20 minutes
    Cook Time 40 minutes
    Total Time 1 hour
    Servings: 4
    Course: Main Course
    Cuisine: American
    Calories: 250

    Ingredients
      

    • 4 large bell peppers preferably orange or yellow for a vibrant effect
    • 1 cup cooked rice preferably long-grain or jasmine rice
    • 1/2 cup shredded cheese cheddar or mozzarella work well
    • 1 cup mixed vegetables diced bell peppers, onions, or corn
    • 2 teaspoons olive oil for brushing and roasting
    • to taste salt and pepper
    • 1 teaspoon paprika optional, adds smoky flavor

    Equipment

    • Chef’s Knife
    • Spoon
    • Baking sheet
    • Small knife or paring knife

    Method
     

    1. Preheat your oven to 375°F (190°C)..
    2. Use a small knife or paring knife to carefully carve faces into the tops of each bell pepper, creating classic jack-o’-lantern expressions. Set aside the carved tops for later use.
    3. Gently scoop out the seeds and membranes from inside each carved pepper, making space for the stuffing while keeping the peppers intact.
    4. In a mixing bowl, combine cooked rice, shredded cheese, mixed vegetables, a drizzle of olive oil, and season with salt, pepper, and paprika. Mix thoroughly until evenly combined.
    5. Use a spoon to fill each hollowed pepper with the rice mixture, pressing gently to pack the filling tightly and fill the peppers completely.
    6. Place the stuffed peppers upright on a baking sheet lined with parchment paper. Brush the outside of each pepper lightly with olive oil for a roasted finish.
    7. Bake the peppers in the preheated oven for about 35-40 minutes, until the peppers are tender and slightly caramelized, and the cheese is melted and bubbly.
    8. Remove the peppers from the oven and let them cool for a few minutes. Place the carved lids back on top or serve as a decorative garnish if desired.
    9. Arrange the finished stuffed peppers on a platter, showcasing their carved faces and vibrant colors. Serve warm and enjoy their festive, hearty flavor.

    These Jack-o’-Lantern Stuffed Peppers are more than just a Halloween gimmick. They serve up cozy, colorful comfort that makes the season special. Their cheerful faces hide a warm filling that’s perfect for chilly nights, filled with familiar flavors and seasonal charm.

    As the days grow shorter and the air turns crisp, dishes like this remind us of the joy in simple, creative cooking. They bring a touch of whimsy to the table while nourishing our bodies and spirits. A perfect way to celebrate fall, one vibrant pepper at a time.

  • Reviving Nostalgia: The Perfect Chicken Noodle Soup with a Twist

    Reviving Nostalgia: The Perfect Chicken Noodle Soup with a Twist

    Chicken noodle soup often feels like a warm blanket on a chilly day, but I like to think of it as a canvas for unexpected flavor adventures. Today, I like to take you on a journey where classic comfort meets a dash of culinary daring, transforming this humble dish into something memorable.

    Imagine savoring each spoonful and discovering hints of fresh herbs, a splash of citrus, or even a subtle smoky undertone. It be your favorite soup, but with a new twist, making it ideal for both cozy nights and lively gatherings. The secret? A few unconventional ingredients and a hearty share of passion.

    Herb-Infused Chicken Noodle Soup with a Citrus Twist

    This chicken noodle soup combines tender shredded chicken and al dente noodles in a flavorful broth enriched with fresh herbs and a splash of citrus. The dish features a clear, comforting broth with visible herb and vegetable garnishes, finished with a hint of smoky flavor for added depth.
    Prep Time 15 minutes
    Cook Time 30 minutes
    Total Time 45 minutes
    Servings: 4
    Course: Main Course
    Cuisine: Comfort Food
    Calories: 320

    Ingredients
      

    • 1 lb boneless, skinless chicken breasts or thighs
    • 8 oz egg noodles or any pasta of choice
    • 1 medium onion diced
    • 3 cloves garlic minced
    • 4 cups chicken broth
    • 1 cup diced carrots
    • 1 cup chopped celery
    • 2 tablespoons olive oil
    • 2 tablespoons fresh lemon juice
    • 1 teaspoon dried thyme or fresh if available
    • to taste salt and pepper
    • 1/4 cup chopped fresh herbs parsley, dill, or cilantro
    • 1 teaspoon smoked paprika optional for smoky flavor

    Equipment

    • Large Dutch oven or stockpot
    • Chef’s Knife
    • Cutting board
    • Wooden spoon or ladle
    • Measuring cups and spoons

    Method
     

    1. Place the chicken breasts in a large stockpot and cover with water. Bring to a boil, then reduce heat and simmer until cooked through, about 15 minutes. Remove the chicken, let it cool slightly, then shred into bite-sized pieces.
    2. While the chicken cools, dice the onion, mince the garlic, and chop the carrots and celery. Set aside.
    3. In the same pot, heat olive oil over medium heat. Add the diced onion and cook until translucent and fragrant, about 3-4 minutes, stirring occasionally.
    4. Add the minced garlic, carrots, and celery to the pot. Cook for another 3 minutes, until the vegetables begin to soften and release their aroma.
    5. Pour in the chicken broth and add the dried thyme, smoked paprika (if using), salt, and pepper. Bring the mixture to a gentle boil.
    6. Once boiling, add the shredded chicken back into the pot and stir to combine. Reduce heat to low and let the broth simmer for 10 minutes, allowing flavors to meld.
    7. Meanwhile, cook the egg noodles separately in salted boiling water according to package instructions until al dente. Drain and set aside.
    8. Add the cooked noodles to the simmering soup and stir gently to distribute them evenly throughout the broth.
    9. Squeeze fresh lemon juice into the soup for a bright citrus note, then stir in the chopped fresh herbs for a burst of freshness and color.
    10. Taste and adjust seasoning with salt and pepper as needed. Let the soup simmer for another 2-3 minutes to incorporate all flavors fully.
    11. Serve the soup hot, garnished with additional fresh herbs if desired. Enjoy the comforting yet boldly flavored bowl of chicken noodle soup with a citrus twist.

    Notes

    For added smoky depth, sprinkle extra smoked paprika on top before serving. You can use leftover cooked chicken if preferred. Adjust the citrus amount to your taste for a brighter or subtler flavor.

    This recipe is a celebration of simplicity with a twist, perfect for those moments when you crave familiarity but want a little sparkle. The aroma of herbs and roasted chicken simmering together makes every kitchen feel like a memory in the making.

    Whether you like to prep it quickly on a busy weeknight or slow-cook it on the weekend, this soup offers comfort with a bit of adventure. Keep a spoon handy and enjoy every warm, flavorful sip as the season shifts and your cooking style evolves.

  • Spooky Delight: Halloween Eyeball Pasta with Meatball ‘Eyeballs’

    Spooky Delight: Halloween Eyeball Pasta with Meatball ‘Eyeballs’

    As Halloween approaches, I love digging into those playful, creepy dishes that make dinner feel like a costume party. This eyeball pasta transforms a simple plate of spaghetti into a ghoulish spectacle with meatball “eyeballs” staring back at you. The smell of roasted garlic and simmered marinara fills my kitchen, setting the perfect spooky ambiance.

    But what truly makes this recipe special isn’t just its visual impact. It’s the nostalgic comfort of hearty meatballs paired with the thrill of a Halloween surprise. Plus, it’s a chaos-friendly dinner that kids and adults alike can help assemble—chaos turns into giggles every time.

    ## WHY I LOVE THIS RECIPE?
    – It mixes childhood nostalgia with festive fun.
    – The chaotic assembly sparks joy and creativity.
    – The aroma of garlic and herbs makes it irresistible.
    – It’s a playful way to enjoy a comforting meal during spooky season.

    ## AVOID MY DISASTER (You’re Welcome)
    – FORGOT the eyeball dot? Dropped a meatball in the sauce—quickly replaced with an extra one.
    – DUMPED the sauce from the spoon? Spilled on the counter—cleaned with a damp cloth, no biggie.
    – OVER-TORCHED the meatballs? Got a little black—transferred to a fresh pan and started over.
    – MISPLACED the tiny eyes? Found them hiding in the fridge—placed them on top, instant spooky effect.

    ## QUICK FIXES THAT SAVE YOUR DAY
    – If sauce is too thick, splash in a little pasta water to loosen.
    – WHEN meatballs stick, patch with a gentle nudge with a spatula.
    – Shield your eyeballs with a paper towel if they crack during placement.
    – If the meatball is bland, stir in a dash of parmesan for a flavorful punch.
    – When in doubt, crack a pepper and add a shimmer of olive oil for flavor and shine.

    Enjoy creating a dish that’s all about spooky fun and savory bites. This eyeball pasta turns a simple dinner into a memorable Halloween spectacle. It’s a playful dish that brings out both your creativity and appetite. Perfect for a festive, family-friendly celebration or a surprise dinner for guests dressed up in their costumes.

    Eyeball Spaghetti

    Eyeball Spaghetti is a playful pasta dish featuring cooked spaghetti topped with tender meatball ‘eyeballs’. The dish is finished with marinara sauce and faux eyeballs made from meatballs with small cheese or olive centers, creating a spooky, fun presentation. The final appearance is a spooky plate with meatballs resembling creepy eyes amidst red sauce and pasta.
    Prep Time 20 minutes
    Cook Time 40 minutes
    Total Time 1 hour
    Servings: 4
    Course: Main Course
    Cuisine: Italian
    Calories: 600

    Ingredients
      

    • 1 pound spaghetti uncooked
    • 1 pound ground beef for meatballs
    • 1/2 cup bread crumbs to bind meatballs
    • 1 large egg to bind meatballs
    • 2 cloves garlic minced
    • 2 cups marinara sauce
    • 1 cup shredded mozzarella cheese for eyeballs
    • to taste salt and pepper
    • as needed olive oil

    Equipment

    • Large pot
    • Mixing bowl
    • Baking sheet
    • Saucepan
    • Slotted spoon

    Method
     

    1. Cook the spaghetti in a large pot of boiling salted water until al dente, then drain and set aside.
    2. Preheat your oven to 400°F (200°C). In a mixing bowl, combine ground beef, bread crumbs, minced garlic, egg, salt, and pepper. Mix gently until well combined.
    3. Shape the meat mixture into small, round meatballs about the size of a golf ball and place them on a baking sheet lined with parchment paper. Bake for 20 minutes until browned and cooked through.
    4. While the meatballs bake, heat marinara sauce in a saucepan over medium heat until warmed through and bubbling.
    5. Once the meatballs are done, add them to the simmering marinara sauce and let them soak for a few minutes, allowing the flavors to meld.
    6. Place cooked spaghetti on serving plates, then ladle the hot marinara sauce with meatballs over the pasta. Arrange the meatballs on top to resemble creepy eyeballs, with some cheese or olives pressed into the center of each to create ‘pupils.’
    7. Add shredded mozzarella cheese or small cheese slices inside each meatball to resemble irises, and lightly press them into the meatball to stay in place.
    8. Finish by placing tiny bits of mozzarella or olives in the center of each eyeball to mimic pupils, completing the spooky look.
    9. Serve the eyeball spaghetti hot, with extra sauce on the side for dipping if desired.

    Notes

    To enhance the spooky effect, use black olives or small cheese slices for pupils. Be careful when handling hot sauce and meatballs. This dish is fun to assemble as a family activity during Halloween.
    This Halloween eyeball pasta isn’t just about the looks, though—its taste delivers comfort with a fun, festive twist. It’s quick enough for a weeknight but memorable enough for a special spooky dinner. Watching the kids giggle at each creepy, tasty meatball eye is part of the magic.

    As the season deepens, recipes like this remind us of the joy in simple, playful food—perfect for crisp fall nights when the air smells like pumpkin and spice. It’s a dish that celebrates seasonal cheer while giving everyone a good laugh—and maybe a little spook. Just the way Halloween should be.

  • Slow-Cooker Turkey Chili with a Cinnamon Twist

    Slow-Cooker Turkey Chili with a Cinnamon Twist

    The twist? A hint of cinnamon and a splash of apple cider dance with the smoky chili spices, making every spoonful an emotional swirl of warmth and nostalgia. It’s a dish that marries classic chili heart with a subtle, surprise spice that keeps everyone guessing. Perfect for those busy days when comfort food comes together effortlessly but tastes like an adventure.

    Spiced Apple Cider Chili

    This chili combines tender beans and ground meat simmered with smoky chili spices, enhanced by a splash of apple cider and a hint of cinnamon. The dish develops a rich, hearty texture with a savory, slightly sweet and smoky flavor profile. Once cooked, it has a thick, comforting consistency with a vibrant appearance from the spices and ingredients.
    Prep Time 15 minutes
    Cook Time 40 minutes
    Total Time 55 minutes
    Servings: 4
    Course: Main Course
    Cuisine: American
    Calories: 350

    Ingredients
      

    • 1 lb ground beef or turkey or use plant-based alternative
    • 1 can (15 oz) kidney beans rinsed and drained
    • 1 can (14.5 oz) diced tomatoes
    • 1 cup apple cider preferably unsweetened
    • 1 tablespoon chili powder
    • 1 teaspoon smoked paprika
    • 1/2 teaspoon ground cinnamon a subtle hint of warmth
    • 1 medium onion finely chopped
    • 2 cloves garlic minced
    • 1 tablespoon oil for sautéing
    • to taste Salt and pepper for seasoning

    Equipment

    • Large pot or Dutch oven
    • Wooden spoon or spatula
    • Knife
    • Cutting board

    Method
     

    1. Heat the oil in a large pot over medium heat. Add the chopped onion and sauté until translucent and fragrant, about 5 minutes.
    2. Add the minced garlic and cook for another 30 seconds, until aromatic.
    3. Stir in the ground meat, breaking it apart with the spoon, and cook until browned and cooked through, about 5-7 minutes.
    4. Add the chili powder, smoked paprika, cinnamon, salt, and pepper to the meat mixture, stirring well to coat evenly and release their aromas.
    5. Pour in the apple cider and diced tomatoes, stirring to combine all ingredients thoroughly.
    6. Bring the mixture to a boil, then reduce the heat to low and let it simmer uncovered for about 25 minutes, stirring occasionally, until the chili thickens slightly and develops rich flavors.
    7. Add the rinsed kidney beans to the pot and stir well. Continue simmering for another 10 minutes to heat through and meld flavors.
    8. Taste the chili and adjust seasoning with salt and pepper as needed.
    9. Once the chili is thickened and flavors have melded, turn off the heat and serve hot, garnished if desired with fresh herbs or a dollop of sour cream.

    Notes

    For a milder heat, reduce the chili powder or omit the cayenne. This chili tastes great the next day after flavors deepen overnight.
    Best of all, it’s adaptable—add beans, switch up the vegetables, or adjust the heat level to suit your mood. As the flavors meld over a few hours, it becomes a dish that nourishes both body and soul, and leaves everyone asking for seconds.

  • Spooky Crunch: Halloween Bat Wings (Soy Sauce Chicken Wings)

    Spooky Crunch: Halloween Bat Wings (Soy Sauce Chicken Wings)

    Halloween is the perfect time to embrace the whimsy and spooky charm of the season. These Bat Wings, coated in a savory soy sauce glaze, turn ordinary chicken wings into tiny creatures from the night sky. The crispy skin combined with the umami-rich marinade creates a playful yet satisfying treat.

    What makes this recipe stand out is the unexpected aesthetic—miniature winged creatures that look just like black bats. They’re a delightful surprise for kids and adults alike, adding a touch of fun to any Halloween feast. Plus, the simple ingredients make it an easy yet impressive dish to serve on a busy holiday night.

    Halloween Bat Wing Chicken Wings

    These baked chicken wings are coated in a savory soy sauce glaze and shaped to resemble tiny black bats, creating a playful and spooky appetizer for Halloween. The crispy skin and flavorful marinade give the wings a satisfying texture with a rich umami taste, making them both fun and delicious to serve.
    Prep Time 15 minutes
    Cook Time 25 minutes
    Total Time 40 minutes
    Servings: 4
    Course: Main Course
    Cuisine: American
    Calories: 320

    Ingredients
      

    • 2 pounds chicken wings split into drumettes and flats
    • 1/4 cup soy sauce for marinade
    • 2 tablespoons honey adds slight sweetness to balance the soy
    • 1 teaspoon garlic powder
    • 1/2 teaspoon ground black pepper
    • Optional black food coloring or black tape for shaping wings into bats

    Equipment

    • Baking sheet
    • Mixing bowls

    Method
     

    1. Preheat your oven to 400°F (200°C). Line a baking sheet with parchment paper for easy cleanup.
    2. In a large mixing bowl, whisk together soy sauce, honey, garlic powder, and black pepper until well combined.
    3. Add the chicken wings to the marinade, tossing to coat each piece evenly. Cover and refrigerate for at least 20 minutes to infuse flavor.
    4. Arrange the marinated wings on the prepared baking sheet in a single layer, skin side up. Bake in the preheated oven for about 25 minutes, until the skin is crispy and golden.
    5. Once cooked, remove the wings from the oven and let them cool slightly. Use kitchen scissors or a small knife to cut each wing into two or three sections to resemble bats with outstretched wings.
    6. If you want to enhance the bat shape, use black food coloring or black tape to create wing outlines. Carefully attach or draw wings onto the wing sections to mimic tiny bats.
    7. Arrange the shaped wings on a serving platter, with some positioned to look like bats flying or hanging upside down for a spooky effect.
    8. Serve immediately for crispy, flavorful Halloween bat wings that are sure to impress your guests!

    Notes

    Using black food coloring or tape helps create the bat wing silhouette; however, the wings are tasty even without decoration.

    As the crispness of the wings gives way to a burst of salty, sweet, and savory flavors, these Bat Wings capture the spirit of Halloween perfectly. Their fun appearance makes them a conversation starter, but their unbeatable taste keeps everyone coming back for more.

    Whether you’re hosting a costume party or just looking to add some spooky flair to your dinner table, this recipe offers a playful twist on traditional chicken wings. Remember, sometimes the smallest details—like wings that resemble bats—can turn an ordinary meal into a memorable celebration of the season.

  • Hauntingly Delicious: Bloody Spaghetti and Sausage Fingers for Halloween

    Hauntingly Delicious: Bloody Spaghetti and Sausage Fingers for Halloween

    Halloween is the one time of year when chaos in the kitchen means fun, not mess. This recipe transforms a simple spaghetti dish into a gory masterpiece that feels like it belongs in a movie scene. The sausage fingers, with their eerie nail beds and blood-red sauce, are both a terrifying and tasty addition.

    Discover how this spooky yet savory meal can turn your table into a haunted house of flavors. Perfect for kids’ parties or a ghostly dinner with friends craving a little culinary mischief.

    This Bloody Spaghetti with Sausage Fingers isn’t just a meal, it’s a storytelling experience on a plate. The visual shock blends seamlessly with the rich, comforting flavors, making it a standout in any Halloween feast.

    As the night winds down, the aroma of garlic, sizzling sausages, and spicy tomato sauce will linger, creating memories as textured as the spaghetti itself. It’s a dish that’s sure to spark conversations and maybe even a few screams of delight.

  • Spooky Slice: The Halloween Mummy Pizza

    Spooky Slice: The Halloween Mummy Pizza

    Halloween brings out the playful chef in all of us. But this year, I wanted to create something that’s both whimsical and a little chaos in the kitchen. Enter the Mummy Pizza, a gooey, cheesy marvel that looks straight out of a haunted house.

    The aroma of melting cheese mixing with crispy crust and smoky pepperoni makes this recipe irresistible. Plus, the messy, tangled bandages of melted mozzarella are oddly satisfying to assemble. It turns a simple pizza into a spooky, fun masterpiece that kids and adults alike will adore.

    Mummy Pizza

    Mummy Pizza is a playful, cheesy dish featuring a crispy crust topped with melting cheese and smoky pepperoni. It is decorated with melted mozzarella strips resembling mummy bandages, creating a spooky and fun appearance. The final texture combines a crunchy base with gooey, cheesy toppings and a tangled, ghostly design.
    Prep Time 15 minutes
    Cook Time 15 minutes
    Total Time 30 minutes
    Servings: 4
    Course: Main Course
    Cuisine: American
    Calories: 350

    Ingredients
      

    • 1 package pizza dough store-bought or homemade
    • 1 cup shredded mozzarella cheese
    • 1/2 cup pepperoni slices
    • 1 tablespoon olive oil
    • to taste salt

    Equipment

    • Baking sheet
    • Rolling pin
    • Oven
    • Cooking knife
    • Parchment paper

    Method
     

    1. Preheat the oven to 425°F (220°C). Place a sheet of parchment paper on a baking sheet and roll out the pizza dough into a 12-inch circle, shaping it evenly.
    2. Brush the surface of the dough lightly with olive oil to help it crisp up and prevent sogginess.
    3. Spread shredded mozzarella cheese evenly over the dough, leaving a small border around the edges for the crust.
    4. Arrange pepperoni slices over the cheese, concentrating in the center, but leaving space around the edges for the crust and to mimic the mummy’s wrapping effect.
    5. Bake in the preheated oven until the crust is golden and crispy, and the cheese is bubbling—about 12 to 15 minutes.
    6. Remove the pizza from the oven and let it cool for a minute so the cheese sets slightly.
    7. Using a sharp knife, carefully cut thin strips of mozzarella from the remaining cheese or extra cheese block, creating tangled bandages to resemble mummy wrappings.
    8. Gently place the mozzarella strips in a tangled pattern over the top of the pizza, starting from the center and radiating outward to resemble mummy bandages.
    9. Add small pieces of pepperoni or other toppings as ‘mummy eyes’ if desired for extra spooky charm.
    10. Return the decorated pizza to the oven for an additional 2-3 minutes to melt the mozzarella strips slightly and set the design.
    11. Remove the pizza from the oven, let it cool briefly, then slice and serve your fun, spooky Mummy Pizza.

    Notes

    For extra creepy effect, use black olives or cherry tomatoes for eyes. Be careful when arranging mozzarella strips to avoid tearing the cheese.
    Creating this Mummy Pizza is a delightful way to embrace the spooky season. It’s more than just a dish—it’s a little bit of chaos, humor, and culinary creativity on a plate. Plus, it gives the perfect excuse to get a little messy in the kitchen.

    Enjoy the spectacle and flavors as you serve up this eerie, cheesy creation. It’s sure to spark giggles and maybe even a few silly screams around the table. Happy haunting and baking, everyone!