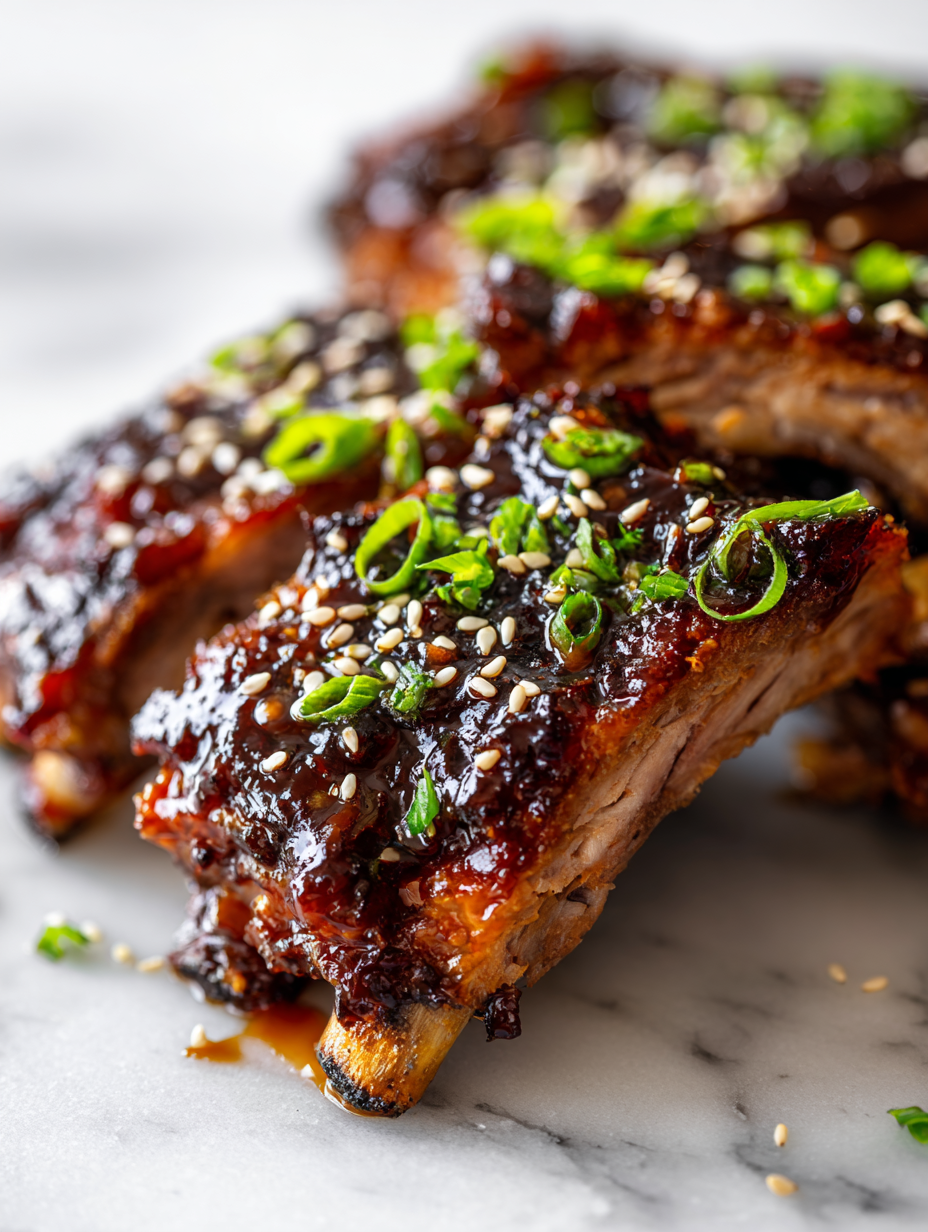
Category: Main Course

  • Black Bean Burgers with a Twist: A Cozy, Unexpected Spin

    Black Bean Burgers with a Twist: A Cozy, Unexpected Spin

    Black bean burgers often get a bad rap for being bland or mushy, but I’ve found that with a few tweaks, they can be deeply satisfying. The secret is in the texture and that smoky, roasted flavor that makes them crave-worthy. This recipe is about transforming humble beans into something you want to hold in your hand, bite after bite.

    Why this recipe keeps calling me back

    It’s the kind of comfort food that surprises with its depth. I love how versatile it is—toppings, buns, even salads. Plus, it’s a reminder that simple pantry staples can become something memorable with a little care and heat.

    Inside the ingredient lineup

    • Canned black beans: Rich, earthy base; I prefer organic for that extra oomph, but dried works too.
    • Onion and garlic: Bring a sweet, savory warmth; sauté until translucent and fragrant.
    • Breadcrumbs: Help hold the burger together; go for panko for extra crunch.
    • Egg: Acts as a binder; skip if vegan and replace with flaxseed meal.
    • Smoked paprika and cumin: Add a smoky, warm depth; they make the flavor sing.
    • Olive oil: For frying; use enough to get a nice crust but not greasy.
    • Toppings like lettuce, tomato, and spicy mustard: Finish with fresh, bright flavors that cut through the richness.

    Tools of the trade for perfect black bean burgers

    • Large mixing bowl: To combine all ingredients comfortably without spilling.
    • Fork or potato masher: To mash the beans to the right texture.
    • Non-stick skillet or cast iron pan: To get a crispy crust without sticking.
    • Spatula: To flip the burgers gently without breaking.
    • Measuring spoons and cups: To keep ingredients balanced.

    Step-by-step guide to smoky, satisfying black bean burgers

    Step 1: Mash the beans until chunky but cohesive. Use a fork or potato masher, leaving some texture.

    Step 2: Sauté onions, garlic, and spices until fragrant, about 5 minutes. The smell should be warm and inviting.

    Step 3: Mix beans, sautéed aromatics, breadcrumbs, and an egg in a big bowl. Stir until combined but not overworked.

    Step 4: Shape into patties, about 3-4 inches wide. Keep them firm but not dense.

    Step 5: Heat a splash of oil in a non-stick pan over medium heat (around 160°C/320°F).

    Step 6: Cook patties for 4-5 minutes each side, until golden and slightly crispy.

    Step 7: Rest on a paper towel for a minute. They firm up as they cool.

    Step 8: Serve on toasted buns, with your favorite toppings. Press slightly to ensure they hold.

    Step 9: Check for doneness: golden crust, firm but not hard, and a fragrant, smoky aroma.

    Cooking checkpoints and tips to keep in mind

    • Ensure the oil is heated enough before adding the patties—listen for a slight crackle.
    • The patties should be golden and slightly crispy on the outside, not burnt.
    • When pressing down, you should see a gentle sizzle and smell toasty beans—don’t rush the flip.

    Common pitfalls and how to fix them

    • Over-mashed beans turn into a paste.? Use a gentle hand when mashing beans; over-mashing makes them mushy.
    • Burgers falling apart during cooking.? Don’t skip resting time; it helps the burgers hold together.
    • Too high heat causing blackened outsides.? Adjust heat if they burn too fast.
    • Mixture is too sticky and won’t shape.? Add a touch more breadcrumbs if mixture feels too loose.

    Smoky Black Bean Burgers

    These black bean burgers are transformed from humble pantry staples into hearty, satisfying patties with a crispy exterior and a tender, flavorful interior. They are seasoned with smoked paprika and cumin, then pan-fried until golden, offering a deliciously smoky and textured vegetarian option. Topped with fresh toppings and served on toasted buns, they make for a comforting, versatile meal.
    Prep Time 15 minutes
    Cook Time 10 minutes
    Total Time 25 minutes
    Servings: 4
    Course: Main Course
    Cuisine: American
    Calories: 350

    Ingredients
      

    • 2 cups canned black beans drained and rinsed
    • 1/2 cup breadcrumbs panko preferred for crunch
    • 1 egg or flaxseed meal for vegan
    • 1/2 cup onion finely chopped
    • 2 cloves garlic minced
    • 1 teaspoon smoked paprika
    • 1/2 teaspoon cumin
    • 2 tablespoons olive oil for frying
    • to taste Toppings lettuce, tomato, spicy mustard, etc.

    Equipment

    • Large mixing bowl
    • Fork or potato masher
    • Non-stick skillet or cast iron pan
    • Spatula
    • Measuring spoons and cups

    Method
     

    1. Place the drained black beans in a large mixing bowl and mash them with a fork or potato masher until chunky but cohesive, leaving some texture for the burgers.
    2. Heat a splash of olive oil in a skillet over medium heat, then add the chopped onion and minced garlic. Sauté for about 5 minutes until fragrant, soft, and translucent, filling your kitchen with warm aromas.
    3. Add the sautéed onion and garlic, smoked paprika, and cumin to the mashed beans. Stir well to combine the smoky spices evenly through the mixture.
    4. Mix in the breadcrumbs and egg (or flaxseed meal), stirring gently until everything is just combined. The mixture should be sticky but manageable; add more breadcrumbs if it feels too loose.
    5. Divide the mixture into four equal portions and shape each into a patty about 3-4 inches wide, pressing firmly to help them hold together.
    6. Heat a tablespoon of olive oil in a non-stick skillet over medium heat until shimmering and beginning to ripple, indicating the right temperature for frying.
    7. Carefully place the patties in the hot skillet, cooking for about 4-5 minutes on each side until they develop a golden-brown, crispy crust and smell smoky and inviting.
    8. Transfer the cooked burgers to a paper towel-lined plate and let them rest for a minute to firm up and finish crisping.
    9. While the burgers rest, toast your buns until golden and ready for stacking.
    10. Assemble the burgers by placing the crispy patties on the toasted buns, then topping with fresh lettuce, tomato slices, spicy mustard, or your favorite toppings.
    11. Press down gently on the burgers to help them hold together, then serve immediately and enjoy the smoky, hearty flavors.

    Notes

    For vegan options, replace the egg with flaxseed meal and water. Adjust spice levels to your taste, and feel free to add cheese or other toppings for variety.
    These burgers are a reminder that a little improvisation can turn simple ingredients into something memorable. They’re perfect for lazy weekends or when you need comfort food that’s hearty but not heavy. Feel free to tweak the spices or toppings—this is your canvas. Enjoy the process and the cozy, smoky bites that follow.

  • Creepy Stuffed Shells: A Sinister Twist on Comfort Food

    Creepy Stuffed Shells: A Sinister Twist on Comfort Food

    Stuffed shells are a classic for a reason, but I like to twist mine into something a little darker, a little more daring. Think smoky cheese, a hint of heat, and an almost sinister visual appeal. This dish is perfect for when you want comfort but also a little surprise on your plate. It’s my go-to for cozy nights that need a touch of the unexpected.

    Why I keep coming back to this recipe.

    The gooey cheese, the smoky depth of the sauce, and that slightly eerie presentation make it a memorable dish. It’s perfect when I want comfort but also a little edge. Plus, I love how versatile it is—tweaking spices or adding extra herbs keeps it feeling fresh.

    Breaking down the creepy stuffed shells ingredients.

    • Ricotta cheese: Creamy and mild, it binds the filling together, adding richness.
    • Mozzarella cheese: Oozy and stretchy, gives that gooey texture and golden top.
    • Spinach: Wilted and chopped, adds a pop of green and earthy flavor.
    • Garlic: Pungent and aromatic, it’s the backbone of the savory flavor.
    • Red pepper flakes: A little heat to keep things interesting, just enough to spark.
    • Marinara sauce: Tangy and tomatoey, it’s the flavor base that keeps it saucy.
    • Fresh basil or oregano: Bright and fragrant, sprinkled on top for freshness.

    Tools of the trade for creepy stuffed shells.

    • Large pot: Boiling shells and cooking the pasta.
    • Mixing bowl: Combining cheese, herbs, and seasonings.
    • Spoon or piping bag: Filling the shells neatly.
    • Baking dish: Holding the assembled shells for baking.
    • Oven: Getting everything hot and bubbly.

    Step-by-step guide to assembling and baking your creepy stuffed shells.

    Step 1: Preheat your oven to 180°C (350°F).

    Step 2: Cook the shells in boiling salted water until just al dente, about 8 minutes. Drain and set aside.

    Step 3: Make the filling: combine ricotta, shredded mozzarella, chopped spinach, minced garlic, and a pinch of red pepper flakes.

    Step 4: Stuff each shell generously with the cheese mixture, then arrange in a greased baking dish.

    Step 5: Top with marinara sauce and sprinkle with more mozzarella.

    Step 6: Bake uncovered for about 25 minutes until bubbly and golden.

    Step 7: Let cool for 5 minutes before serving to avoid burning your tongue.

    Step 8: Finish with a sprinkle of chopped basil or oregano for that final punch.

    Cooking checkpoints and tips for creepy stuffed shells.

    • Shells should be just tender but not falling apart.
    • Cheese filling should be creamy and slightly stretchy.
    • Baking should produce a bubbly, golden top.

    Common pitfalls and how to fix them.

    • Overstuffed shells collapse or burst.? Use a smaller or larger shell if stuffing feels too tight or loose.
    • Dried-out cheese or sauce.? Add a splash more marinara if filling dries out during baking.
    • Shells turning too dark or cheese burning.? Bake at 180°C (350°F) for the right amount of time—avoid overcooking.
    • Uneven browning or dry edges.? Cover loosely with foil if cheese browns too quickly.

    Smoky Creepy Stuffed Shells

    This dish features large pasta shells filled with a creamy mixture of ricotta, mozzarella, spinach, and garlic, all baked in a smoky marinara sauce until bubbly and golden. The final presentation offers a gooey, slightly charred appearance that’s both comforting and daring, perfect for cozy nights with a twist.
    Prep Time 15 minutes
    Cook Time 30 minutes
    Total Time 45 minutes
    Servings: 4
    Course: Main Course
    Cuisine: Italian-American
    Calories: 450

    Ingredients
      

    • 12 large pasta shells uncooked
    • 1 cup ricotta cheese room temperature
    • 1 cup mozzarella cheese shredded
    • 2 cups fresh spinach chopped and wilted
    • 3 cloves garlic minced
    • 0.5 teaspoon red pepper flakes optional
    • 2 cups marinara sauce
    • 0.25 cup fresh basil or oregano chopped, for garnish

    Equipment

    • Large pot
    • Mixing bowl
    • Spoon or piping bag
    • Baking dish
    • Oven

    Method
     

    1. Bring a large pot of salted water to a boil, then add the shells and cook until just al dente, about 8 minutes. Drain and set aside.
    2. In a mixing bowl, combine ricotta, half of the shredded mozzarella, chopped spinach, minced garlic, and red pepper flakes. Mix until well blended and creamy.
    3. Spoon the cheese mixture into a piping bag or use a small spoon to fill each shell generously, pressing gently to pack the filling inside.
    4. Preheat your oven to 180°C (350°F). Lightly grease a baking dish with a bit of sauce or oil.
    5. Arrange the stuffed shells in the baking dish, open side up, and evenly pour marinara sauce over them. Sprinkle the remaining mozzarella on top.
    6. Bake uncovered for about 25 minutes, or until the sauce is bubbling and the cheese is golden and melted.
    7. Remove from the oven and let sit for 5 minutes. This helps the cheese set slightly and makes serving easier.
    8. Garnish with chopped fresh basil or oregano for a fragrant, fresh finish. Serve hot and enjoy the gooey, smoky, and slightly sinister presentation.

    Notes

    For extra smoky flavor, consider adding a dash of smoked paprika to the cheese filling. To make it spicier, increase the red pepper flakes or add a dash of hot sauce to the marinara.
    Once out of the oven, these shells should be oozy and browned at the edges, with a fragrant basil aroma wafting up. Though they look a little spooky, they’re deeply comforting, with cheesy warmth that melts in your mouth. Feel free to add a dash of chili flakes or a squeeze of lemon to brighten the richness. They’re best enjoyed hot, with a side of crusty bread or a crisp salad to balance the gooey richness.

  • Black Pasta with Squid Ink: A Bold Play in Darkness and Depth

    Black Pasta with Squid Ink: A Bold Play in Darkness and Depth

    Squid ink pasta feels like a secret handshake among cooks. It’s dramatic, yes, but also surprisingly simple to pull off at home. There’s something satisfying about turning a humble pantry staple into a dish that looks like it belongs in a seaside trattoria.

    Why This Recipe Calls Me Back

    The bold visual impact and the complex sea-salty flavor make every attempt feel like a small adventure. It reminds me that cooking can be both dramatic and simple, a dance of ingredients meeting heat. Plus, the inky darkness feels like a secret shared with anyone who dares to try it.

    Ingredients & Their Secrets

    • Squid ink: Provides that striking black color and a complex umami flavor; use fresh or good quality canned.
    • Black pasta: The canvas for the ink; opt for high-quality dried pasta for the best texture.
    • Garlic: Adds aromatic depth; minced finely so it cooks evenly.
    • Chili flakes: For a gentle heat; adjust to taste.
    • White wine or lemon: Brightens the dish; use fresh lemon for a zesty lift.
    • Parsley: Fresh herb for color and freshness; chop just before adding.
    • Olive oil: Brings richness and helps meld flavors; use a good extra virgin.

    Tools of the Trade for Black Pasta with Squid Ink

    • Large pot: Boiling pasta evenly and efficiently.
    • Wide pan or skillet: Creating a large surface area for tossing pasta with sauce.
    • Ladle or small cup: Reserving pasta water for adjusting sauce consistency.
    • Tongs or pasta fork: Handling and serving the pasta without breaking the noodles.

    Step-by-Step for the Deep, Dark Pasta

    Step 1: Bring a large pot of water to a boil, salt generously, about 10g per liter. This is your pasta’s only chance to soak up flavor.

    Step 2: Add the black pasta, stir well so it doesn’t stick, and cook for 8-10 minutes. Keep an eye on the color—deep, inky black is what you want.

    Step 3: While the pasta cooks, heat a splash of olive oil in a wide pan over medium heat, about 160°C (320°F).

    Step 4: Add minced garlic and a pinch of chili flakes, cook until fragrant, about 30 seconds. It should smell smoky and inviting.

    Step 5: Pour in a splash of white wine or a squeeze of lemon for brightness, let it reduce slightly.

    Step 6: Drain the pasta, reserving a cup of starchy cooking water.

    Step 7: Toss pasta into the pan with the garlic, add squid ink, and a little reserved water to loosen the sauce.

    Step 8: Stir everything together, cook for another minute until glossy and dark.

    Step 9: Finish with chopped parsley, a drizzle of good olive oil, and a sprinkle of sea salt.

    Cooking Checkpoints & Tips to Keep in Mind

    • The pasta should be al dente — firm to the bite, with a slight chew.
    • The sauce should be glossy and cling to the noodles, not watery or greasy.
    • The squid ink should have dispersed evenly, giving a rich, uniform black coating.

    Common Mistakes & How to Fix Them

    • Cooking pasta too long.? OVERCOOKED PASTA → Rinse immediately and toss with sauce to prevent mush.
    • Adding all ink at once.? SPLATTERED INK → Lower heat and add ink gradually to control color.
    • Sauce becoming too thick or sticky.? SAUCY GLOSSYNESS → Add a splash more pasta water to loosen if sauce is too thick.
    • Under-seasoning.? LACK OF FLAVOR → Season with more salt or lemon for brightness.

    Black Pasta with Squid Ink

    This striking dish features black pasta coated in a rich, umami-laden squid ink sauce. The process involves cooking the pasta to al dente, creating a fragrant garlic and chili oil base, and tossing everything together with fresh parsley and a splash of lemon or white wine for brightness. The final dish has a glossy, dark appearance with a tender yet slightly chewy texture that captures the essence of seaside dining.
    Prep Time 10 minutes
    Cook Time 15 minutes
    Total Time 25 minutes
    Servings: 4
    Course: Main Course
    Cuisine: Seafood
    Calories: 450

    Ingredients
      

    • 400 g black pasta (squid ink pasta) preferably dried for best texture
    • 2 cloves garlic finely minced
    • 1/2 teaspoon chili flakes adjust to taste
    • 1/4 cup white wine or lemon juice for brightness
    • 2 tablespoons olive oil extra virgin recommended
    • 1/4 cup chopped parsley fresh, added at the end
    • to taste sea salt for seasoning
    • 1 tsp squid ink use fresh or canned quality ink

    Equipment

    • Large pot
    • Wide pan or skillet
    • Ladle or small cup
    • Tongs or pasta fork

    Method
     

    1. Bring a large pot of salted water to a rolling boil. Add the black pasta and cook for 8-10 minutes, stirring occasionally, until it reaches al dente and turns a deep, inky black.
    2. While the pasta cooks, heat olive oil in a wide skillet over medium heat. Add the minced garlic and chili flakes, cooking until fragrant and slightly golden, about 30 seconds. The garlic should smell aromatic and the oil will shimmer.
    3. Pour in the white wine or a squeeze of lemon juice and let it simmer, reducing slightly and filling the kitchen with a bright, citrusy aroma.
    4. Drain the pasta, reserving about a cup of the starchy cooking water. This will help loosen the sauce if needed.
    5. Add the cooked pasta directly into the skillet with the garlic and chili oil. Stir to coat the noodles evenly with the fragrant oil.
    6. Stir in the squid ink, dispersing it gradually into the pasta, and add a splash of reserved pasta water if the sauce feels too thick or sticky. Mix thoroughly until the noodles are glossy and evenly coated with the inky black sauce.
    7. Cook everything together for another minute, allowing the flavors to meld and the sauce to cling beautifully to each strand of pasta.
    8. Remove from heat, then toss in chopped parsley and drizzle with a little more olive oil. Season with sea salt to taste, adjusting for flavor.
    9. Serve immediately on warm plates, showcasing the glossy, dark noodles topped with fresh parsley and a hint of olive oil. Enjoy the dramatic, seaside-inspired flavors!
    This dish isn’t just about the striking color; it’s about the umami punch from the ink and the briny sweetness of the seafood. It’s a reminder that sometimes, the boldest flavors come from the most unexpected ingredients. Enjoy customizing it with a squeeze of lemon or a dash of chili to match your mood.

  • Halloween Tacos: A Playful Spook on Classic Flavors

    Halloween Tacos: A Playful Spook on Classic Flavors

    Halloween isn’t just about costumes and candy anymore. It’s about making food fun and memorable, even for the busiest weeknights. These tacos turn simple ingredients into a playful, visual feast that kids and adults alike can enjoy. They’re a little messy, a little silly, and totally adaptable.

    Why I Keep Coming Back to These Halloween Tacos

    They’re imperfect, playful, and forgiving. Every batch feels like a tiny celebration, especially with kids. Plus, they’re quick to throw together, perfect for chaotic weeknights or last-minute spooky cravings.

    Ingredients Breakdown for Spooky Goodness

    • Tortillas: Soft, warm, and flexible, they form the base. Whole wheat or corn—your call.
    • Ground meat or veggie mix: Rich, savory, or veggie-packed for a hearty bite. Use leftover chili for instant flavor.
    • Cheese: Oozy, gooey, with a sharp tang. Cheddar or Monterey Jack melt well and look spooky.
    • Toppings (lettuce, sour cream, salsa): Fresh, zesty, and cool contrast. Brighten up with chopped herbs or hot sauce.
    • Shapes (cheese or tortilla cut-outs): Add visual fun with ghost or bat shapes—makes every bite a little more festive.
    • Seasonings: Taco seasoning brings smoky, spicy warmth—use your favorite blend.
    • Oil or butter: For warming tortillas and crisping shapes, just enough for a shimmer.

    Tools of the Trade for Spooky Tacos

    • Skillet: To warm tortillas and cook fillings evenly.
    • Cookie cutters: To cut fun shapes from cheese or tortillas.
    • Spoons and spatulas: For filling and shaping the tacos.
    • Serving platter: To display the finished spooky tacos.

    Step-by-Step Guide to Spooky Tacos

    Step 1: Start by prepping your fillings: cook ground meat or veggie mix with taco seasoning until fragrant, about 8 minutes.

    Step 2: Warm your tortillas in a dry skillet over medium heat until soft and pliable, just 30 seconds per side.

    Step 3: Assemble the tacos: spoon the filling into each tortilla, then add your favorite toppings like shredded cheese, lettuce, and sour cream.

    Step 4: For the finishing touch, cut out small shapes (ghosts, bats) from cheese or tortillas, and place on top for a spooky effect.

    Step 5: Serve immediately, letting everyone customize their own with toppings and shapes.

    Cooking Checkpoints & Tips for Perfect Halloween Tacos

    • Ensure tortillas are warm enough to fold without cracking.
    • Check the filling’s internal temperature if using meat—aim for 75°C (165°F).
    • Look for a crispy, golden cheese topping for added texture and flavor.

    Common Mistakes and How to Fix Them

    • Tortillas crack when folding.? Use a non-stick skillet to prevent tortillas from sticking and tearing.
    • Filling is too dry or crumbly.? Warm tortillas thoroughly before filling to keep them pliable.
    • Cheese or shapes fall off easily.? Add a splash of water or broth to moisten the filling if it dries out.
    • Overcooking the fillings.? Secure shapes with a touch of melted cheese or a toothpick.

    Halloween Spooky Tacos

    These playful tacos combine seasoned ground meat or veggie mixture with warm tortillas, topped with gooey cheese and fresh toppings. The addition of fun-shaped cheese or tortilla cut-outs adds a festive, spooky touch, making them both visually appealing and deliciously satisfying. Perfect for quick weeknight dinners with a fun Halloween twist.
    Prep Time 10 minutes
    Cook Time 15 minutes
    Total Time 25 minutes
    Servings: 4
    Course: Main Course
    Cuisine: American
    Calories: 350

    Ingredients
      

    • 8 pieces tortillas whole wheat or corn
    • 1 pound ground meat or veggie mix use leftover chili for extra flavor
    • 1 cup shredded cheese cheddar or Monterey Jack
    • 1 cup lettuce chopped
    • 0.5 cup sour cream for topping
    • 0.5 cup salsa optional
    • to taste taco seasoning your favorite blend
    • 1 tablespoon oil or butter for warming tortillas and crisping shapes
    • as needed cheese or tortilla cut-outs ghost or bat shapes

    Equipment

    • Skillet
    • Cookie cutters
    • Spoons and spatulas
    • Serving platter

    Method
     

    1. Cook the ground meat or veggie mixture in a skillet over medium heat, breaking it apart with a spoon, until fragrant and cooked through, about 8 minutes. Stir in taco seasoning and a splash of water if needed, then simmer until thickened.
    2. Warm the tortillas in a dry skillet over medium heat for about 30 seconds per side until soft and pliable, making them easier to fold without cracking.
    3. Spoon the seasoned filling evenly into each tortilla, then top with shredded cheese, chopped lettuce, a dollop of sour cream, and salsa if using. The cheese should melt slightly from the warmth of the filling.
    4. Use cookie cutters to cut fun shapes like ghosts or bats from cheese slices or tortillas. Carefully place these shapes on top of the assembled tacos for a spooky effect, pressing gently to adhere.
    5. Heat a small amount of oil or butter in a skillet, then crisp the cheese or tortilla shapes until golden and slightly crispy, about 1-2 minutes per side.
    6. Arrange the finished tacos on a serving platter, garnish with extra toppings if desired, and serve immediately for a fun, festive meal.

    Notes

    For extra visual fun, encourage kids to create their own shapes and customize toppings. Keep tortillas warm to prevent cracking and handle shapes gently while crisping.
    These Halloween tacos aren’t just fun, they’re a way to make a simple dinner feel like a celebration. Use whatever fillings you have—spicy sausage, roasted sweet potatoes, or even leftover chili. The shapes and toppings add that extra dash of mischief and charm, perfect for a casual spooky night. Get creative, and don’t stress—sometimes the mess makes the best memories.

  • Halloween Lasagna: A Spooky Twist on a Comfort Classic

    Halloween Lasagna: A Spooky Twist on a Comfort Classic

    Lasagna often feels like a straightforward comfort food, but turn it into a Halloween-themed dish and it takes on a playful, spooky edge. I love how the layers mimic a haunted house, with dark tomato sauce and cheesy ghosts peeking through. It’s imperfect, a little chaotic, but always satisfying to pull together at the last minute.

    Why I Keep Coming Back to This Dish

    It’s imperfect, chaotic, and unpretentious—just like Halloween itself. Every time I make it, I remember how fun it is to throw together something spooky and comforting at once. Plus, it’s a perfect way to sneak in extra veggies or plant-based ingredients without fuss.

    What’s in This Haunted Layered Dish?

    • Lasagna noodles: Al dente and sturdy, these form the backbone of the dish. Swap for zucchini slices if you want to cut carbs.
    • Ground beef or plant-based protein: Adds hearty richness and a smoky flavor. Use lentils for a vegetarian twist.
    • Tomato sauce: The dark, flavorful base, simmered with garlic and onions. For a richer taste, add a splash of red wine.
    • Cheese (mozzarella, ricotta, Parmesan): Creates gooey layers and a crispy top. Use vegan cheese if needed, but add a bit more for stretch.
    • Onions and garlic: Builds depth and aroma, essential for that savory kick.
    • Spooky toppings (optional): Black olives, chopped peppers, or edible eyes for decoration. Use what’s on hand to amp up the creep.

    Tools of the Trade for Spooky Lasagna

    • Large pot: Boil noodles efficiently.
    • Skillet: Sauté aromatics and meat.
    • 9×13 inch baking dish: Layer and bake your lasagna.
    • Aluminum foil: Cover during baking to prevent drying out.
    • Cheese grater: Shred cheese for topping.

    Step-by-Step Guide to Spooky Good Lasagna

    Step 1: Preheat your oven to 180°C (350°F).

    Step 2: Cook the lasagna noodles according to package instructions until al dente, about 8 minutes. Drain and set aside.

    Step 3: Prepare the filling: sauté chopped onions and garlic until fragrant, then add ground beef or plant-based substitute, cook until browned. Mix in tomato sauce, season with salt, pepper, and a pinch of smoked paprika.

    Step 4: Layer your lasagna: spread a thin layer of meat sauce at the bottom of a 9×13 inch baking dish, add noodles, then cheese mixture, repeating until ingredients are used, ending with a top layer of sauce and shredded cheese.

    Step 5: Cover with foil and bake for 40 minutes. Remove foil, bake another 10 minutes until bubbly and golden.

    Step 6: Let it rest for 10 minutes before slicing. Serve with a side of greens or crusty bread.

    Cooking Checkpoints and Tips

    • Noodles should be cooked just al dente, not mushy, to hold their shape.
    • Sauce should be thick but still pourable, not watery or gloopy.
    • Cheese topping should be golden and bubbly, not burnt or pale.
    • Lasagna needs to rest to set properly, avoid slicing immediately after baking.

    Common Mistakes and How to Fix Them

    • Over-salted sauce.? Use too much salt in the sauce? Rinse the excess with a splash of cold water.
    • Clumped boiled noodles.? Noodles sticking together? Rinse with cold water and toss with a bit of olive oil.
    • Cheese not bubbly.? Cheese isn’t melting properly? Cover with foil during baking to trap heat.
    • Soggy lasagna.? Lasagna is watery? Let it rest, or cook off excess moisture before layering.

    Spooky Halloween Lasagna

    This Halloween-themed lasagna features dark tomato sauce layered with hearty meat or plant-based protein, melted cheese, and spooky toppings like olives and peppers. The dish is assembled in layers, baked until bubbly and golden, with a playful haunted house appearance that’s perfect for celebrating the holiday. Its cheesy, saucy layers create a satisfying, comforting texture with a fun, spooky twist.
    Prep Time 20 minutes
    Cook Time 50 minutes
    Total Time 1 hour 10 minutes
    Servings: 8
    Course: Main Course
    Cuisine: Halloween
    Calories: 450

    Ingredients
      

    • 12 oz lasagna noodles preferably oven-ready or cook al dente
    • 1 lb ground beef or plant-based protein for vegetarian, use lentils or mushrooms
    • 24 oz tomato sauce preferably rich and flavorful
    • 2 cups mozzarella cheese shredded
    • 1 cup ricotta cheese for creamy layers
    • 0.5 cup Parmesan cheese grated
    • 1 large onion chopped
    • 3 cloves garlic minced
    • to taste salt and pepper for seasoning
    • black olives for spooky eyes and decorations sliced or whole
    • chopped peppers for spooky toppers red or green

    Equipment

    • Large pot
    • Skillet
    • 9×13 inch baking dish
    • Aluminum foil
    • Cheese grater

    Method
     

    1. Preheat your oven to 180°C (350°F). Prepare all your ingredients and gather your tools for an easy assembly.
    2. Cook the lasagna noodles in a large pot of boiling salted water until just al dente, about 8 minutes. Drain and set aside to cool slightly.
    3. In a skillet, sauté chopped onions and minced garlic until fragrant and translucent, about 3-4 minutes. Add the ground beef or plant-based protein, cooking until browned and cooked through, about 5-7 minutes. Stir in tomato sauce, season with salt, pepper, and a pinch of smoked paprika if desired. Let simmer for 5 minutes until thickened.
    4. Mix ricotta cheese with half of the grated Parmesan for a creamy layer. Set aside.
    5. Spread a thin layer of the meat sauce at the bottom of your baking dish. Layer with cooked noodles, then spread a layer of the ricotta mixture, followed by a sprinkle of shredded mozzarella. Repeat these layers until all ingredients are used, finishing with a top layer of sauce and cheese.
    6. Cover the assembled lasagna tightly with aluminum foil and bake in the preheated oven for 40 minutes. Remove the foil and bake for an additional 10 minutes until bubbling and golden on top.
    7. Let the lasagna rest for at least 10 minutes before slicing. During this time, prepare spooky toppings like sliced black olives for eyes, chopped peppers for decorations, or other fun creepy elements.
    8. Decorate the top with olives, peppers, or edible eyes to create spooky faces and haunted house effects. Slice and serve hot, accompanied by greens or crusty bread for a complete fall feast.

    Notes

    For extra creepiness, use black food coloring in the sauce or add more spooky toppings. Resting the lasagna helps it set for cleaner slices. Feel free to get creative with your decorations for a fun Halloween presentation.
    This Halloween lasagna isn’t just about the look; it’s about the layered comfort that sneaks up on you with every bite. A bit chaotic, a little messy, but totally worth it. Feel free to swap ingredients—vegan cheese, spicy sausage, or even a sprinkle of black sesame seeds for extra flair. It’s a dish that invites play, mess, and hearty satisfaction, perfect for turning a simple dinner into a festive occasion.

  • Pumpkin Risotto: A Cozy Fall Classic with a Twist

    Pumpkin Risotto: A Cozy Fall Classic with a Twist

    Pumpkin risotto is a dish that whispers autumn, with its warm, earthy aroma and comforting texture. I’ve always loved how it balances richness with a touch of sweetness from the pumpkin. It’s a recipe that feels indulgent but comes together in under an hour, making it a go-to for cozy dinners.
    What makes this version different is the addition of a splash of sage and a hint of crispy pancetta on top. It’s like a warm hug in a bowl, perfect for those chilly evenings when you want something hearty but elegant. Plus, it’s a good way to use up that leftover pumpkin purée from last week’s pie.

    Why I Keep Coming Back to Pumpkin Risotto

    Its comforting warmth feels grounding, especially in fall. The balance of sweet pumpkin and savory depth keeps surprising me. It’s simple, yet every batch can be tweaked—more herbs, a dash of spice, a splash of cream. It’s honest food that makes me slow down and savor each bite.

    Breaking Down the Key Ingredients

    • Pumpkin purée: Adds sweetness and vibrant color; opt for smooth, canned pumpkin for convenience.
    • Arborio rice: Starchy and creamy when cooked; don’t substitute with long-grain or jasmine.
    • Butter and Parmesan: Create richness and depth; use good-quality butter and freshly grated cheese.
    • Onion and garlic: Builds the savory base; skip garlic if you prefer a milder flavor.
    • Broth: Enriches the risotto and helps develop flavor; use homemade or good-quality stock.
    • Sage and pancetta: Add herbal aroma and crunch; fresh sage is best, but dried works too.
    • Olive oil or infused oil: A finishing drizzle for shimmer and extra flavor.

    Tools of the Trade for Risotto

    • Heavy-bottomed saucepan: Ensures even heat and prevents rice from sticking or burning.
    • Ladle: Helps add broth gradually and stir gently.
    • Wooden spoon: Stirs without breaking down the rice; good for scraping the pan.
    • Measuring cups and spoons: Accurate ingredient portions for perfect texture.

    Step-by-Step to the Perfect Pumpkin Risotto

    Step 1: Start by heating 1 liter of chicken or veggie broth in a pot on medium heat. Keep it warm; you’ll add it gradually.

    Step 2: In a large pan, melt 2 tablespoons of butter over medium heat. Add 1 finely chopped onion and cook until translucent, about 5 minutes.

    Step 3: Stir in 1 cup of Arborio rice. Cook for 2 minutes, until the rice is just starting to toast and smell nutty.

    Step 4: Add 1 cup of pumpkin purée, stirring well, and cook for another minute.

    Step 5: Begin adding the warm broth, ladle by ladle, stirring constantly. Wait until the liquid is mostly absorbed before adding more.

    Step 6: Continue this process for about 20 minutes, until the rice is creamy and tender but still has a slight bite.

    Key Checks for Risotto Success

    • The rice should be tender but still slightly firm to the bite, not mushy.
    • The risotto should be creamy and slightly loose, not stiff or dry.
    • A gentle crackle when stirring indicates proper starch release and heat.

    Common Pitfalls and How to Fix Them

    • Cooking on too high or too low heat, leading to uneven doneness.? Use high heat initially to toast rice, then lower to maintain simmer.
    • Not stirring enough, resulting in less creamy risotto.? Stir constantly when adding broth to release starch.
    • Over-salting or under-seasoning at the end.? Taste often to adjust seasoning during cooking.
    • Overcooking, turning risotto mushy.? Remove from heat before rice is fully tender.

    Pumpkin Risotto with Sage and Pancetta

    This pumpkin risotto showcases a creamy, velvety texture achieved through slow addition of warm broth to Arborio rice, infused with sweet pumpkin purée and savory aromatics. Topped with fragrant sage and crispy pancetta, it’s a comforting dish that balances richness with a touch of herbal brightness, finished with a drizzle of olive oil for shimmer.
    Prep Time 10 minutes
    Cook Time 30 minutes
    Total Time 40 minutes
    Servings: 4
    Course: Main Course
    Cuisine: Italian
    Calories: 420

    Ingredients
      

    • 1 liter chicken or vegetable broth keep warm
    • 2 tablespoons butter for sautéing and finishing
    • 1 finely chopped onion yellow or white onion
    • 1 cup Arborio rice starchy rice for creaminess
    • 1 cup pumpkin purée smooth, canned pumpkin
    • 1/4 cup Parmesan cheese freshly grated
    • 2 cloves garlic minced
    • 4 slices pancetta diced and cooked until crispy
    • 4 leaves sage fresh leaves, chopped
    • to taste salt and pepper for seasoning
    • 1 tablespoon olive oil for finishing

    Equipment

    • Heavy-bottomed saucepan
    • Ladle
    • Wooden spoon
    • Measuring cups and spoons

    Method
     

    1. Heat the broth in a saucepan over medium heat until simmering, then keep it warm on low.
    2. Melt 1 tablespoon of butter in a large heavy-bottomed pan over medium heat. Add the chopped onion and sauté until translucent, about 5 minutes, until it becomes soft and fragrant.
    3. Stir in the minced garlic and cook for another minute until fragrant, filling the kitchen with a warm aroma.
    4. Add the Arborio rice to the pan, stirring constantly for 2 minutes until the edges become translucent and the rice starts to toast lightly.
    5. Mix in the pumpkin purée, stirring well to coat every grain, and cook for another minute to warm through.
    6. Begin adding the warm broth, one ladleful at a time, stirring constantly. Wait until most of the liquid is absorbed before adding the next ladleful. Continue this process for about 20 minutes, until the rice is tender but still has a slight bite.
    7. While the risotto cooks, cook the diced pancetta in a separate pan until crispy, then set aside. Chop the fresh sage leaves finely.
    8. Once the risotto is creamy and the rice is al dente, remove it from heat. Stir in the remaining butter, grated Parmesan, chopped sage, and season with salt and pepper to taste.
    9. Transfer the risotto to serving bowls, top with crispy pancetta slices, and drizzle with a splash of olive oil for shine and added flavor.
    10. Serve immediately, enjoying the rich, velvety texture contrasted with crispy pancetta and fragrant herbs.

    Notes

    For extra depth, add a splash of cream or a pinch of nutmeg. Ensure to stir constantly when adding broth to achieve that signature creamy risotto texture.
    As the risotto reaches that velvety, slightly runny consistency, taste and adjust salt or seasoning. Let it rest off the heat for a few minutes to settle. Serve warm, perhaps with a sprinkle of toasted pumpkin seeds or a drizzle of sage-infused oil. This dish is a quiet celebration of fall’s bounty, perfect for cozy nights or last-minute gatherings. Play around with toppings or cheese, but the creamy pumpkin base is what makes it special.

  • Mummy Hot Dogs: A Nostalgic Snack with a Twist

    Mummy Hot Dogs: A Nostalgic Snack with a Twist

    Mummy hot dogs are a playful, slightly spooky twist on a classic snack. I’ve been making these since childhood, tweaking the wrapping and baking times to get that perfect crispy crunch. They’re a hit at Halloween parties or when you need a quick, comforting bite. The best part? Watching the little ones’ faces light up when they see the bandaged hot dogs.

    Why I Keep Making These in the Fall

    They bring back childhood chaos, the smell of baked dough, and the joy of simple, messy fun. Plus, they’re quick to whip up and always a crowd-pleaser—no fuss, just flavor and a little spooky charm.

    What Goes into Mummy Hot Dogs?

    • Hot dogs: Juicy, smoky, and satisfying—your base. Feel free to swap for veggie dogs if you want a vegetarian twist.
    • Pastry or wrapping material: Puff pastry is classic, flaky, and golden. Bacon strips add a salty crunch. Shredded cheese can add gooeyness.
    • Egg wash: Brushed on for a shiny, golden finish. Use a beaten egg with a splash of water for best results.
    • Optional decorations: Olives, small veggies, or cheese bits for eyes or adornments—make your mummy more expressive.
    • Seasonings: A pinch of garlic powder or paprika can add a subtle flavor boost.

    Tools of the Trade for Mummy Hot Dogs

    • Baking sheet: To hold the hot dogs and wrapping while baking.
    • Parchment paper: Prevents sticking and makes cleanup easier.
    • Sharp knife: To cut the wrapping into strips or shapes.
    • Pastry brush: To brush egg wash for extra golden color.

    Step-by-Step Guide to Mummy Hot Dogs

    Step 1: Preheat your oven to 200°C (390°F).

    Step 2: Line a baking sheet with parchment paper.

    Step 3: Prepare your ingredients and tools before starting.

    Step 4: Follow the step-by-step guide below to assemble and bake.

    How to Know When It’s Perfectly Mummified

    • The puff pastry or wrapping is golden brown and crispy.
    • The hot dog is heated through, with a slight jiggle when shaken.
    • Smell of baked dough and smoky, savory notes fills the air.

    Common Wrapping Woes and How to Fix Them

    • Wrapping tears or falls apart.? If wrapping tears, dampen the edges and press gently to seal.
    • Dry, tough wrapping.? If hot dogs are too dry, brush with a little beaten egg before baking.
    • Over-browning before hot dogs heat through.? If the pastry browns too quickly, cover loosely with foil.
    • Undercooked hot dogs.? If hot dogs aren’t cooked through, bake a few minutes longer.

    Mummy Hot Dogs

    Mummy hot dogs are a fun and slightly spooky snack featuring juicy hot dogs wrapped in flaky puff pastry or bacon, baked until golden and crispy. The dish combines savory flavors with playful visual appeal, perfect for Halloween parties or quick snacks. The final result is a crispy, golden, bandaged hot dog with a delightful crunch and a warm, satisfying core.
    Prep Time 15 minutes
    Cook Time 15 minutes
    Total Time 30 minutes
    Servings: 4
    Course: Main Course
    Cuisine: American
    Calories: 250

    Ingredients
      

    • 4 pieces hot dogs juicy, smoky, or veggie options
    • 1 package puff pastry or bacon strips enough to wrap each hot dog
    • 1 egg beaten egg for egg wash
    • 1 tbsp water to mix with egg
    • optional olives or cheese bits for eyes or decorations
    • to taste seasonings garlic powder or paprika for flavor

    Equipment

    • Baking sheet
    • Parchment paper
    • Sharp knife
    • Pastry brush

    Method
     

    1. Preheat your oven to 200°C (390°F) and line a baking sheet with parchment paper.
    2. Unroll the puff pastry and cut it into thin strips, about 1/4 inch wide, or prepare bacon strips if using bacon.
    3. Wrap each hot dog tightly with a strip of puff pastry or bacon, leaving a small space at the top for eyes if desired.
    4. Place the wrapped hot dogs on the prepared baking sheet, spacing them evenly.
    5. In a small bowl, whisk the beaten egg with water to create an egg wash.
    6. Brush the egg wash generously over each wrapped hot dog, giving them a shiny, golden appearance once baked.
    7. If adding eyes or decorations, place small pieces of olives or cheese onto the top of each hot dog before baking.
    8. Bake in the preheated oven for about 15 minutes, or until the pastry is golden brown and crispy.
    9. Remove from the oven and let cool slightly — the pastry should be crisp and flaky, the hot dog heated through.
    10. Serve your spooky mummy hot dogs hot, with additional decorations or seasonings if desired.

    Notes

    For extra fun, use small veggie slices or cheese to create expressive eyes or faces on your mummies. Adjust baking time if using larger or smaller hot dogs.
    Once out of the oven, these mummy hot dogs will have crispy, golden bandages and juicy centers. They’re perfect for a casual gathering or a fun weeknight treat. Feel free to get creative with the wrapping—bacon strips, puff pastry, or even shredded cheese can add extra flair. Enjoy the nostalgic crunch and savory aroma that fills your kitchen.

  • Mummy Hot Dogs: A Nostalgic Snack with a Twist

    Mummy Hot Dogs: A Nostalgic Snack with a Twist

    Mummy hot dogs are a playful, slightly spooky twist on a classic snack. I’ve been making these since childhood, tweaking the wrapping and baking times to get that perfect crispy crunch. They’re a hit at Halloween parties or when you need a quick, comforting bite. The best part? Watching the little ones’ faces light up when they see the bandaged hot dogs.

    Why I Keep Making These in the Fall

    They bring back childhood chaos, the smell of baked dough, and the joy of simple, messy fun. Plus, they’re quick to whip up and always a crowd-pleaser—no fuss, just flavor and a little spooky charm.

    What Goes into Mummy Hot Dogs?

    • Hot dogs: Juicy, smoky, and satisfying—your base. Feel free to swap for veggie dogs if you want a vegetarian twist.
    • Pastry or wrapping material: Puff pastry is classic, flaky, and golden. Bacon strips add a salty crunch. Shredded cheese can add gooeyness.
    • Egg wash: Brushed on for a shiny, golden finish. Use a beaten egg with a splash of water for best results.
    • Optional decorations: Olives, small veggies, or cheese bits for eyes or adornments—make your mummy more expressive.
    • Seasonings: A pinch of garlic powder or paprika can add a subtle flavor boost.

    Tools of the Trade for Mummy Hot Dogs

    • Baking sheet: To hold the hot dogs and wrapping while baking.
    • Parchment paper: Prevents sticking and makes cleanup easier.
    • Sharp knife: To cut the wrapping into strips or shapes.
    • Pastry brush: To brush egg wash for extra golden color.

    Step-by-Step Guide to Mummy Hot Dogs

    Step 1: Preheat your oven to 200°C (390°F).

    Step 2: Line a baking sheet with parchment paper.

    Step 3: Prepare your ingredients and tools before starting.

    Step 4: Follow the step-by-step guide below to assemble and bake.

    How to Know When It’s Perfectly Mummified

    • The puff pastry or wrapping is golden brown and crispy.
    • The hot dog is heated through, with a slight jiggle when shaken.
    • Smell of baked dough and smoky, savory notes fills the air.

    Common Wrapping Woes and How to Fix Them

    • Wrapping tears or falls apart.? If wrapping tears, dampen the edges and press gently to seal.
    • Dry, tough wrapping.? If hot dogs are too dry, brush with a little beaten egg before baking.
    • Over-browning before hot dogs heat through.? If the pastry browns too quickly, cover loosely with foil.
    • Undercooked hot dogs.? If hot dogs aren’t cooked through, bake a few minutes longer.

    Mummy Hot Dogs

    Mummy hot dogs are a fun, spooky snack made by wrapping juicy hot dogs in flaky puff pastry or bacon strips, then baking until golden and crispy. The hot dogs become warm and savory inside a crispy, bandaged exterior, often decorated with small edible eyes for a playful touch. Perfect for Halloween parties or quick, festive bites, they combine comforting flavors with a touch of spooky charm.
    Prep Time 15 minutes
    Cook Time 15 minutes
    Total Time 30 minutes
    Servings: 4
    Course: Main Course
    Cuisine: American
    Calories: 290

    Ingredients
      

    • 4 pieces hot dogs juicy and smoky
    • 1 sheet puff pastry thawed if frozen
    • 1 egg egg beaten, for egg wash
    • 1 tablespoon water to mix with egg
    • optional small olives or cheese bits for eyes or decorations
    • to taste seasonings garlic powder or paprika for extra flavor

    Equipment

    • Baking sheet
    • Parchment paper
    • Sharp knife
    • Pastry brush

    Method
     

    1. Preheat your oven to 200°C (390°F) and line a baking sheet with parchment paper.
    2. Roll out the thawed puff pastry on a lightly floured surface to smooth out creases and slightly enlarge it.
    3. Cut the pastry into strips about 1/2 inch wide, which will serve as the bandages wrapping the hot dogs.
    4. Wrap each hot dog with the pastry strips, starting at one end and spiraling around, leaving a small section of hot dog exposed at each end.
    5. Place the wrapped hot dogs on the prepared baking sheet, spacing them apart so they have room to crisp up.
    6. Mix the beaten egg with a splash of water to create an egg wash, then brush it generously over the pastry to give it a shiny, golden finish.
    7. Bake in the preheated oven for about 12-15 minutes, or until the pastry is golden brown and crispy.
    8. Remove the hot dogs from the oven and let them cool slightly until safe to handle.
    9. If desired, add small olive or cheese bits as eyes or decorations on the pastry bandages for a spooky effect.
    10. Serve immediately while crispy and warm, enjoying the playful, bandaged appearance and delicious savory flavor.

    Notes

    For extra spookiness, add small edible eyes or decorations. Adjust baking time for crisper or softer pastry as preferred.
    Once out of the oven, these mummy hot dogs will have crispy, golden bandages and juicy centers. They’re perfect for a casual gathering or a fun weeknight treat. Feel free to get creative with the wrapping—bacon strips, puff pastry, or even shredded cheese can add extra flair. Enjoy the nostalgic crunch and savory aroma that fills your kitchen.

  • Mummy Hot Dogs: A Nostalgic Snack with a Twist

    Mummy Hot Dogs: A Nostalgic Snack with a Twist

    Mummy hot dogs are a playful, slightly spooky twist on a classic snack. I’ve been making these since childhood, tweaking the wrapping and baking times to get that perfect crispy crunch. They’re a hit at Halloween parties or when you need a quick, comforting bite. The best part? Watching the little ones’ faces light up when they see the bandaged hot dogs.

    Why I Keep Making These in the Fall

    They bring back childhood chaos, the smell of baked dough, and the joy of simple, messy fun. Plus, they’re quick to whip up and always a crowd-pleaser—no fuss, just flavor and a little spooky charm.

    What Goes into Mummy Hot Dogs?

    • Hot dogs: Juicy, smoky, and satisfying—your base. Feel free to swap for veggie dogs if you want a vegetarian twist.
    • Pastry or wrapping material: Puff pastry is classic, flaky, and golden. Bacon strips add a salty crunch. Shredded cheese can add gooeyness.
    • Egg wash: Brushed on for a shiny, golden finish. Use a beaten egg with a splash of water for best results.
    • Optional decorations: Olives, small veggies, or cheese bits for eyes or adornments—make your mummy more expressive.
    • Seasonings: A pinch of garlic powder or paprika can add a subtle flavor boost.

    Tools of the Trade for Mummy Hot Dogs

    • Baking sheet: To hold the hot dogs and wrapping while baking.
    • Parchment paper: Prevents sticking and makes cleanup easier.
    • Sharp knife: To cut the wrapping into strips or shapes.
    • Pastry brush: To brush egg wash for extra golden color.

    Step-by-Step Guide to Mummy Hot Dogs

    Step 1: Preheat your oven to 200°C (390°F).

    Step 2: Line a baking sheet with parchment paper.

    Step 3: Prepare your ingredients and tools before starting.

    Step 4: Follow the step-by-step guide below to assemble and bake.

    How to Know When It’s Perfectly Mummified

    • The puff pastry or wrapping is golden brown and crispy.
    • The hot dog is heated through, with a slight jiggle when shaken.
    • Smell of baked dough and smoky, savory notes fills the air.

    Common Wrapping Woes and How to Fix Them

    • Wrapping tears or falls apart.? If wrapping tears, dampen the edges and press gently to seal.
    • Dry, tough wrapping.? If hot dogs are too dry, brush with a little beaten egg before baking.
    • Over-browning before hot dogs heat through.? If the pastry browns too quickly, cover loosely with foil.
    • Undercooked hot dogs.? If hot dogs aren’t cooked through, bake a few minutes longer.

    Mummy Hot Dogs

    Mummy hot dogs are a fun and spooky snack featuring juicy hot dogs wrapped in flaky puff pastry, baked until golden and crispy. The wrapping forms bandage-like strips that give a mummy effect, while the hot dogs inside stay heated and flavorful. Perfect for Halloween parties or quick comfort food with a playful twist.
    Prep Time 15 minutes
    Cook Time 15 minutes
    Total Time 30 minutes
    Servings: 4
    Course: Main Course
    Cuisine: American
    Calories: 250

    Ingredients
      

    • 4 pieces hot dogs juicy and smoky
    • 1 sheet puff pastry thawed if frozen
    • 1 egg egg beaten, for egg wash
    • 1 tablespoon water to mix with egg
    • optional black olives or small vegetables for eyes and decorations

    Equipment

    • Baking sheet
    • Parchment paper
    • Sharp knife
    • Pastry brush

    Method
     

    1. Preheat your oven to 200°C (390°F) and line a baking sheet with parchment paper.
    2. Unroll the puff pastry sheet on a clean surface and cut it into thin strips, about 1/4 inch wide — these will become the mummy bandages.
    3. Wrap each hot dog with strips of puff pastry, overlapping slightly and leaving a small gap at one end for the hot dog to show through.
    4. Place the wrapped hot dogs on the prepared baking sheet, spacing them evenly apart.
    5. Mix the beaten egg with a splash of water to create an egg wash, then brush this over the pastry for a shiny, golden finish.
    6. If using, add small pieces of olives or vegetables as eyes or decorations to give your mummies a spooky face.
    7. Bake in the preheated oven for about 15 minutes, or until the pastry is golden brown and crispy, and the hot dogs are heated through.
    8. Remove from the oven and let cool slightly before serving, revealing crispy bandages wrapped around warm, smoky hot dogs.

    Notes

    For extra spooky effect, use black olives or small vegetables for eyes. Keep an eye on baking time to prevent over-browning, and cover with foil if necessary.
    Once out of the oven, these mummy hot dogs will have crispy, golden bandages and juicy centers. They’re perfect for a casual gathering or a fun weeknight treat. Feel free to get creative with the wrapping—bacon strips, puff pastry, or even shredded cheese can add extra flair. Enjoy the nostalgic crunch and savory aroma that fills your kitchen.

  • Jack O’ Lantern Burgers: A Playful Autumn Feast with a Twist

    Jack O’ Lantern Burgers: A Playful Autumn Feast with a Twist

    I’ve always loved the whimsical charm of Halloween, but I wanted a way to bring that into the kitchen that felt more edible than just decorations. These Jack O’ Lantern Burgers are my playful nod to the season, with roasted squash faces that turn a simple burger into a conversation piece. Plus, they taste like cozy autumn—sweet, smoky, and just a little mischievous.

    Why This Keeps Coming Back to My Kitchen

    Because it’s a fun, savory way to celebrate fall, blending comfort and creativity. The playful squash faces are a hit every time, sparking smiles and conversations. Plus, it’s a reminder that cooking can be as imaginative as carving pumpkins.

    Inside the Ingredients of a Festive Bite

    • Butternut squash: Sweet and creamy, it turns into a cute pumpkin face, adding seasonal flair.
    • Ground beef: Juicy, flavorful, and perfect for forming into patties that hold well.
    • Cheese (cheddar or pepperjack): Melts beautifully and adds a gooey, spicy kick.
    • Spicy mayo or aioli: Bright, creamy, with a hint of heat—balances the savory burger.
    • Fresh greens: Crunchy and fresh, they lift the whole burger.
    • Seasonings (paprika, salt, pepper): Enhance the meat’s natural flavor and add smoky depth.
    • Olive oil: For brushing and roasting, gives a rich sheen and flavor.

    Tools of the Trade for Fun and Flavor

    • Sharp paring knife: Carve cute or spooky faces into the squash.
    • Grill or heavy skillet: Cook the burger patties and squash evenly.
    • Basting brush: Apply oil and seasonings smoothly.
    • Spatula: Flip patties and handle delicate squash slices.
    • Meat thermometer: Check the burger’s internal temperature for safety.

    Cooking up the Halloween spirit with a savory twist

    Step 1: Gather your ingredients and preheat your grill or skillet to medium-high, about 200°C (390°F).

    Step 2: Slice the butternut squash into thin rounds, and brush with a bit of olive oil, salt, and pepper.

    Step 3: Cook the squash until tender and slightly caramelized, around 8-10 minutes, flipping halfway.

    Step 4: Meanwhile, form your burger patties from ground beef, seasoning well with salt, pepper, and a pinch of smoked paprika.

    Step 5: Grill or pan-fry the patties until they reach 68°C (155°F) for medium, about 4 minutes each side.

    Step 6: While the patties cook, carve small jack-o’-lantern faces into the cooked squash slices for a fun garnish.

    Step 7: Assemble the burgers with cheese, greens, and your roasted squash ‘pumpkins’.

    Step 8: Serve hot, with a drizzle of spicy mayo or your favorite sauce.

    Watch These Details for Perfect Jack O’ Lantern Burgers

    • Squash slices should be tender and slightly caramelized, not burnt or soggy.
    • Burger patties should be juicy but hold together without falling apart.
    • Carved squash faces must be crisp enough not to crumble when served.
    • The cheese melts nicely over the hot patties without sliding off.

    Common Pitfalls and How to Avoid Them

    • Overcooked squash faces.? If squash is too mushy, cook for less time or at a lower heat.
    • Burger patties falling apart.? If burger cracks, mix the meat a bit more before shaping.
    • Cheese not melting properly.? If cheese slides off, add it in the last minute of cooking.
    • Dry, tough burgers.? If patties are dry, lower the heat and don’t overcook.

    Jack O’ Lantern Burgers

    These playful Jack O’ Lantern Burgers feature roasted butternut squash faces that turn into adorable, edible decorations. Juicy ground beef patties are topped with melted cheese, fresh greens, and the carved squash for a festive fall presentation with cozy, smoky flavors and a fun, conversation-starting appearance.
    Prep Time 15 minutes
    Cook Time 20 minutes
    Total Time 35 minutes
    Servings: 4
    Course: Main Course
    Cuisine: American
    Calories: 650

    Ingredients
      

    • 1 medium butternut squash peeled and sliced into thin rounds
    • 1 lb ground beef preferably 80/20 for juiciness
    • 4 slices cheddar or pepperjack cheese for melting over patties
    • 2 tbsp spicy mayo or aioli optional, for drizzling
    • 4 cups fresh greens such as arugula or lettuce
    • 1 tsp paprika smoked paprika for seasoning the beef
    • to taste salt and pepper
    • 1-2 tbsp olive oil olive oil for brushing squash and cooking

    Equipment

    • Sharp paring knife
    • Grill or heavy skillet
    • Basting brush
    • Spatula
    • Meat thermometer

    Method
     

    1. Preheat your grill or skillet to a medium-high heat, around 200°C (390°F), and gather all your ingredients.
    2. Slice the butternut squash into thin, even rounds, about 1/4 inch thick. Brush each slice lightly with olive oil and season with salt and pepper.
    3. Place the squash slices on the grill or skillet and cook for about 8-10 minutes, flipping halfway, until they are tender and caramelized with golden edges.
    4. Meanwhile, shape the ground beef into four equal patties, about 3/4 inch thick. Season generously with salt, pepper, and smoked paprika to enhance flavor.
    5. Grill or pan-fry the patties for approximately 4 minutes per side, using a meat thermometer to ensure they reach an internal temperature of 68°C (155°F) for medium doneness.
    6. Once cooked, place a slice of cheese on each patty during the last minute of cooking to allow it to melt gently.
    7. Using the sharp paring knife, carve small Jack O’ Lantern faces into the cooked squash slices for a festive, spooky touch.
    8. Assemble each burger by placing a greens bed on the bottom bun, followed by the juicy beef patty with melted cheese, and topped with a roasted squash face for a fun, decorative finish.
    9. Drizzle with a bit of spicy mayo or aioli for an extra kick and creamy contrast.
    10. Serve the Jack O’ Lantern Burgers hot, with a side of your favorite fall-inspired sides, and enjoy the cozy, festive flavors.
    These burgers bring a playful, seasonal vibe to any fall table, blending cozy flavors with a dash of creativity. They’re fun to make with kids or to surprise guests at a spooky gathering. Feel free to swap out ingredients—think spicy peppers or a different cheese—to keep each batch feeling fresh and personal. Enjoy the process, and let your kitchen be a little more festive tonight.