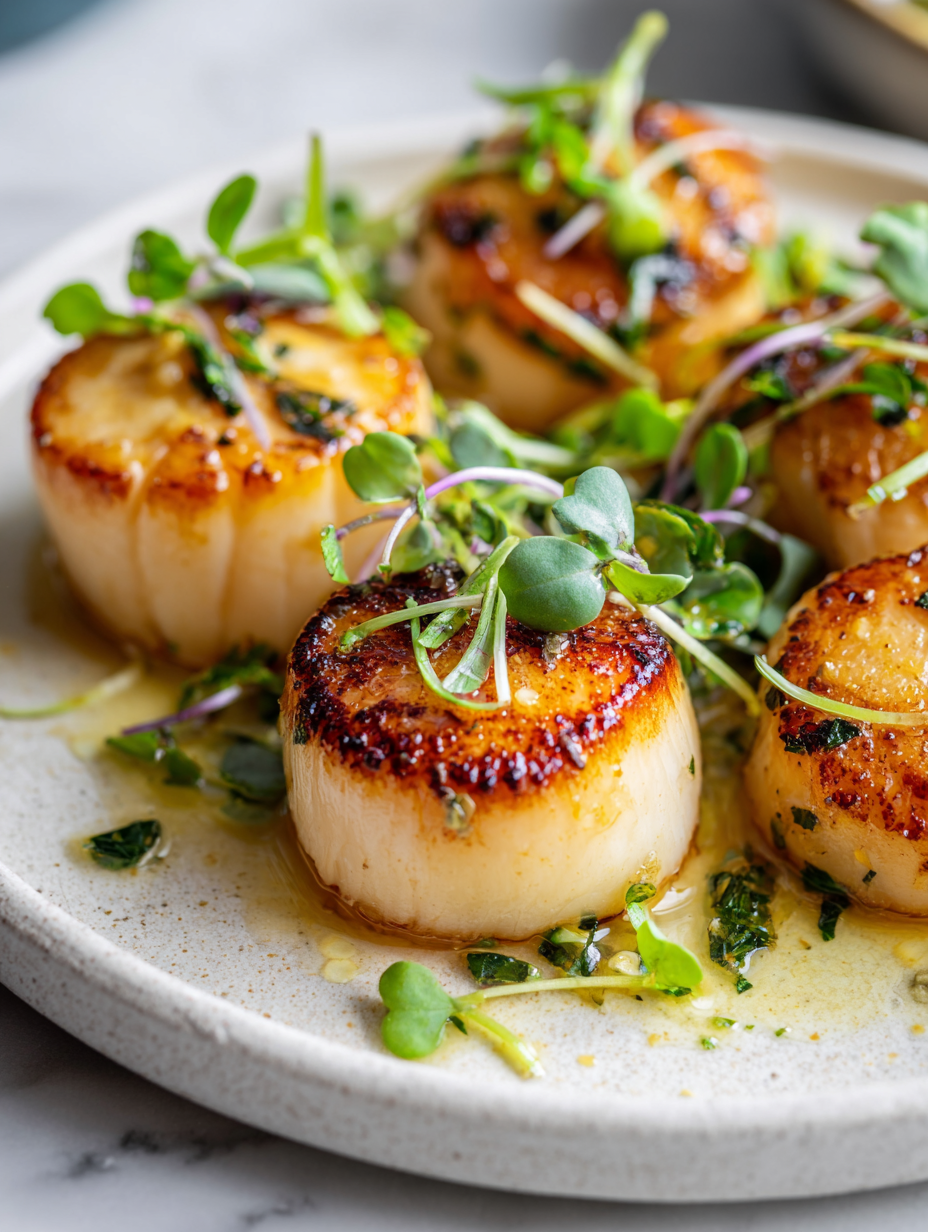
Category: Appetizers

  • Spine-Chilling Halloween Deviled Egg Eyeballs!

    Spine-Chilling Halloween Deviled Egg Eyeballs!

    Every October, I crave a touch of the bizarre in my holiday spread. These Halloween Deviled Egg Eyeballs turn a classic appetizer into a spooky spectacle. They look hauntingly real, with bloodshot veins and glassy eyes that startle even the bravest guests.

    The fun part? These creepy treats are surprisingly simple to assemble. The blend of creamy yolk filling and striking red accents makes them both disgustingly fun and delicious. They’re perfect for a party where everyone loves a dash of edible horror.

    Halloween Deviled Egg Eyeballs

    These deviled eggs are crafted to resemble sinister eyeballs, with creamy yolk filling shaped into small spheres. Red accents and bloodshot veins are added for a spooky, realistic look, resulting in a creepy yet delicious appetizer. The final presentation is both haunting and appetizing, perfect for Halloween parties.
    Prep Time 20 minutes
    Cook Time 10 minutes
    Total Time 30 minutes
    Servings: 12
    Course: Main Course
    Cuisine: Halloween
    Calories: 70

    Ingredients
      

    • 6 pieces large eggs hard-boiled and peeled
    • 1/4 cup mayo
    • 1 tsp yellow mustard
    • to taste salt and pepper
    • 1 small red food coloring or ketchup for bloodshot effect
    • 1 small black or dark brown edible marker or dark food coloring for veins

    Equipment

    • Large pot
    • Mixing bowl
    • Piping bag or plastic bag
    • Toothpick or fine tip squeeze bottle
    • Small spoon

    Method
     

    1. Cook the eggs in a large pot of boiling water until hard-boiled, about 10 minutes. Then, transfer them to cold water and peel carefully, setting aside to cool completely.
    2. Cut the cooled eggs in half lengthwise and carefully remove the yolks, placing them in a mixing bowl. Arrange the egg whites on a serving platter for filling.
    3. Mash the yolks with a fork until smooth, then stir in mayonnaise, mustard, salt, and pepper until the mixture is creamy and well combined.
    4. Fill a piping bag or a plastic sandwich bag with the yolk mixture, then pipe the filling into the cavities of the egg whites, shaping them into small rounded eyeballs.
    5. Use a small spoon or toothpick dipped in red food coloring or ketchup to add bloodshot veins radiating outward on each egg, creating a creepy, bloodshot eye effect.
    6. Carefully add a tiny dot of black or dark brown edible marker or food coloring to the center of each egg to resemble the dilated pupil or a glassy eye.
    7. Optionally, lightly tint the bloodshot veins with a small brush or toothpick dipped in red food coloring to enhance the creepy appearance.
    8. Chill the assembled eggs in the refrigerator for at least 15 minutes to set the appearance and flavors.
    9. Serve the Halloween deviled egg eyeballs chilled, making sure each is decorated with veins and a central eye pupil before serving.

    Notes

    Use a fine-tipped toothpick or edible marker for precise veins. For more realistic eyes, consider adding a small dab of food-safe gelatin or using edible gel for a glossy appearance.

    These eyeball deviled eggs are a little twisted, a little spooky, and just the right amount of gross. They turn any Halloween gathering into a memorable, giggle-filled event. Plus, their straightforward assembly leaves plenty of room for adding personal bloodshot details or creepy accessories.

    As the season deepens, I find myself craving these odd little bites more each year—part art project, part snack. They remind me of childhood thrills and the joy of creating something unexpected. Come October, they’re the perfect playful twist to the haunting season.

  • Spine-Chillingly Fun: Halloween Eyeball Caprese Bites

    Spine-Chillingly Fun: Halloween Eyeball Caprese Bites

    Imagine sinking your teeth into a hauntingly adorable appetizer that looks straight out of a spooky movie set. These Halloween Eyeball Caprese Bites are not just delicious—they’re a conversation starter at any party. Bright cherry tomatoes, fresh mozzarella, and a pop of balsamic glaze turn simple ingredients into a creepy, fun spectacle.

    What better way to celebrate the season than with a snack that mixes chaos and charm? The creepy eyeball effect is surprisingly easy to achieve, making it perfect for last-minute scares and smiles. Plus, the fresh flavors bring a cool, basil-infused twist to your Halloween table.

    Halloween Eyeball Caprese Bites

    These Eyeball Caprese Bites are bite-sized appetizers assembled with cherry tomatoes, fresh mozzarella, and basil, finished with a balsamic glaze to resemble creepy eyeballs. They are simple to make using no-cook assembly, resulting in a visually striking and fresh-tasting snack with a smooth, juicy, and creamy texture. The final presentation is both whimsical and spooky, perfect for Halloween parties.
    Prep Time 10 minutes
    Total Time 10 minutes
    Servings: 8
    Course: Main Course
    Cuisine: American
    Calories: 150

    Ingredients
      

    • 16 pieces cherry tomatoes preferably ripe and firm
    • 8 oz fresh mozzarella balls bite-sized or ciliegine
    • 16 small fresh basil leaves small whole leaves
    • 4 tbsp balsamic glaze for drizzling
    • 8 pieces pitted black olives sliced for eyeballs
    • to taste salt and pepper for seasoning

    Equipment

    • Serving platter
    • Toothpicks or small skewers

    Method
     

    1. Thread a cherry tomato onto a toothpick, followed by a small basil leaf and a mozzarella ball to assemble the eyeball shape.
    2. Place a sliced black olive on top of the mozzarella to create a dark, creepy eyeball pupil.
    3. Repeat these steps until all the bites are assembled on a platter for easy serving.
    4. Drizzle the balsamic glaze over the assembled eyeballs to mimic the bloodshot spots and create a spooky effect.
    5. Finish with a light sprinkle of salt and pepper if desired, then serve immediately for a fresh, juicy, and visually striking appetizer.
    As the evening winds down, these eyeball bites remind us that fun and flavor can go hand in hand. They’re a quick, charming addition to your spooky spread that guests will love to poke at and devour. Whether you’re hosting a haunted house party or just crafting a playful snack for the family, these bites add a dash of whimsy to the festivity.

    Keep your eyes peeled for other quick Halloween treats you can whip up with minimal fuss. After all, the best parties are about the little surprises—and these creepy, cute eyeballs might just steal the show.

  • Spooky Specter: The Halloween Spider Cheese Ball

    Spooky Specter: The Halloween Spider Cheese Ball

    Halloween is the one night when chaos and creativity collide in the kitchen. Instead of the usual candy or pumpkin-shaped treats, this year I decided to craft something really unique: a Halloween Spider Cheese Ball. Its creepy-crawly appearance is just the start; beneath the surface, it’s rich, creamy, and perfect for sharing.

    This cheese ball turns a simple appetizer into a conversation starter. It’s fun to make, and even more fun to watch guests’ eyes widen when they see it. Plus, it’s surprisingly easy — a few ingredients, a little artistry, and you’ve got a spooky centerpiece for your haunted feast.

    Halloween Spider Cheese Ball

    This Halloween-themed appetizer is a creamy cheese ball shaped like a spider, made by combining softened cream cheese and shredded cheese, then shaping and decorating it for a spooky effect. The final dish has a smooth, firm texture with crunchy decorations to resemble spider legs, creating a striking centerpiece for any Halloween party.
    Prep Time 20 minutes
    Total Time 20 minutes
    Servings: 8
    Course: Main Course
    Cuisine: Halloween
    Calories: 250

    Ingredients
      

    • 16 oz cream cheese, softened
    • 2 cups shredded cheddar cheese
    • 1 teaspoon garlic powder
    • 1/2 cup chopped black olives for eyes
    • 12 pieces uncooked spaghetti or pretzel sticks for spider legs
    • plastic wrap

    Equipment

    • Mixing bowl
    • Plastic wrap
    • Knife
    • Spoon

    Method
     

    1. In a mixing bowl, combine softened cream cheese, shredded cheddar, and garlic powder. Mix thoroughly with a spoon until smooth and well blended, creating a uniform cheese mixture.
    2. Scoop the cheese mixture onto a large piece of plastic wrap. Shape it into a rounded sphere, smoothing the surface with your hands.
    3. Tightly wrap the cheese sphere with the plastic wrap and refrigerate for at least 15 minutes to firm up.
    4. Remove the cheese ball from the fridge, then carefully unwrap it and place it on a serving plate. It should be firm yet soft enough to hold its shape.
    5. Decorate the top of the cheese ball with small chopped black olives to form eyes.
    6. Take the uncooked spaghetti or pretzel sticks and cut them in half if they are too long. These will serve as spider legs.
    7. Insert 8 spider legs evenly around the cheese ball, pressing them gently into the surface to secure.
    8. Arrange the completed Halloween Spider Cheese Ball on a platter, adjusting legs for a balanced, creepy look.
    9. Serve immediately or keep refrigerated until ready to enjoy. The cheese ball should have a smooth exterior with playful spider legs radiating outward, perfect for festive Halloween snacking.
    As the night progresses, this cheese ball will be a magnet for hungry fingers and giggles. Its irresistible aroma and gooey texture make it hard to resist grabbing just one more bite. It’s a playful addition that captures the spirit of Halloween—delightfully spooky and delectably satisfying.

    Enjoy the chaos and creativity that comes with this recipe. It’s a perfect way to add a dash of whimsy to your fall gathering. Amidst the pumpkins and costumes, this cheese ball brings both nostalgia and a splash of spooky fun.

  • Spooky Bat-Shaped Guacamole & Chips: A Halloween Getaway

    Spooky Bat-Shaped Guacamole & Chips: A Halloween Getaway

    Halloween is the perfect excuse to unleash your creative side in the kitchen. This year, I decided to craft a playful yet slightly eerie appetizer: bat-shaped tortilla chips paired with luscious, green guacamole. It’s surprising how a simple idea, like shaping chips as bats, can turn an ordinary snack into the star of your spooky gathering.

    As I started cutting out bat shapes from tortillas, the smell of warm corn tortillas filled my kitchen. The vibrant green of the guacamole, speckled with chili and cilantro, contrasts beautifully with the dark silhouettes of the chips. It’s a fun project that gets everyone involved, and the best part — it tastes as good as it looks.

    Bat-Shaped Tortilla Chips with Green Guacamole

    This dish features tortillas cut into bat shapes and baked until crispy, served alongside a creamy, vibrant green guacamole. The chips’ dark silhouettes contrast with the bright, chunky avocado mixture, creating a fun and visually appealing appetizer.
    Prep Time 15 minutes
    Cook Time 10 minutes
    Total Time 25 minutes
    Servings: 4
    Course: Main Course
    Cuisine: American
    Calories: 180

    Ingredients
      

    • 8 large corn tortillas fresh or slightly stale
    • 2 ripe avocados mashed for guacamole
    • 1 tablespoon lime juice freshly squeezed
    • 2 cloves garlic minced
    • 1 small red chili finely chopped, optional for spice
    • 2 tablespoons cilantro chopped
    • to taste salt for seasoning
    • 1 pinch black pepper optional

    Equipment

    • Baking sheet
    • Sharp knife
    • Small cookie cutter or template for bat shape
    • Mixing bowl
    • Fork or potato masher

    Method
     

    1. Preheat your oven to 375°F (190°C). Line a baking sheet with parchment paper for easy cleanup.
    2. Using a sharp knife and a bat-shaped cookie cutter or template, carefully cut out bat shapes from the tortillas. Collect the scraps and reroll if desired for additional chips.
    3. Arrange the bat-shaped tortilla pieces on the prepared baking sheet in a single layer. Bake for about 8-10 minutes until golden and crispy, keeping an eye to prevent burning.
    4. While the chips bake, prepare the guacamole: in a mixing bowl, mash the peeled avocados with a fork or potato masher until mostly smooth but still chunky.
    5. Add lime juice, minced garlic, chopped chili, cilantro, salt, and pepper to the mashed avocados. Mix well until combined and vibrant green in color.
    6. Remove the baked tortilla chips from the oven and let them cool slightly to crisp up further.
    7. Arrange the bat-shaped chips on a serving platter around a bowl of the freshly made green guacamole, or serve the guacamole in a bowl on the side.

    Notes

    For extra fun, use black food coloring in the guacamole or decorate the chips with edible eyes for a spooky effect.
    Creating this Halloween-themed snack adds a dash of chaos and charm to the holiday. Kids and adults alike will appreciate the whimsical touch and the tasty refreshment at your spooky bash.

    Plus, it’s a flexible recipe — tweak the spices, or try different shapes for different occasions. This isn’t just about carving pumpkins; it’s about making every moment delicious and memorable, one creepy chip at a time.

  • Spooky-Sweet Halloween Ghost Veggie Platter

    Spooky-Sweet Halloween Ghost Veggie Platter

    Halloween parties are the perfect excuse to embrace the whimsical chaos of the season. This spooky ghost veggie platter transforms ordinary vegetables into adorable, ghostly figures that kids and adults will adore. Plus, it’s an easy way to sneak health into your ghoul gang’s snack table while looking festive.

    Crafting this platter feels like a mini magic trick — suddenly, veggies become friendly spirits. The best part? It works with whatever seasonal produce you have on hand, making it an adaptable and fun project. When the clock’s ticking down to the party, this is your no-stress, crowd-pleaser centerpiece.

    Spooky Ghost Veggie Platter

    This ghost veggie platter features an assortment of fresh vegetables transformed into adorable ghost shapes using cheese and olives. The vegetables serve as the canvas, while the cheese and olives create the ghostly faces, resulting in a fun, eye-catching display with a crunchy and creamy texture. It’s an easy, healthy snack centerpiece perfect for Halloween gatherings.
    Prep Time 20 minutes
    Total Time 20 minutes
    Servings: 8
    Course: Main Course
    Cuisine: Party Snacks
    Calories: 50

    Ingredients
      

    • 1 bunch celery stalks washed and trimmed
    • 2 cups broccoli florets fresh, washed
    • 2 cups carrot sticks peeled and cut into lengths
    • 1 cup sliced cheese like cheddar or mozzarella, cut into small rectangles
    • 20 pitted black olives black olives for ghost eyes and mouths

    Equipment

    • Knife
    • Cutting board
    • Serving platter

    Method
     

    1. Arrange the celery stalks, broccoli florets, and carrot sticks on a serving platter to resemble forest-like backgrounds for your ghosts, creating different heights and shapes.
    2. Cut the cheese into small rectangular shapes, about the size of a ghost’s body, and place them on top of the vegetables to serve as the ghost figures.
    3. Use black olives to create ghost eyes by slicing them in half and placing each half on the cheese pieces, or use whole olives for larger eyes.
    4. Create ghost mouths by slicing some olives into small rings or chunks and positioning them beneath the eyes for a spooky expression.
    5. Repeat the process across the platter, arranging cheese, olives, and vegetables to resemble a whimsical ghost scene.
    6. Optional: Decorate the platter further with additional veggies or edible embellishments for extra spooky charm.

    Notes

    Feel free to use whatever seasonal vegetables you prefer. This dish is highly customizable for different colors and shapes.

    As the party winds down, the ghostly veggies leave everyone smiling, and maybe even a few asking for the recipe. It’s a charming way to celebrate the season without fuss or frills, just fresh ingredients and a sprinkle of imagination. Plus, it’s the kind of dish that sparks a few giggles and plenty of compliments.

    This platter isn’t just for Halloween — it’s a reminder that food can be playful and beautiful at the same time. Keep it simple, keep it fun, and let your creativity run wild with the ingredients. Happy haunting — and snacking!

  • Spooky & Savory: Halloween Jack-o’-Lantern Stuffed Bell Peppers

    Spooky & Savory: Halloween Jack-o’-Lantern Stuffed Bell Peppers

    Every October, I find myself craving the playful chaos of Halloween in the kitchen. These stuffed bell peppers dressed as Jack-o’-Lanterns turn a simple veggie into edible art with carved pumpkin faces that gleam in candlelight. It’s a perfect blend of festive cheer and comfort food on a busy spooky night.

    Their sweet bell pepper aroma, mixed with smoky fillings and melty cheese, fills the house with a nostalgic scent of childhood costumes and candy buckets. Preparing these feels like crafting tiny lanterns, and each pepper becomes a cheerful face full of savory surprises. It’s a clever way to make dinner fun before the night’s spooky festivities begin.

    Halloween Stuffed Bell Peppers as Jack-o’-Lanterns

    This dish features bell peppers carved into Jack-o’-Lantern faces, stuffed with a savory mixture of cooked rice, seasoned ground meat, and cheese. The peppers are baked until tender and the filling is bubbling, resulting in colorful, playful, and flavorful Halloween-themed appetizers or main courses, with a combination of soft peppers and melt-in-your-mouth fillings.
    Prep Time 20 minutes
    Cook Time 30 minutes
    Total Time 50 minutes
    Servings: 4
    Course: Main Course
    Cuisine: American
    Calories: 250

    Ingredients
      

    • 4 large bell peppers preferably orange or yellow for classic Jack-o’-Lantern look
    • 1 cup cooked rice white or jasmine rice works well
    • 1/2 pound ground beef or turkey, for a leaner option
    • 1 cup shredded cheese cheddar, Monterey Jack, or a blend
    • 1 small onion finely chopped
    • 2 cloves garlic minced
    • 2 tablespoons olive oil for sautéing
    • to taste salt and pepper
    • 1 cup cooked pumpkin or carrot puree optional for added color and sweetness

    Equipment

    • Chef’s Knife
    • Baking dish
    • Spoon
    • Cutting board

    Method
     

    1. Preheat your oven to 375°F (190°C). Begin by carefully slicing off the tops of the bell peppers and removing the seeds and membranes, creating an opening for carving and filling.
    2. Use a small paring knife to carve classic Jack-o’-Lantern faces into each pepper. Make sure to cut out eyes, a nose, and a jagged mouth, ensuring the cuts are deep enough to be visible but not through the entire pepper wall.
    3. Heat olive oil in a skillet over medium heat. Add chopped onion and minced garlic, sautéing until fragrant and translucent, about 2-3 minutes. This fills your kitchen with a delicious aroma as the onions soften.
    4. Add ground beef to the skillet, breaking it apart with the spoon. Cook until browned and cooked through, about 5-7 minutes. Season with salt and pepper to taste.
    5. Stir in cooked rice, shredded cheese, and optional pumpkin or carrot puree for added color and sweetness. Mix thoroughly so that all ingredients are combined evenly.
    6. Spoon the filling mixture into each carved pepper, pressing gently to fill fully and level the surface. Place the stuffed peppers upright in a baking dish.
    7. Bake in the preheated oven for about 25-30 minutes, or until the peppers are tender and the filling is hot and bubbly. You’ll hear gentle bubbling and see the cheese lightly melted and browned.
    8. Remove the peppers from the oven and let cool slightly. Use a fork or spoon to add finishing touches, like a small stem or additional face details, if desired.
    9. Serve these colorful Halloween peppers warm, with a side of your favorite autumny sides or a simple salad for a complete meal.

    Notes

    For more fun, use different colored peppers or add small accessory face pieces for extra personality.

    This recipe not only lights up the dinner table but also brings a playful touch to your Halloween gathering. The combination of colorful peppers and cheesy fillings makes it both a visual and flavorful treat. With just a few simple ingredients, you can create a showcase of spooky charm that’s easy to assemble and even easier to enjoy.

    As the season shifts into full spooky mode, these Jack-o’-Lantern stuffed peppers remind us that food can be both delightful and amusing. They’re perfect for parties or a festive family dinner that sparks giggles and compliments alike. After all, Halloween should be fun — and delicious.

  • Spooky Creativity with Halloween Mummy Hot Dogs!

    Spooky Creativity with Halloween Mummy Hot Dogs!

    As the season shifts into spook mode, I love exploring treats that blend fun and simplicity. This year, I dove into a project inspired by classic horror movies and old-school kids’ parties—transforming ordinary hot dogs into creepy mummies. The process is so satisfying, especially when wrapping the hot dogs like shrouds of wriggly bandages.

    Using just a few ingredients—hot dogs, crescent roll dough, and some tiny googly eyes—you get to channel your inner mad scientist while crafting creepy, delicious bites. The aroma of baked dough mixed with sizzling hot dogs is pure nostalgia, making this a perfect, no-fuss Halloween snack for all ages. Plus, messes are minimal, but the laughs are plenty.

    Creepy Mummy Hot Dogs

    Creepy mummy hot dogs are made by wrapping hot dogs in crescent roll dough to resemble bandaged mummies, then baking until golden. The dish features crispy, flaky dough with juicy hot dogs inside, finished off with googly eyes for a fun, spooky appearance. It results in bite-sized, savory treats with a crunchy exterior and tender interior.
    Prep Time 10 minutes
    Cook Time 15 minutes
    Total Time 25 minutes
    Servings: 6
    Course: Main Course
    Cuisine: American
    Calories: 250

    Ingredients
      

    • 1 pack crescent roll dough cut into strips
    • 6 hot dogs hot dogs
    • small googly eyes for decoration

    Equipment

    • Baking sheet
    • Parchment paper
    • Knife
    • Cutting board
    • Small bowl
    • Toothpick

    Method
     

    1. Preheat your oven to 375°F (190°C) and line a baking sheet with parchment paper.
    2. Unroll the crescent roll dough and use a sharp knife to cut it into thin strips, about 1/4 inch wide. These will mimic bandages.
    3. Place a hot dog on the edge of a dough strip and gently swirl or wrap the dough around the hot dog, leaving a small gap at the top for the ‘face.’ Repeat with all hot dogs.
    4. Arrange the wrapped hot dogs on the prepared baking sheet, spacing them out evenly.
    5. Bake in the preheated oven for about 12-15 minutes, or until the dough is golden brown and crispy.
    6. Remove from the oven and let cool slightly, just enough to handle without burning your fingers.
    7. Using a toothpick, carefully place a small googly eye on the ‘face’ of each mummy for a spooky flair. Press gently to secure.
    8. Your creepy mummy hot dogs are now ready to serve! They offer a fun, festive look with a crispy exterior and juicy inside, perfect for Halloween parties.

    Notes

    Feel free to use different edible eyes or decorate with additional features like tiny bits of olives for eyes or ketchup for mouths.

    Whether it’s for a last-minute party or a fun family project, these mummy hot dogs bring a festive twist to your table. They’re quick to put together and sure to turn heads and spark giggles. As the oven buzzes away, you’re already imagining the next spooky creation to try.

    This recipe is a reminder that Halloween is about creativity and celebration, not perfection. The little imperfections—like slightly lopsided bandages—add to the charm. Now, you’ve got a creepy, delightful treat that’s as fun to make as it is to eat.

  • Spook-tacular Halloween Mummy Meatballs

    Spook-tacular Halloween Mummy Meatballs

    Halloween is the perfect time to embrace playful and surprising flavors, especially with food that sparks conversation and nostalgia. These Mummy Meatballs are more than just a fun snack; they’re a celebration of creative chaos in the kitchen. Each bite offers a crispy, savory experience topped with googly eyes and wrapped in fragrant, seasoned meat.

    What makes these meatballs stand out is their ability to bring joy and a little chaos to your spooky gathering. They’re simple to make but deliver maximum delight with their spooky mummy wrappings and tender, flavorful interior. This recipe is perfect for anyone looking to add a touch of humor and horror to their holiday table.

    Mummy Meatballs

    Mummy Meatballs are crispy, savory meatballs wrapped with strips of puff pastry or dough, giving them a bandaged, mummy-inspired appearance. They are baked until golden and topped with googly eyes for a playful Halloween presentation, featuring a tender interior and flaky exterior. This dish combines classic meatball flavors with fun, spooky decor for festive occasions.
    Prep Time 20 minutes
    Cook Time 25 minutes
    Total Time 45 minutes
    Servings: 4
    Course: Main Course
    Cuisine: American
    Calories: 250

    Ingredients
      

    • 1 pound ground beef or preferred ground meat
    • 1/4 cup bread crumbs for binding
    • 1 large egg to help bind the mixture
    • 1 teaspoon salt
    • 1/2 teaspoon black pepper
    • 1 tablespoon olive oil for cooking
    • 1 sheet puff pastry thawed and cut into strips
    • to taste googly eyes for decoration

    Equipment

    • Baking sheet
    • Parchment paper
    • Mixing bowls
    • Small knife
    • Pastry brush

    Method
     

    1. Preheat your oven to 400°F (200°C) and line a baking sheet with parchment paper.
    2. In a large mixing bowl, combine the ground beef, bread crumbs, egg, salt, and black pepper. Mix everything gently until just combined, taking care not to overwork the meat.
    3. Form the meat mixture into small, evenly sized meatballs, about one inch in diameter, and place them on the prepared baking sheet.
    4. Bake the meatballs in the preheated oven for 15-20 minutes, or until they are cooked through and lightly browned.
    5. While the meatballs are baking, cut the puff pastry sheet into thin strips, approximately 1/4 inch wide, to create bandage-like layers.
    6. Once the meatballs are cool enough to handle, wrap each one carefully with strips of puff pastry, overlapping slightly to resemble bandages. Leave some space at the top for the googly eyes.
    7. Return the wrapped meatballs to the oven and bake for an additional 8-10 minutes, until the pastry is golden and crispy.
    8. Remove the mummy meatballs from the oven and place them on a serving platter. Top each one with a googly eye for a spooky, fun look.
    9. Serve the Mummy Meatballs warm as a festive appetizer or main dish, garnished with additional Halloween décor if desired.
    These meatballs serve up nostalgic comfort with a spooky twist, making them a hit at any Halloween party. Plus, they’re quick to prepare, so you can spend more time enjoying the screaming fun and less time in the kitchen.

    Whether you’re hosting a kid-friendly party or a grown-up horror movie marathon, these Mummy Meatballs bring festive spirit and a delightful crunch to your festivities. Keep the fun going with more creepy appetizers and watch as everyone raves about your creative culinary skills.