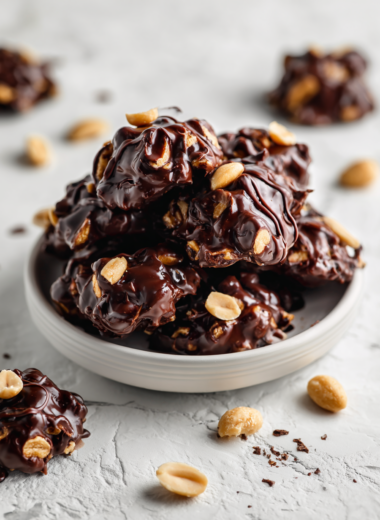
Author: GraceMorgan

  • Harvest Gold: The Unconventional Fall Frittata You Need to Try

    Harvest Gold: The Unconventional Fall Frittata You Need to Try

    As the leaves turn and a crisp chill fills the air, I find myself craving more than just pumpkin spice. I want something hearty yet bright, something that captures the essence of fall with every bite. That’s where this Autumn-inspired frittata comes into play, but with a twist that even seasoned cooks might overlook.

    This isn’t your average egg dish. Think caramelized butternut squash, a burst of sage, and a surprise crunch of toasted walnuts tucked inside fluffy eggs. It feels like autumn in every forkful, especially when baked to golden perfection under a gentle broil. I’ve always loved simple egg dishes, but this one elevates the humble frittata into a seasonal sensation.

    Autumn Butternut Squash & Sage Frittata

    This frittata features caramelized butternut squash, fresh sage, and toasted walnuts folded into fluffy eggs. It is baked until golden and set, with a slightly crispy top and tender interior that showcases seasonal flavors and textures.
    Prep Time 15 minutes
    Cook Time 20 minutes
    Total Time 35 minutes
    Servings: 4
    Course: Main Course
    Cuisine: American
    Calories: 210

    Ingredients
      

    • 1 small butternut squash, peeled and diced about 1 cup
    • 2 tablespoons olive oil
    • 1 teaspoon fresh sage, chopped
    • 1/2 cup toasted walnuts, chopped
    • 6 large eggs
    • 1/4 cup milk
    • 1/2 teaspoon salt
    • 1/4 teaspoon black pepper
    • 2 tablespoons grated Parmesan cheese

    Equipment

    • Skillet or ovenproof frying pan
    • Mixing bowl
    • Whisk
    • Measuring cups and spoons
    • Wooden spoon or spatula
    • Oven or broiler

    Method
     

    1. Preheat your oven or broiler to 400°F (200°C). Heat a skillet over medium heat and add a tablespoon of olive oil. Add the diced butternut squash and cook, stirring occasionally, until the edges are golden and caramelized, about 8-10 minutes.
      1 small butternut squash, peeled and diced, 2 tablespoons olive oil
    2. Stir in the chopped sage and cook for another minute until fragrant. Remove the squash mixture from the skillet and set aside to cool slightly.
      1 teaspoon fresh sage, chopped
    3. In a mixing bowl, whisk together the eggs, milk, salt, and black pepper until well combined and slightly frothy. Stir in the grated Parmesan cheese.
      6 large eggs, 1/4 cup milk, 1/2 teaspoon salt, 1/4 teaspoon black pepper, 2 tablespoons grated Parmesan cheese
    4. Add the cooled butternut squash mixture and toasted walnuts to the egg batter, gently folding them in with a spatula. This helps evenly distribute the fillings without deflating the eggs.
      1 small butternut squash, peeled and diced, 1/2 cup toasted walnuts, chopped
    5. Pour the mixture back into the skillet, spreading it out evenly. Cook over medium heat for about 3-4 minutes until the edges start to set and become slightly golden.
    6. Transfer the skillet to the oven or place it under the broiler, and bake for 12-15 minutes until the top is puffed, golden, and set in the center.
    7. Remove the skillet from the oven and allow the frittata to rest for a few minutes. The residual heat will finish setting the eggs and enhance flavor.
    8. Slice the frittata into wedges and serve warm, ideally garnished with additional sage or walnuts if desired.
    This fall, let this frittata be your guide through busy mornings and leisurely brunches alike. Its blend of sweet, savory, and crunchy textures makes it a versatile choice for any occasion. Plus, it reminds me that sometimes the simplest ingredients, paired thoughtfully, create the most memorable meals.

    Enjoy the cozy aroma of sage and roasted squash wafting through your kitchen—an instant reminder that autumn is here. Whether you make this for yourself or for guests, it’s bound to become a seasonal staple. And always, trust that a little extra cheese on top never hurts when aiming for that perfect finish.

    ,

  • The Art of the Gatorade Slushie: A Nostalgic Thirst-Quencher

    The Art of the Gatorade Slushie: A Nostalgic Thirst-Quencher

    Ever wondered how to turn hydration into a fun, nostalgic treat? Enter the Gatorade slushie, a frozen concoction that revives childhood memories while sneaking in some hydration boost. This recipe offers a playful spin on a classic sports drink, transforming it into a cool, icy delight that’s perfect for hot days.

    Crafting this slushie is more than just blending; it’s about capturing the essence of summer and relishing those sweet, tangy flavors that hit just right. Whether you’re cooling down after a workout or looking for a vibrant snack, this recipe is your ticket to icy refreshment with a twist. It’s surprisingly simple, yet endlessly customizable to match your favorite flavors.

    Gatorade Slushie

    A frozen beverage made by blending flavored sports drink with ice to create a tangy, icy treat. The mixture results in a vibrant, slushy consistency that combines refreshment with hydration, perfect for hot days or post-workout recovery.
    Prep Time 5 minutes
    Total Time 5 minutes
    Servings: 2
    Course: Main Course
    Cuisine: fusion
    Calories: 80

    Ingredients
      

    • 2 cups flavored sports drink (e.g., Gatorade) chilled for best results
    • 1 cup ice cubes adjust for desired consistency

    Equipment

    • Blender
    • Measuring cups and spoons

    Method
     

    1. Pour the chilled sports drink into the blender.
    2. Add the ice cubes to the blender with the sports drink.
    3. Secure the lid on the blender and blend on high for about 30-45 seconds, until the mixture is thick and slushy with a smooth, icy texture.
    4. Stop the blender and check the consistency; if it’s too thick, add a splash more sports drink and blend briefly again.
    5. Pour the slushie into glasses, using a spoon if needed to serve any remaining ice in the blender.
    6. Serve immediately with a straw or spoon for a cool, tangy treat.
    This Gatorade slushie is more than just a cool down; it’s a small celebration of flavor and nostalgia. With every sip, you’re transported back to sunny afternoons and carefree moments, now revamped into a modern, icy treat.

    Perfect for hot afternoons or game-day sensibilities, this recipe is a fun way to hydrate and indulge. In less than five minutes, you can whip up a batch that guarantees smiles and chilly refreshment for everyone around you.

  • Chill Out with a Whiskey Slushie on Lazy Summer Days

    Chill Out with a Whiskey Slushie on Lazy Summer Days

    Imagine sitting on a porch, the sun setting, with a glass of whiskey slushie in hand. There’s a mysterious coolness to each sip, dancing with hints of smoky bourbon and a whisper of sweet syrup. This isn’t just a drink; it’s a nostalgic escape wrapped in icy bliss.

    Whiskey slushies aren’t just for parties—they’re perfect for a quiet evening when you crave something spirited yet refreshingly simple. Their icy texture sparks joy, making each sip feel like a mini celebration. So, whether it’s a lazy weekend or a spontaneous get-together, this quirky frozen cocktail will steal the show.

    Whiskey Slushie

    A whiskey slushie is a frozen cocktail made by blending bourbon with sweet syrup and ice, resulting in a smooth, icy drink with a glossy, frosty appearance. The mixture is pureed until thick and slushy, offering a refreshing and spirited beverage with a semi-frozen, granular texture. Its deep amber color and frosty exterior make it visually appealing and perfect for casual sipping.
    Prep Time 10 minutes
    Total Time 10 minutes
    Servings: 2
    Course: Main Course
    Cuisine: American
    Calories: 250

    Ingredients
      

    • 1/2 cup bourbon whiskey preferably a smoky bourbon
    • 1 cup sweetened condensed milk for sweetness and creaminess
    • 3 cups ice cubes crushed or whole
    • 2 tbsp simple syrup adjust to taste for sweetness

    Equipment

    • Blender
    • Measuring cups and spoons

    Method
     

    1. Add the bourbon, sweetened condensed milk, simple syrup, and ice cubes to the blender.
    2. Secure the lid on the blender and blend on high until the mixture is smooth, thick, and slushy, with a frosty consistency comparable to wet snow.
    3. Stop the blender briefly and check the texture; if it’s too thick, add a splash of water or more simple syrup and blend briefly to incorporate.
    4. Pour the frozen mixture into chilled glasses, allowing it to mound slightly above the rim, showcasing its icy texture.
    5. If desired, garnish with a twist of lemon, a maraschino cherry, or a sprig of mint for visual appeal.
    6. Serve immediately with a straw or small spoon so you can scoop and enjoy the cool, boozy treat.

    Notes

    For an extra festive touch, rim the glasses with sugar or sea salt before pouring.
    Whiskey slushies are the ultimate summer-time indulgence that require minimal fuss but deliver maximum flavor. Creating an icy elixir that’s both boozy and refreshing makes any warm day feel like a celebration.

    Plus, their nostalgic charm makes them a perfect conversation starter at almost any gathering. Keep this recipe handy for when you need a cool, spirited pick-me-up—no matter the season, they are a refreshing twist on the classic cocktail.

  • Autumn Harvest Chicken Casserole: An Unexpected Cozy Twist

    Autumn Harvest Chicken Casserole: An Unexpected Cozy Twist

    As the leaves turn and the air crisps, I find myself craving comfort that comes with a touch of the unexpected. This fall, I decided to reinvent the classic chicken casserole by incorporating flavors like roasted squash and sage, echoing the feeling of a brisk autumn walk. The smell of caramelized onions mingling with thyme in my oven instantly transports me to a pumpkin patch.

    But what truly makes this dish stand out is its ability to adapt. Whether you’re short on time or want to experiment with seasonal ingredients, this casserole is your canvas. It’s a humble dish turned festive with just a few clever additions, embodying the cozy chaos of fall cooking.

    ## WHY I LOVE THIS RECIPE?
    – It captures the essence of fall with warm, earthy flavors and hearty textures.
    – The recipe is flexible, accommodating pantry staples and seasonal vegetables alike.
    – It sparks a nostalgic joy of comfort dinners, yet feels exciting enough for guests.
    – The aroma alone fills my home with a feeling of gratitude and togetherness.
    – Making this dish always reminds me that simple ingredients can create magic.

    ## AVOID MY DISASTER (You’re Welcome)
    – FORGOT to cover the casserole; it dried out and burned the top. Cover it next time!
    – DUMPED the spice mix; it was too bland. Just a pinch of nutmeg lifts the flavor.
    – OVER‑TORCHED the cheese; it turned bitter and crispy. Keep a close eye in the last minutes.
    – MISSED adding the broth; it made the dish dry. Pour it in before baking for juicy results.

    ## QUICK FIXES THAT SAVE YOUR DAY
    – If the top burns, shield it with foil for the last 10 minutes to prevent more charring.
    – Splash a little chicken broth if the casserole looks dry after baking.
    – Patch a bland casserole by stirring in a teaspoon of maple syrup or honey.
    – When in doubt, add a splash of cream or milk to freshen flavors.
    – Shield with foil if cheese starts to burn, capturing the smoky aroma without the bitterness.

    In the end, this dish feels like a warm hug after a chilly day outside. It’s a reminder that fall’s true magic lies in its ability to bring people together around a comforting meal. The crispy edges and fragrant herbs make every bite feel like an autumn walk in the crisp air.

    Fall Chicken and Roasted Squash Casserole

    This casserole combines tender shredded chicken with roasted squash, caramelized onions, and fragrant sage baked together until bubbly and golden. The dish features a creamy texture with crispy edges and aromatic herbs, presenting a hearty yet seasonal main course.
    Prep Time 20 minutes
    Cook Time 40 minutes
    Total Time 1 hour
    Servings: 4
    Course: Main Course
    Cuisine: American
    Calories: 350

    Ingredients
      

    • 2 cups cooked shredded chicken preferably cooked ahead or rotisserie
    • 1 pound butternut squash peeled and cubed
    • 1 large onion thinly sliced
    • 2 tablespoons olive oil for roasting and sautéing
    • 1 teaspoon fresh sage chopped
    • 1 cup heavy cream for richness
    • 1 cup shredded cheese cheddar or Gruyère work well
    • 1 cup bread crumbs for topping
    • to taste salt and pepper adjust seasoning as needed

    Equipment

    • Baking dish
    • Large skillet
    • Sharp knife
    • Cutting board
    • Mixing Spoon

    Method
     

    1. Preheat your oven to 400°F (200°C). Toss the cubed squash with a tablespoon of olive oil, salt, and pepper, then spread on a baking sheet. Roast until tender and caramelized, about 25-30 minutes, filling your kitchen with warm, sweet aromas.
    2. While the squash roasts, heat the remaining tablespoon of olive oil in a large skillet over medium heat. Add the sliced onions and cook, stirring frequently, until golden and sweet, about 10-15 minutes. Add the chopped sage during the last minute to release its fragrance.
    3. In a large mixing bowl, combine the shredded chicken with the cooked onions and sage. Mix well to distribute the flavors evenly.
    4. Once the squash is done roasting and slightly cooled, add it to the chicken mixture. Pour in the heavy cream and stir gently to coat all ingredients in a creamy sauce.
    5. Transfer the mixture into a greased baking dish, spreading it out evenly. Sprinkle the shredded cheese over the top for a gooey, cheesy layer that will melt and bubble during baking.
    6. Sprinkle the bread crumbs evenly over the cheese to add a crispy topping. Place the dish in the oven and bake until bubbling and golden around the edges, about 20-25 minutes.
    7. Remove the casserole from the oven once it’s bubbling and the top is deeply golden. Let it rest for a few minutes to settle, then serve hot and enjoy the cozy, crispy, and creamy layers.

    Notes

    Feel free to substitute other seasonal vegetables or cheeses to customize this dish. Cover loosely with foil if topping browns too quickly during baking.
    Cooking this Easy Fall Chicken Casserole is a celebration of seasonal bounty and simple joys. It’s perfect for those precious busy nights when you still want to indulge in something hearty and flavorful.

    Sharing a plate of this casserole is also a quiet way to embrace the fleeting beauty of fall. The scents of sage, roasted vegetables, and tender chicken linger long after the last forkful, leaving a cozy, satisfied feeling in your home.

  • Spine-Chillingly Fun: Halloween Eyeball Caprese Bites

    Spine-Chillingly Fun: Halloween Eyeball Caprese Bites

    Imagine sinking your teeth into a hauntingly adorable appetizer that looks straight out of a spooky movie set. These Halloween Eyeball Caprese Bites are not just delicious—they’re a conversation starter at any party. Bright cherry tomatoes, fresh mozzarella, and a pop of balsamic glaze turn simple ingredients into a creepy, fun spectacle.

    What better way to celebrate the season than with a snack that mixes chaos and charm? The creepy eyeball effect is surprisingly easy to achieve, making it perfect for last-minute scares and smiles. Plus, the fresh flavors bring a cool, basil-infused twist to your Halloween table.

    Halloween Eyeball Caprese Bites

    These Eyeball Caprese Bites are bite-sized appetizers assembled with cherry tomatoes, fresh mozzarella, and basil, finished with a balsamic glaze to resemble creepy eyeballs. They are simple to make using no-cook assembly, resulting in a visually striking and fresh-tasting snack with a smooth, juicy, and creamy texture. The final presentation is both whimsical and spooky, perfect for Halloween parties.
    Prep Time 10 minutes
    Total Time 10 minutes
    Servings: 8
    Course: Main Course
    Cuisine: American
    Calories: 150

    Ingredients
      

    • 16 pieces cherry tomatoes preferably ripe and firm
    • 8 oz fresh mozzarella balls bite-sized or ciliegine
    • 16 small fresh basil leaves small whole leaves
    • 4 tbsp balsamic glaze for drizzling
    • 8 pieces pitted black olives sliced for eyeballs
    • to taste salt and pepper for seasoning

    Equipment

    • Serving platter
    • Toothpicks or small skewers

    Method
     

    1. Thread a cherry tomato onto a toothpick, followed by a small basil leaf and a mozzarella ball to assemble the eyeball shape.
    2. Place a sliced black olive on top of the mozzarella to create a dark, creepy eyeball pupil.
    3. Repeat these steps until all the bites are assembled on a platter for easy serving.
    4. Drizzle the balsamic glaze over the assembled eyeballs to mimic the bloodshot spots and create a spooky effect.
    5. Finish with a light sprinkle of salt and pepper if desired, then serve immediately for a fresh, juicy, and visually striking appetizer.
    As the evening winds down, these eyeball bites remind us that fun and flavor can go hand in hand. They’re a quick, charming addition to your spooky spread that guests will love to poke at and devour. Whether you’re hosting a haunted house party or just crafting a playful snack for the family, these bites add a dash of whimsy to the festivity.

    Keep your eyes peeled for other quick Halloween treats you can whip up with minimal fuss. After all, the best parties are about the little surprises—and these creepy, cute eyeballs might just steal the show.

  • Chill with a Twist: The Ultimate Coffee Slushie Recipe

    Chill with a Twist: The Ultimate Coffee Slushie Recipe

    Imagine a scorching summer day when you crave something frosty but want the rich kick of coffee. This coffee slushie is not just your average icy drink—it’s a playful twist that transforms your usual brew into a refreshing frozen treat. The blend of robust coffee and icy crunch makes every sip feel like a tiny celebration.

    What makes this recipe stand out is its simplicity and versatility. Whether you need a quick pick-me-up or a nostalgic afternoon snack, this slushie hits the mark. Plus, it’s easily customizable with your favorite add-ins, making each batch uniquely yours.

    ## WHY I LOVE THIS RECIPE?
    – It combines my love for coffee with my obsession with cold desserts.
    – There’s joy in blending ice and coffee until perfect, like a mini ice cream shop in my apartment.
    – It’s chaos-free, requiring just a blender and a handful of ingredients.
    – I can make it ahead and enjoy a chilled sip anytime, even during busy mornings.
    – Nostalgic memories of summer camp treats flood back every time I sip this.

    ## AVOID MY DISASTER (You’re Welcome)
    – FORGOT to chill the coffee? Reheat and cool it down before blending.
    – DUMPED too much ice? Add more coffee or milk to balance the texture.
    – OVER-TORCHED the sugar syrup? Use honey or agave instead, no smoke involved.
    – BURNED the milk accidentally? Rinse and start fresh, the coffee still needs to shine.

    ## QUICK FIXES THAT SAVE YOUR DAY
    – If the slushie is too watery, blend in more frozen coffee cubes.
    – Splash in a little vanilla extract for extra aroma.
    – Patch bland flavor with a dash of cinnamon or cocoa powder.
    – Shield from heat by serving immediately after blending.
    – When in doubt, pop the mix into the freezer for 10 minutes for a firmer texture.

    The joy of this coffee slushie lies in its chilled simplicity. It’s perfect for beating the heat and satisfying that coffee craving at once. As the weather warms, this icy treat becomes a go-to comfort without the heaviness of traditional coffee drinks.

    Whether you’re lounging with friends or enjoying a solo break, this recipe offers a delightful way to cool down. The slight bitterness of coffee contrasted with the sweet, icy crunch makes each sip a moment of refreshment. Plus, it’s just fun to make and even more fun to drink, once you get the hang of it.

    Coffee Slushie

    A coffee slushie is a frozen beverage that combines brewed coffee with ice, blended into a creamy, icy texture. The result is a refreshing, semi-frozen drink with a robust coffee flavor and a crunchy, slushy consistency. It’s served cold and visually appealing with a frosty surface and a smooth, slushy interior.
    Prep Time 5 minutes
    Total Time 5 minutes
    Servings: 2
    Course: Main Course
    Cuisine: Summer
    Calories: 80

    Ingredients
      

    • 1 cup freshly brewed coffee cooled completely before blending
    • 1 cup ice cubes preferably frozen coffee cubes for extra flavor
    • 2 tablespoons simple syrup or sweetener adjust to taste

    Equipment

    • Blender
    • Measuring cups or spoons

    Method
     

    1. Measure out the cooled brewed coffee and pour it into your blender.
    2. Add the ice cubes to the blender, distributing them evenly over the coffee.
    3. Pour in the sweetener, such as simple syrup or honey, for added sweetness and flavor.
    4. Secure the lid of the blender and start blending on low speed, gradually increasing to high.
    5. Continue blending until the mixture becomes thick, slushy, and smooth, with a frosty surface forming on top.
    6. Stop the blender and check the consistency; if it’s too watery, add a few more ice cubes and blend again for a few seconds.
    7. Pour the coffee slushie into glasses, allowing some of the icy texture to be visible and inviting.
    8. Garnish with optional toppings like whipped cream, chocolate shavings, or a dusting of cocoa powder if desired.
    9. Serve immediately and enjoy the refreshing, crunchy texture of this chilled coffee treat.

    Notes

    For an even richer flavor, try using cold brew coffee or add a splash of milk before blending. Adjust sweetness to your preference. If the slushie becomes too thick, stir in a little cold milk or water to loosen it up.
    As summer stretches on, a cold coffee slushie is more than just a treat—it’s a small rebellion against the heat. Its crisp, invigorating flavor keeps the season feeling lively and cool.

    This recipe is a little reminder that sometimes, the simplest pleasures come from mixing a few familiar ingredients and embracing a little chaos. A frozen mug of coffee has a way of making any warm day stand out, one icy sip at a time.

  • Reviving Nostalgia: The Perfect Chicken Noodle Soup with a Twist

    Reviving Nostalgia: The Perfect Chicken Noodle Soup with a Twist

    Chicken noodle soup often feels like a warm blanket on a chilly day, but I like to think of it as a canvas for unexpected flavor adventures. Today, I like to take you on a journey where classic comfort meets a dash of culinary daring, transforming this humble dish into something memorable.

    Imagine savoring each spoonful and discovering hints of fresh herbs, a splash of citrus, or even a subtle smoky undertone. It be your favorite soup, but with a new twist, making it ideal for both cozy nights and lively gatherings. The secret? A few unconventional ingredients and a hearty share of passion.

    Herb-Infused Chicken Noodle Soup with a Citrus Twist

    This chicken noodle soup combines tender shredded chicken and al dente noodles in a flavorful broth enriched with fresh herbs and a splash of citrus. The dish features a clear, comforting broth with visible herb and vegetable garnishes, finished with a hint of smoky flavor for added depth.
    Prep Time 15 minutes
    Cook Time 30 minutes
    Total Time 45 minutes
    Servings: 4
    Course: Main Course
    Cuisine: Comfort Food
    Calories: 320

    Ingredients
      

    • 1 lb boneless, skinless chicken breasts or thighs
    • 8 oz egg noodles or any pasta of choice
    • 1 medium onion diced
    • 3 cloves garlic minced
    • 4 cups chicken broth
    • 1 cup diced carrots
    • 1 cup chopped celery
    • 2 tablespoons olive oil
    • 2 tablespoons fresh lemon juice
    • 1 teaspoon dried thyme or fresh if available
    • to taste salt and pepper
    • 1/4 cup chopped fresh herbs parsley, dill, or cilantro
    • 1 teaspoon smoked paprika optional for smoky flavor

    Equipment

    • Large Dutch oven or stockpot
    • Chef’s Knife
    • Cutting board
    • Wooden spoon or ladle
    • Measuring cups and spoons

    Method
     

    1. Place the chicken breasts in a large stockpot and cover with water. Bring to a boil, then reduce heat and simmer until cooked through, about 15 minutes. Remove the chicken, let it cool slightly, then shred into bite-sized pieces.
    2. While the chicken cools, dice the onion, mince the garlic, and chop the carrots and celery. Set aside.
    3. In the same pot, heat olive oil over medium heat. Add the diced onion and cook until translucent and fragrant, about 3-4 minutes, stirring occasionally.
    4. Add the minced garlic, carrots, and celery to the pot. Cook for another 3 minutes, until the vegetables begin to soften and release their aroma.
    5. Pour in the chicken broth and add the dried thyme, smoked paprika (if using), salt, and pepper. Bring the mixture to a gentle boil.
    6. Once boiling, add the shredded chicken back into the pot and stir to combine. Reduce heat to low and let the broth simmer for 10 minutes, allowing flavors to meld.
    7. Meanwhile, cook the egg noodles separately in salted boiling water according to package instructions until al dente. Drain and set aside.
    8. Add the cooked noodles to the simmering soup and stir gently to distribute them evenly throughout the broth.
    9. Squeeze fresh lemon juice into the soup for a bright citrus note, then stir in the chopped fresh herbs for a burst of freshness and color.
    10. Taste and adjust seasoning with salt and pepper as needed. Let the soup simmer for another 2-3 minutes to incorporate all flavors fully.
    11. Serve the soup hot, garnished with additional fresh herbs if desired. Enjoy the comforting yet boldly flavored bowl of chicken noodle soup with a citrus twist.

    Notes

    For added smoky depth, sprinkle extra smoked paprika on top before serving. You can use leftover cooked chicken if preferred. Adjust the citrus amount to your taste for a brighter or subtler flavor.

    This recipe is a celebration of simplicity with a twist, perfect for those moments when you crave familiarity but want a little sparkle. The aroma of herbs and roasted chicken simmering together makes every kitchen feel like a memory in the making.

    Whether you like to prep it quickly on a busy weeknight or slow-cook it on the weekend, this soup offers comfort with a bit of adventure. Keep a spoon handy and enjoy every warm, flavorful sip as the season shifts and your cooking style evolves.

  • Spooky Delight: Halloween Eyeball Pasta with Meatball ‘Eyeballs’

    Spooky Delight: Halloween Eyeball Pasta with Meatball ‘Eyeballs’

    As Halloween approaches, I love digging into those playful, creepy dishes that make dinner feel like a costume party. This eyeball pasta transforms a simple plate of spaghetti into a ghoulish spectacle with meatball “eyeballs” staring back at you. The smell of roasted garlic and simmered marinara fills my kitchen, setting the perfect spooky ambiance.

    But what truly makes this recipe special isn’t just its visual impact. It’s the nostalgic comfort of hearty meatballs paired with the thrill of a Halloween surprise. Plus, it’s a chaos-friendly dinner that kids and adults alike can help assemble—chaos turns into giggles every time.

    ## WHY I LOVE THIS RECIPE?
    – It mixes childhood nostalgia with festive fun.
    – The chaotic assembly sparks joy and creativity.
    – The aroma of garlic and herbs makes it irresistible.
    – It’s a playful way to enjoy a comforting meal during spooky season.

    ## AVOID MY DISASTER (You’re Welcome)
    – FORGOT the eyeball dot? Dropped a meatball in the sauce—quickly replaced with an extra one.
    – DUMPED the sauce from the spoon? Spilled on the counter—cleaned with a damp cloth, no biggie.
    – OVER-TORCHED the meatballs? Got a little black—transferred to a fresh pan and started over.
    – MISPLACED the tiny eyes? Found them hiding in the fridge—placed them on top, instant spooky effect.

    ## QUICK FIXES THAT SAVE YOUR DAY
    – If sauce is too thick, splash in a little pasta water to loosen.
    – WHEN meatballs stick, patch with a gentle nudge with a spatula.
    – Shield your eyeballs with a paper towel if they crack during placement.
    – If the meatball is bland, stir in a dash of parmesan for a flavorful punch.
    – When in doubt, crack a pepper and add a shimmer of olive oil for flavor and shine.

    Enjoy creating a dish that’s all about spooky fun and savory bites. This eyeball pasta turns a simple dinner into a memorable Halloween spectacle. It’s a playful dish that brings out both your creativity and appetite. Perfect for a festive, family-friendly celebration or a surprise dinner for guests dressed up in their costumes.

    Eyeball Spaghetti

    Eyeball Spaghetti is a playful pasta dish featuring cooked spaghetti topped with tender meatball ‘eyeballs’. The dish is finished with marinara sauce and faux eyeballs made from meatballs with small cheese or olive centers, creating a spooky, fun presentation. The final appearance is a spooky plate with meatballs resembling creepy eyes amidst red sauce and pasta.
    Prep Time 20 minutes
    Cook Time 40 minutes
    Total Time 1 hour
    Servings: 4
    Course: Main Course
    Cuisine: Italian
    Calories: 600

    Ingredients
      

    • 1 pound spaghetti uncooked
    • 1 pound ground beef for meatballs
    • 1/2 cup bread crumbs to bind meatballs
    • 1 large egg to bind meatballs
    • 2 cloves garlic minced
    • 2 cups marinara sauce
    • 1 cup shredded mozzarella cheese for eyeballs
    • to taste salt and pepper
    • as needed olive oil

    Equipment

    • Large pot
    • Mixing bowl
    • Baking sheet
    • Saucepan
    • Slotted spoon

    Method
     

    1. Cook the spaghetti in a large pot of boiling salted water until al dente, then drain and set aside.
    2. Preheat your oven to 400°F (200°C). In a mixing bowl, combine ground beef, bread crumbs, minced garlic, egg, salt, and pepper. Mix gently until well combined.
    3. Shape the meat mixture into small, round meatballs about the size of a golf ball and place them on a baking sheet lined with parchment paper. Bake for 20 minutes until browned and cooked through.
    4. While the meatballs bake, heat marinara sauce in a saucepan over medium heat until warmed through and bubbling.
    5. Once the meatballs are done, add them to the simmering marinara sauce and let them soak for a few minutes, allowing the flavors to meld.
    6. Place cooked spaghetti on serving plates, then ladle the hot marinara sauce with meatballs over the pasta. Arrange the meatballs on top to resemble creepy eyeballs, with some cheese or olives pressed into the center of each to create ‘pupils.’
    7. Add shredded mozzarella cheese or small cheese slices inside each meatball to resemble irises, and lightly press them into the meatball to stay in place.
    8. Finish by placing tiny bits of mozzarella or olives in the center of each eyeball to mimic pupils, completing the spooky look.
    9. Serve the eyeball spaghetti hot, with extra sauce on the side for dipping if desired.

    Notes

    To enhance the spooky effect, use black olives or small cheese slices for pupils. Be careful when handling hot sauce and meatballs. This dish is fun to assemble as a family activity during Halloween.
    This Halloween eyeball pasta isn’t just about the looks, though—its taste delivers comfort with a fun, festive twist. It’s quick enough for a weeknight but memorable enough for a special spooky dinner. Watching the kids giggle at each creepy, tasty meatball eye is part of the magic.

    As the season deepens, recipes like this remind us of the joy in simple, playful food—perfect for crisp fall nights when the air smells like pumpkin and spice. It’s a dish that celebrates seasonal cheer while giving everyone a good laugh—and maybe a little spook. Just the way Halloween should be.

  • Spooky Spider Web Cake: A Haunted Halloween Dessert

    Spooky Spider Web Cake: A Haunted Halloween Dessert

    Imagine slicing into a cake that looks like a mysterious spider web spun across a dark night sky. This Halloween, I dared to create a dessert that’s as much a visual thrill as a treat for the senses. The sticky fondant and delicate icing web seem to trap the spirit of spooky nights and festive chaos in every bite.

    Turning my kitchen into a haunted atelier, I experimented with piping tricks and edible glitter, aiming for a masterpiece that sends shivers of delight down your spine. It’s a perfect centerpiece that sparks conversation and ignites the thrill of the season. No fancy tools needed—just a willing spirit and a sweet tooth for the monstrous and beautiful.

    Spooky Web Halloween Cake

    This cake features a rich chocolate sponge layered with creamy frosting, decorated to resemble a spider web with intricate fondant and icing piping. Its dark, glossy exterior and delicate web design create a striking visual effect, with a soft, moist interior that balances sweetness and texture.
    Prep Time 30 minutes
    Cook Time 35 minutes
    Total Time 1 hour 5 minutes
    Servings: 8
    Course: Main Course
    Cuisine: Festive
    Calories: 450

    Ingredients
      

    • 1 3/4 cups all-purpose flour sifted
    • 2 cups granulated sugar
    • 3/4 cups unsweetened cocoa powder sifted
    • 1 1/2 teaspoons baking soda
    • 1/2 teaspoon baking powder
    • 1 teaspoon salt
    • 2 large eggs
    • 1 cup buttermilk or milk with 1 tbsp vinegar
    • 1/2 cup vegetable oil
    • 3 cups powdered sugar
    • 1/2 cup unsalted butter softened
    • 2-3 tablespoons milk to adjust frosting consistency
    • 1 block black fondant
    • Edible black icing gel for piping web
    • Edible silver glitter for decoration

    Equipment

    • Mixing bowls
    • Cake pans
    • Piping bags with fine tips
    • Spatula
    • Cooling rack
    • Rolling pin

    Method
     

    1. Preheat your oven to 350°F (175°C) and grease two 8-inch round cake pans. In a large bowl, sift together flour and cocoa powder to ensure a smooth batter.
    2. In a separate bowl, beat eggs with sugar until the mixture turns light and slightly fluffy, filling the air with a sweet aroma. Mix in the buttermilk, vegetable oil, and vanilla extract until well combined.
    3. Gradually fold the dry ingredients into the wet mixture, mixing gently until the batter is smooth and free of lumps. Pour the batter evenly into the prepared cake pans.
    4. Bake for 30-35 minutes or until a toothpick inserted in the center comes out clean. Let the cakes cool in their pans for 10 minutes, then turn them onto a wire rack to cool completely.
    5. While the cakes cool, prepare the frosting by beating softened butter until creamy, then gradually add powdered sugar, mixing well. Mix in a splash of milk to loosen the frosting, aiming for a smooth, spreadable consistency.
    6. Once cooled, level the cake layers with a serrated knife if needed. Spread a layer of frosting on top of the first cake, then place the second layer on top. Cover the entire cake with a thin crumb coat and refrigerate for 20 minutes.
    7. Knead the black fondant until soft and pliable. Roll it out on a dusted surface to about 1/8 inch thickness, then carefully drape it over the chilled cake, smoothing the sides and top.
    8. Fill a piping bag fitted with a fine tip with black icing gel. Starting from the center, pipe concentric circles onto the top of the cake.
    9. Using a toothpick or skewer, drag from the center outward across the circles to create a web effect. Repeat in different directions until you get a spider web pattern.
    10. Sprinkle edible silver glitter over the web pattern to add a shimmering, spooky effect. Attach a fondant spider or other decorations if desired.
    11. Present the cake on a decorative platter and enjoy the striking, web-adorned Halloween centerpiece with friends and family.
    As the last crumb disappears and the curtain falls on this creepy confection, I’m reminded of why Halloween desserts hold such magic. They blend nostalgia, creativity, and just a dash of chaos into one captivating package. Every bite is a reminder of childhood fears and adult fun, wrapped up in the delight of a beautifully spooky cake.

    So light your haunted candles, dim the lights, and let this Spider Web Cake bring a touch of eerie elegance to your Halloween celebration. It’s more than a dessert; it’s a mini spectacle of ghostly elegance that ensures your party is unforgettable. Embrace the playful spookiness and let the festivities begin.

  • Vibrant Summer Fresh Salsa: A Bright Twist on a Classic

    Vibrant Summer Fresh Salsa: A Bright Twist on a Classic

    Imagine taking a bite into nothing but the freshest garden bounty—ripe tomatoes, zesty lime, and fragrant cilantro all dancing in your mouth. This salsa isnt just a condiment; its an experience of summer captured in a bowl, perfect for spontaneous cookouts or a quick snack after a long day. Its unsung hero quality is how it transforms in minutes, yet tastes like it has simmered all afternoon.

    Making this fresh salsa is an act of joyful chaos in the kitchen, chopped tomatoes flying, peppers tangling on the cutting board. The smell of garlic and fresh herbs instantly lifts the spirits and stirs up nostalgia. Even if youre not a seasoned chef, the simplicity and vibrancy of this recipe make it an inviting project for a lazy weekend or a lively get-together.

    Fresh Tomato Salsa

    This fresh tomato salsa combines ripe tomatoes, chopped cilantro, minced garlic, and zesty lime juice to create a vibrant condiment. It has a chunky texture with bright, crisp flavors that are ready in minutes, making it ideal for serving alongside grilled dishes or as a snack. The ingredients are roughly chopped and mixed to preserve their natural juiciness and freshness.
    Prep Time 10 minutes
    Total Time 10 minutes
    Servings: 4
    Course: Main Course
    Cuisine: Mexican
    Calories: 20

    Ingredients
      

    • 4 cups ripe tomatoes seeded and chopped
    • 1/2 cup fresh cilantro chopped
    • 2 cloves garlic minced
    • 1 lime lime juiced
    • 1/2 tsp salt or to taste
    • 1/4 tsp fresh ground black pepper optional

    Equipment

    • Cutting board
    • Chef’s Knife

    Method
     

    1. Dice the ripe tomatoes into small chunks and place them in a mixing bowl, allowing the juices to start releasing.
    2. Finish chopping the cilantro and sprinkle it over the tomatoes, adding a burst of herbal freshness.
    3. Mince the garlic cloves finely and add them to the bowl, infusing the salsa with aromatic depth.
    4. Juice the lime directly over the mixture, giving it a bright, tangy flavor that ties everything together.
    5. Add salt and pepper to taste, then gently toss all the ingredients together with a spoon until evenly combined.
    6. Let the salsa rest for a few minutes to allow the flavors to meld and the texture to become vibrant and chunky.
    This salsa isnt just a recipe; its a celebration of summers bounty in every bite. It pairs beautifully with everything from crispy tortilla chips to grilled fish, adding a burst of freshness that brightens any dish.

    As the seasons shift, this salsa remains a staple in my kitchen: a reminder that sometimes, the simplest ingredients create the most memorable flavors. It refreshes and energizes, making every meal feel a little more special. Whether served at a backyard party or just for myself, it always brings a splash of sunshine.