Sometimes, you just need a sweet fix without turning on the oven. These no bake marshmallow bars come together fast, using pantry staples I always keep around. There’s a certain satisfaction in pulling together something rich and gooey with minimal fuss, especially when cravings hit late at night.
I remember the first time I made these at a chaotic family picnic—everyone hovered around, eyes wide at how simple ingredients could turn into something so indulgent. It’s honestly about those small moments of surprise, realizing you don’t need fancy tools or hours of work to make a treat that feels special. Sometimes, the best recipes are the ones that come together in a flash and taste like childhood.
This recipe is inspired by those late-night, spontaneous kitchen cravings when you just want something sweet and satisfying without the fuss of baking. It’s about reclaiming comfort food with minimal effort, turning simple pantry staples into a nostalgic treat that’s perfect for last-minute gatherings or quiet evenings alone.
The story behind this recipe
- This recipe harks back to lazy weekends at my grandma’s house, where she’d whip up something sweet in no time, no oven required. It’s been a go-to for me ever since, especially on nights when I want something comforting without the hassle of baking.
- One summer evening, I was scrambling to put together a quick dessert for a last-minute get-together. I remembered her no-bake bars—so simple, so satisfying—and decided to give it my own twist. When the gooey marshmallow mixture hit the graham cracker crumbs, I knew I’d rediscovered a little slice of childhood.
- heading:
Ingredient breakdown: key components
- Marshmallows: I love that gooey, melt-in-your-mouth texture, but if yours aren’t as soft, pop them in the microwave for 10 seconds to loosen them up before mixing.
- Butter: I always use salted butter for flavor, but if you’re watching salt intake, unsalted works fine—just taste and adjust the salt in your crust if needed.
- Graham Cracker Crumbs: The crunch here is key—I crush my own to get that perfect coarse texture, but store-bought crumbs save time if you’re in a rush.
- Chocolate Chips: I prefer semi-sweet for balance, but dark chocolate or even white chocolate can switch up the flavor profile. Melt them gently for a smooth drizzle.
- Vanilla Extract: That tiny splash adds depth—it’s subtle but makes all the difference. Skip it if you don’t have any, but it’s worth hunting down.
- Optional Add-ins: Nuts or dried fruit can add a nice crunch or chew. I sometimes toss in a handful of chopped pecans for a little extra richness.
Spotlight on key ingredients
Marshmallows:
- I love that oozy, melt-in-your-mouth texture, but if yours aren’t as soft, microwave them for 10 seconds to loosen up before mixing.
- Butter: I always use salted butter for flavor, but if you’re watching salt, unsalted works fine—just taste and adjust the salt in your crust if needed.
Graham Crackers & Chocolate Chips:
- Graham Crackers: I crush my own for that perfect coarse crunch, but store-bought crumbs save time if you’re in a rush.
- Chocolate Chips: Semi-sweet are my go-to for balance, but dark or white chocolate can change the flavor profile. Melt gently for smoothness.
Notes for ingredient swaps
- Dairy-Free: Use coconut oil instead of butter for richness, but expect a slightly different flavor and texture.
- Vegan Marshmallows: Swap regular marshmallows for vegan ones—taste remains similar, but some brands are softer or chewier.
- Chocolate: Dark chocolate chips add depth; white chocolate can brighten the sweetness and create a different visual impact.
- Crackers: Gluten-free graham crackers or digestive biscuits work well; expect a slightly different crumb texture and flavor.
- Sweetener: Maple syrup or honey can replace marshmallows for a runnier, more caramel-like consistency—adjust amount accordingly.
- Nuts & Add-ins: Chopped pecans, walnuts, or dried fruit can be mixed in; they add crunch and chewy bites, but can also overwhelm the marshmallow flavor.
- Flavor Variations: Add a splash of peppermint extract or vanilla bean paste to customize the aroma—start small, taste often.
Equipment & Tools
- 9×13 inch pan: To set the mixture into bars
- Large mixing bowl: To hold and mix the melted marshmallows and crumbs
- Spatula: For pressing the mixture into the pan
- Microwave-safe bowl: To melt marshmallows and butter evenly
- Parchment paper or butter: To prevent sticking and facilitate removal
Step-by-step guide to marshmallow bars
- Gather your equipment: a 9×13 inch pan, a large mixing bowl, a spatula, and a microwave-safe bowl. The pan is for setting; the bowl for melting marshmallows.
- Line the pan with parchment paper or lightly butter it. This helps with easy removal later.
- In the microwave-safe bowl, combine 4 cups of large marshmallows and 3 tablespoons of butter. Microwave in 30-second bursts, stirring each time, until fully melted and smooth. About 1-2 minutes total.
- While the marshmallow mixture melts, crush 3 cups of graham crackers into coarse crumbs. You can do this in a plastic bag with a rolling pin or pulse in a food processor.
- Once the marshmallow mixture is smooth and gooey, quickly fold in the crushed graham crackers until evenly coated. The mixture will be sticky, but that’s normal.
- Pour the mixture into your prepared pan. Use a spatula or wax paper to press it down firmly and evenly. Don’t skimp—compact it well so bars hold together.
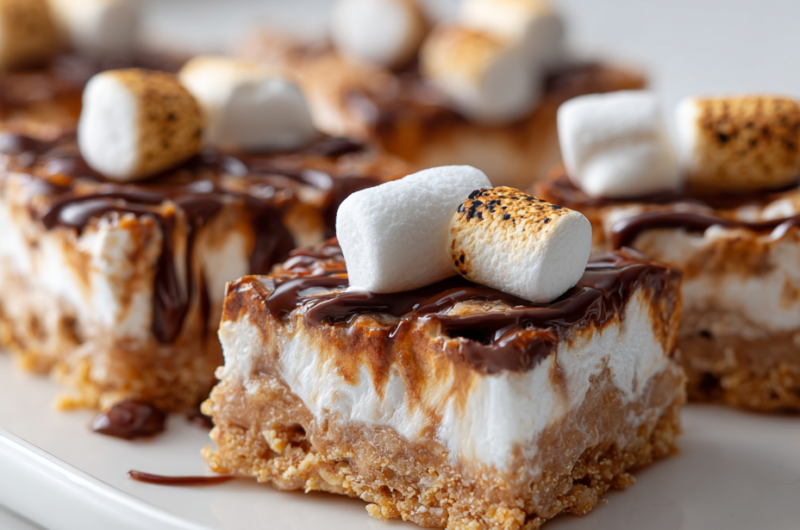
- Optional: sprinkle or drizzle melted chocolate chips over the top for added flavor and visual appeal.
- Let the bars rest at room temperature for about 30 minutes. For quicker setting, refrigerate for 15-20 minutes until firm.
- Check for doneness: the mixture should be set and firm but still slightly soft to the touch; it will firm up more as it cools.
- Once cooled and firm, cut into squares or rectangles. Use a sharp knife and press down firmly to prevent crumbling. Serve and enjoy!
Let the bars rest at room temp for 30 minutes or refrigerate 15-20 minutes until firm. Use a sharp knife to cut clean squares. Serve directly or store in an airtight container.
How to Know It’s Done
- Marshmallow mixture is smooth, shiny, and fully melted without lumps.
- Bars hold their shape when pressed—firm but not brittle.
- Edges are clean and slightly caramelized, with a slight crackle when cut.

No-Bake Marshmallow Bars
Ingredients
Equipment
Method
- Line your 9x13 inch pan with parchment paper or lightly butter it to prevent sticking.
- Combine the marshmallows and butter in a microwave-safe bowl and microwave in 30-second bursts, stirring each time, until the mixture is smooth and bubbly — about 1 to 2 minutes total.
- Add the crushed graham crackers to the melted marshmallow mixture and gently fold until all the crumbs are coated and evenly distributed, creating a sticky, gooey mass.
- Pour the mixture into your prepared pan, then press it down firmly with the back of a spatula or wax paper to create an even layer — compacting it well helps the bars hold together.
- If you like, melt the semi-sweet chocolate chips and drizzle or spread a thin layer over the top for extra richness and visual appeal.
- Let the bars sit at room temperature for about 30 minutes, or refrigerate for 15-20 minutes until they are firm and set.
- Once cooled, use a sharp knife to cut into squares or rectangles. Press down firmly when slicing to prevent crumbling.
- Serve immediately or store in an airtight container at room temperature for up to 3 days. Enjoy these chewy, gooey treats!
Notes
Pro tips for perfect bars
- Bolded Mini-Head: Use a silicone spatula → Gently fold marshmallows to avoid breaking them down too much, preserving gooey texture.
- Bolded Mini-Head: Pre-warm your pan → Lightly butter or line with parchment for easier removal later, preventing sticking and crumbling.
- Bolded Mini-Head: Microwave in short bursts → 30 seconds at a time, stirring in between, for smooth melting without scorching.
- Bolded Mini-Head: Press firmly when setting → Use the back of a spatula or wax paper to compress mixture, ensuring clean cuts and sturdy bars.
- Bolded Mini-Head: Chill for best texture → Refrigerate at least 15 minutes; the bars will become firmer and easier to slice without crumbling.
- Bolded Mini-Head: Add a sprinkle of salt → Enhances sweetness and balances flavors, especially if using sweet add-ins or dark chocolate.
- Bolded Mini-Head: Work quickly after melting → The marshmallow mixture thickens fast; fold in ingredients promptly before it cools and hardens.
Common mistakes and how to fix them
- FORGOT to level the marshmallows before microwaving — use a scale for accuracy.
- DUMPED in all marshmallows at once — heat slowly, stirring for even melting.
- OVER-TORCHED the chocolate — melt on low power, stir frequently to prevent burning.
- MISSED the chilling step — refrigerate for best texture and clean cuts.
Quick fixes and pantry swaps
- When marshmallows are sticky, splash a little warm water to loosen them.
- If mixture is too dry, patch with a drizzle of melted butter or a few drops of milk.
- Splash some vanilla or flavoring if aroma is bland after melting.
- When bars crack when cutting, shield edges with a warm towel for cleaner slices.
- DUMPED in too many chocolate chips? Rescue with a quick microwave melt and swirl on top.
Prep, store, and reheat tips
- Prepare the marshmallow mixture and crush the graham crackers ahead—store in airtight containers at room temperature for up to 24 hours, keeping everything fresh and ready to assemble.
- Bars can be made a day in advance; keep them covered at room temperature or in the fridge for up to 3 days. The marshmallow goo will firm up but stay chewy.
- Refrigerate the assembled bars for at least 15 minutes before cutting. The chill helps achieve clean slices and prevents crumbling.
- To reheat, warm slices briefly in the microwave (10-15 seconds) until slightly softened and gooey again—watch for melting edges and enjoy that nostalgic aroma.
Top questions about marshmallow bars
1. Can I use old marshmallows?
Use fresh marshmallows for the best gooey texture. Stale ones tend to be dry and less melty.
2. Can I skip marshmallows altogether?
Yes, you can substitute honey or corn syrup for marshmallows, but expect a different consistency and flavor.
3. How do I melt marshmallows without burning them?
Microwave the marshmallows and butter in 30-second bursts, stirring until smooth. It takes about 1-2 minutes total.
4. How do I make sure the bars stay together?
Press the mixture firmly into the pan, using a spatula or wax paper, to prevent crumbling later.
5. Should I refrigerate the bars before cutting?
Chill the bars for at least 15-20 minutes in the fridge for clean slicing and firm texture.
6. My mixture is too sticky to work with—what now?
If your mixture is too sticky, lightly dust your hands or spatula with powdered sugar or butter for easier handling.
7. Can I add flavorings or spices?
Add a pinch of salt or vanilla extract to enhance flavor and balance sweetness.
8. How long do these bars stay fresh?
Storing in an airtight container at room temperature keeps them fresh for up to 3 days, longer in the fridge.
9. Can I reheat the bars?
Reheat a slice in the microwave for 10-15 seconds to restore gooeyness before serving.
10. How do I fix uneven chocolate topping?
If chocolate drips are uneven, gently melt more chips and swirl on top for a polished look.
Making these no bake marshmallow bars is like capturing a little piece of childhood in a simple square. They’re perfect for when you need a quick fix that’s both nostalgic and satisfying. Once you get the hang of it, you’ll find yourself reaching for this recipe during busy weeks or spontaneous gatherings.
In the end, it’s the honest, straightforward joy of a gooey, sweet treat that keeps me coming back. No fuss, just good ingredients and a bit of patience—those are the real secrets behind these bars. Sometimes, the simplest desserts are the ones that stick with you most.

Hi, I’m Grace Morgan, and welcome to my kitchen. This is a space shaped by family meals, curious hands reaching for snacks, paws under the table, and recipes that come together in the middle of real life. I’m a food blogger, a mother, and a passionate pet keeper. Most days, I’m cooking with one eye on the stove and the other on someone who needs me, whether that’s a child asking for a taste or a dog hoping something might fall.


