On hot summer days, turning on the oven feels like a punishment, not a necessity. These no bake mini cheesecakes are my go-to because they keep things simple and cool, yet still feel special enough to serve at a gathering. There’s something about the individual portions that makes dessert feel more personal, more inviting.
I love that you can prep these in advance, so you’re not stuck in the kitchen when your friends arrive. Plus, the creamy tang of the cheese paired with a crunchy base makes every bite a little moment of relief from the heat. They’re not fancy, but they sure do make a statement—no oven required, just a little patience in the fridge.
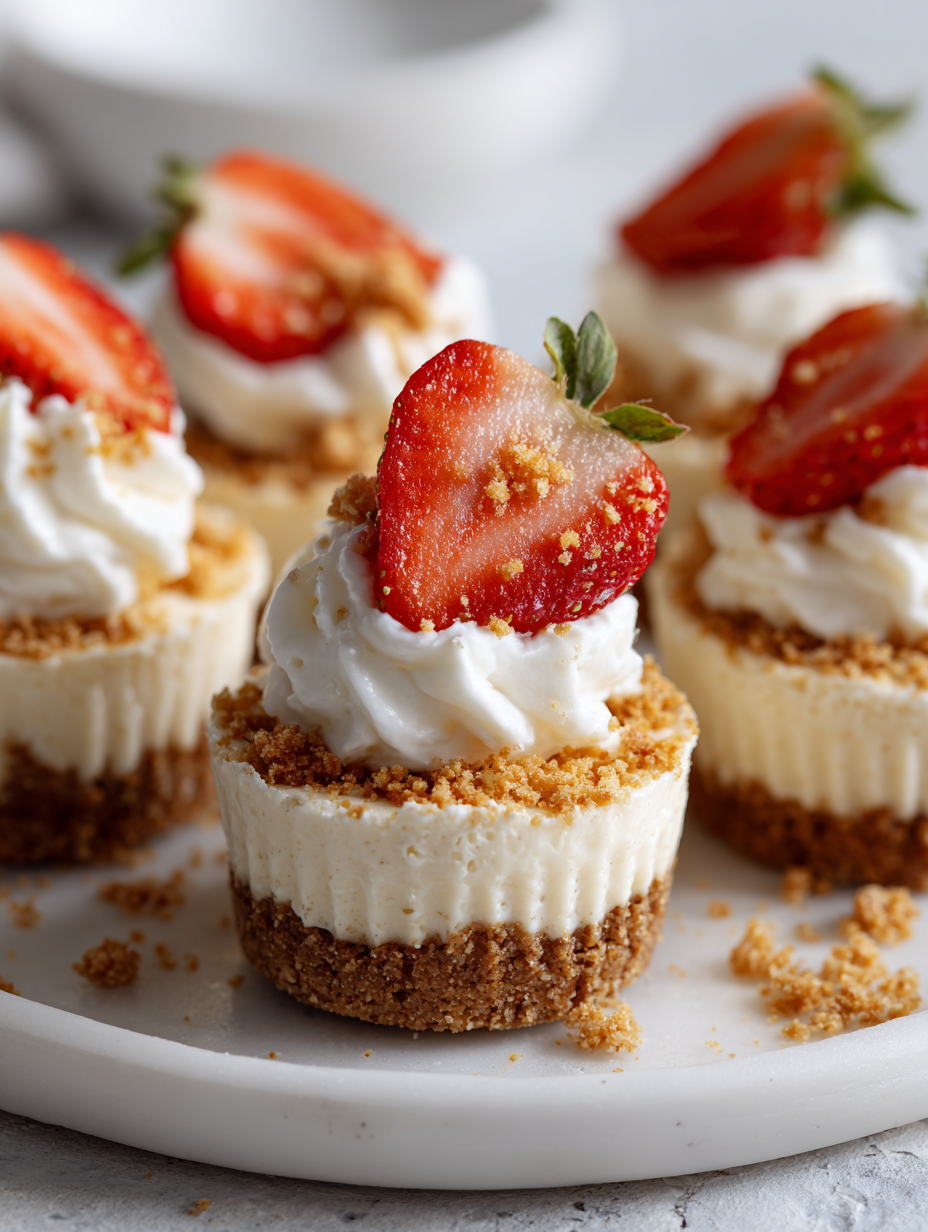
Focusing on the art of creating elegant, individual-sized desserts without turning on the oven, perfect for summer gatherings or when the kitchen is too hot to bear.
Celebrating Simplicity and Elegance
- These cheesecakes remind me of childhood summers—cool, creamy, and just a little messy to make but totally worth it.
- I get oddly proud when I see how quickly everyone devours these—like, I didn’t even realize I was craving something so simple.
- There’s a quiet joy in assembling these with just a spoon and a few ingredients, no fuss, no oven heat, just pure, straightforward comfort.
- I used to think I needed fancy tools to make perfect mini cheesecakes, but honestly, a good spoon and a sturdy muffin tin do the trick every time.
- Whenever I make these, I’m reminded that sometimes the simplest desserts are the most memorable—no bells, no whistles, just honest, delicious goodness.
The story behind this recipe
- This recipe came from a chaotic afternoon when I needed something quick, cool, and satisfying. I had a bunch of cream cheese that was about to expire, and no oven in sight. The idea of assembling a dessert that’s both elegant and effortless felt like a small victory in the middle of a busy weekend.
- I remember the first time I made these for friends—watching them marvel at how something so smooth and creamy could be made without turning on the stove. It’s funny how a simple idea can turn into a little tradition, especially on hot days when the last thing you want is more heat in the kitchen.
- heading: ‘The story behind this recipe’
Historical & Cultural Tidbits
- These no bake cheesecakes trace back to the early 20th century, when inventive cooks sought quick dessert fixes without turning on the oven.
- They gained popularity in the 1970s as convenient party treats, especially in the U.S., thanks to their simplicity and no-fuss prep.
- The idea of individual-sized cheesecakes likely originates from European pastry traditions, adapted for modern, fast-paced lifestyles.
- Using cream cheese in desserts became widespread after Kraft introduced it in the 1930s, paving the way for such easy, creamy treats.
- Today, these mini cheesecakes are a summer favorite, perfect for hot days when oven-baked desserts just don’t make sense.
Ingredient breakdown: key components
- Cream cheese: I prefer it softened for easy mixing, and it’s the creamy base that gives these cheesecakes their signature smoothness. Swap with Greek yogurt if you want tang and a lighter feel—just expect a slightly different texture.
- Graham cracker crumbs: I love their buttery crunch, but digestive biscuits work just as well if you’re craving a slightly richer bite. Toast them lightly if you want an extra toasty aroma in your crust.
- Sugar: Regular granulated sweetens just right, but honey or maple syrup can be a good swap—expect a softer, more nuanced sweetness that’s a little more floral.
- Lemon juice: Brightens everything up with a zingy punch, especially after a long day. Lime juice can stand in if you want a slightly different citrus note, but skip the zest for a less intense flavor.
- Whipped cream: Adds fluff and lightness, but if you’re dairy-free, coconut cream whipped to soft peaks can do the trick—just chill your bowl and beaters first for best volume.
- Vanilla extract: The tiny splash adds warmth and roundness; a splash of almond extract can add a different layer of aroma, but use sparingly—its flavor is stronger.
- Optional toppings: Fresh berries, fruit compote, or a drizzle of chocolate—these make each mini cheesecake uniquely yours and add that extra burst of flavor and color.
Spotlight on key ingredients
Cream cheese:
- I prefer it softened for easy mixing, and it’s the creamy base that gives these cheesecakes their signature smoothness. Swap with Greek yogurt if you want tang and a lighter feel—just expect a slightly different texture.
- Graham cracker crumbs: I love their buttery crunch, but digestive biscuits work just as well if you’re craving a slightly richer bite. Toast them lightly if you want an extra toasty aroma in your crust.
Lemon juice and whipped cream:
- Lemon juice: Brightens everything up with a zingy punch, especially after a long day. Lime juice can stand in if you want a slightly different citrus note, but skip the zest for a less intense flavor.
- Whipped cream: Adds fluff and lightness, but if you’re dairy-free, coconut cream whipped to soft peaks can do the trick—just chill your bowl and beaters first for best volume.
Notes for ingredient swaps
- Dairy-Free: Swap cream cheese for a cashew-based cream or coconut cream. Expect a slightly nuttier or richer flavor and a softer texture.
- Gluten-Free: Use gluten-free graham cracker crumbs or crushed digestive biscuits. The crust might be a bit denser but still tasty.
- Sweetener Alternatives: Replace sugar with honey, maple syrup, or agave nectar. These will add a subtle floral or caramel note and may slightly alter the texture.
- Citrus Variations: Lime or orange juice can replace lemon for different bright, zesty flavors. Zest can be swapped or omitted based on preference.
- Topping Variations: Use fruit compote, jams, or dairy-free whipped toppings instead of fresh berries or chocolate for different finishes.
- Crust Base: Replace graham crackers with crushed cookies, biscuits, or even toasted nuts for varied crunch and flavor profiles.
- Flavor Extracts: Almond or citrus extracts can be swapped for vanilla for a different aromatic punch, but use sparingly to avoid overpowering.
Equipment & Tools
- 12-cup muffin tin: Holds and shapes individual cheesecakes.
- Food processor or zip-top bag and rolling pin: Crushes crackers into fine crumbs.
- Small mixing bowl: Mixes the cream cheese filling.
- Spoon and spatula: Fills and smooths the cheesecakes.
Step-by-step guide to no bake cheesecakes
- Equipment & Tools: Gather a 12-cup muffin tin, a food processor or sturdy zip-top bag, a small mixing bowl, a spoon, and a spatula. The muffin tin is for shaping the crusts; the food processor (or bag) crushes the crackers; the bowl and spoon mix the filling.
- Make the crust. Crush 1 1/2 cups graham cracker crumbs finely—use a food processor or put crackers in a bag and crush with a rolling pin. Mix in 1/4 cup melted butter and a pinch of salt until crumbs stick together when pressed.
- Line the muffin tin. Divide the crumb mixture evenly among the cups—about 1 tablespoon each. Use the back of a spoon to press down firmly, creating a compact crust. Chill in the fridge for 10 minutes while you prepare the filling.
- Prepare the filling. In a mixing bowl, beat 8 oz softened cream cheese until smooth—about 30 seconds with a hand mixer or vigorous stirring with a spoon. Add 1/2 cup sugar, 1 teaspoon vanilla extract, and 1 tablespoon lemon juice. Mix until well combined and creamy.
- Fill the cups. Using a spoon or small scoop, divide the filling among the chilled crusts, smoothing the tops with the back of a spoon. Don’t overfill; leave a little room at the top. Refrigerate for at least 2 hours, preferably overnight, to set.
- Check for doneness. The cheesecakes should be firm around the edges but slightly jiggly in the center when gently shaken. The crust should be crisp and golden. If the filling is too soft, give it more time to chill.
- Finishing touches. Before serving, garnish with fresh berries, a drizzle of chocolate, or a sprig of mint. Carefully remove from the muffin tin with a small spatula or by gently loosening the edges. Serve chilled.
Chill the assembled cheesecakes in the fridge for at least 2 hours or overnight. Before serving, top with fresh toppings if desired. Carefully remove from the muffin tin using a small spatula or by gently loosening the edges. Serve cold, with a spoon.
How to Know It’s Done
- Cream cheese filling is firm and holds shape when piped or scooped.
- Crust is golden and crisp, not soggy or soft.
- Cheesecake jiggles slightly but doesn’t wobble excessively—indicates proper setting.
No Bake Mini Cheesecakes
Ingredients
Equipment
Method
- Crush the graham crackers until finely ground using a food processor or by sealing them in a zip-top bag and rolling with a rolling pin.
- Mix the crumbs with melted butter in a small bowl until the mixture holds together when pressed.
- Divide about a tablespoon of the crumb mixture into each cup of the muffin tin and press down firmly to form a compact crust.
- Set the crust-lined muffin tin in the fridge for 10 minutes to firm up while you prepare the filling.
- In a bowl, beat the softened cream cheese until smooth and creamy, about 30 seconds with a hand mixer or vigorous stirring.
- Add the sugar, lemon juice, and vanilla extract to the cream cheese and mix until well combined and fluffy.
- Incorporate the whipped cream gently into the cream cheese mixture by folding, keeping the filling light and airy.
- Spoon the filling into each crust, smoothing the tops with the back of a spoon or small spatula.
- Refrigerate the cheesecakes for at least 2 hours or overnight until they are firm and set.
- Before serving, add fresh berries or toppings of your choice for color and flavor.
- Gently remove the cheesecakes from the muffin tin with a small spatula or by loosening the edges, then serve cold and enjoy!
Tips for perfect mini cheesecakes
- Bolded mini-head: Chill crust thoroughly → Cold crust prevents sogginess and helps it hold shape.
- Bolded mini-head: Use room temperature ingredients → Ensures smooth, creamy filling without lumps.
- Bolded mini-head: Press crust firmly → Creates a compact base that won’t crumble when served.
- Bolded mini-head: Gently fold whipped cream → Keeps the filling light and airy, avoid deflating the fluff.
- Bolded mini-head: Chill until set → Minimum 2 hours in fridge for firm, sliceable cheesecakes.
- Bolded mini-head: Add toppings just before serving → Keeps them fresh, vibrant, and not soggy.
- Bolded mini-head: Use a hot knife to slice → Wipes clean easily and prevents tearing through the cheesecake.
Common mistakes and how to fix them
- FORGOT to chill crust before filling → Chill crust for at least 10 minutes to prevent sogginess.
- DUMPED the filling into hot crust → Cool crust slightly before adding filling to avoid melting.
- OVER-TORCHED the crust → Toast crust lightly until golden, not dark, to keep it crunchy.
- MISSED the setting time → Ensure cheesecakes chill for minimum 2 hours for proper firmness.
Quick fixes and pantry swaps
- When cheese mixture is too runny → Chill it for 10 minutes to firm up.
- If crust crumbles when pressed → Slightly increase butter for better cohesion.
- Splash hot filling into crust → Let it cool for a few minutes before filling.
- Patch cracks in the cheesecake → Smooth with a hot, damp spatula before chilling.
- Shield delicate toppings from melting → Add them just before serving for freshness.
Prep, store, and reheat tips
- Prepare the crust and filling components a day in advance; keep the crust covered in the fridge and the filling refrigerated in an airtight container. The flavors meld better overnight, and it saves time when assembling.
- Store the assembled cheesecakes in an airtight container in the fridge for up to 3 days. The texture remains creamy, but avoid stacking them to prevent smushing the toppings.
- These mini cheesecakes can be frozen for up to 1 month. Wrap each individually in plastic wrap, then place in a freezer bag. Thaw in the fridge for a few hours before serving.
- Reheating isn’t recommended; serve straight from the fridge to enjoy the firm, chilled texture. If needed, let sit at room temp for 10 minutes for a softer bite. The cold enhances the tangy cream cheese flavor and keeps the crust crisp.
Top questions about no bake cheesecakes
1. Can I use cold cream cheese?
Use softened cream cheese so it mixes smoothly without lumps. Cold cheese makes blending harder.
2. Can I substitute graham crackers?
Yes, graham crackers are classic, but digestive biscuits or even crushed cookies work well for different flavors.
3. My filling is too soft, what can I do?
If the filling is too runny, chill it for 10-15 minutes or add a little more cream cheese to thicken.
4. How long should I chill the cheesecakes?
Chill the assembled cheesecakes for at least 2 hours, ideally overnight, until they are firm and set.
5. How do I get clean slices?
Use a hot, damp knife to slice through the cheesecakes for clean, smooth cuts without cracks.
6. Can I freeze mini cheesecakes?
You can freeze these cheesecakes for up to a month. Wrap individually and thaw in the fridge before serving.
7. The crust is too crumbly, what now?
If your crust crumbles, add a bit more melted butter to help it stick together better.
8. Can I make these dairy-free?
For a dairy-free version, try coconut cream or cashew-based cream cheese, but expect a slightly different texture.
9. How can I make the flavor more tangy?
Adding a splash of lemon juice brightens the flavor, making it more refreshing and tangy.
10. When should I add toppings?
Add toppings just before serving to keep them fresh and vibrant, especially berries or chocolate drizzle.
These no bake mini cheesecakes are a little reminder that simplicity can be stunning. They’re perfect for hot days or when you want something quick without sacrificing flavor. Plus, they bring a certain cool elegance to any table, even if you’re just sharing with friends in pajamas.
In the end, it’s about those small, sweet moments—creamy, tangy bites that remind you sometimes the best things are the easiest to make. No oven, no fuss, just good ingredients and a little patience in the fridge. That’s all it takes to pull off something memorable.

Hi, I’m Grace Morgan, and welcome to my kitchen. This is a space shaped by family meals, curious hands reaching for snacks, paws under the table, and recipes that come together in the middle of real life. I’m a food blogger, a mother, and a passionate pet keeper. Most days, I’m cooking with one eye on the stove and the other on someone who needs me, whether that’s a child asking for a taste or a dog hoping something might fall.


