Sometimes, the best desserts are the ones you can toss together in a flash, especially when last-minute guests are knocking. This no-bake chocolate cheesecake is my go-to for those moments—rich, creamy, and impossible to mess up. No oven, no fuss, just good chocolate and a bit of patience in the fridge.
What I love most is how forgiving this recipe is—no need for fancy equipment or precise baking times. It’s the kind of dessert that feels indulgent but doesn’t demand hours of prep. Plus, the smell of melting chocolate and sweet cream filling wafting through the kitchen? Pure comfort, no matter how chaotic the day.
Focusing on how this no-bake cheesecake can be a spontaneous, stress-free dessert for last-minute gatherings, emphasizing its simplicity and the comforting, rich chocolate flavor that comes together without turning on the oven.
Spontaneous comfort in chocolate
- I love how this dessert turns last-minute chaos into a chocolatey celebration.
- There’s a tiny thrill in pulling together something so rich without heating up the kitchen.
- This recipe reminds me of cozy weekends when I want indulgence without fuss.
- The smell of cocoa and cream filling makes the whole house feel like a treat.
- Sharing this no-bake cheesecake feels like a small victory in everyday life.
The story behind this recipe
- This recipe was born out of a lazy Sunday afternoon, when I wanted something sweet but didn’t want to turn on the oven. I remember rummaging through my pantry, grabbing chocolate, cream cheese, and cookies, and just throwing it all together without much thought. It’s become a staple whenever I need a quick, satisfying dessert that feels a little fancy but is truly fuss-free.
- What keeps me coming back to this no-bake cheesecake is how it transforms simple ingredients into something unexpectedly indulgent. It’s a reminder that you don’t always need to overthink dessert—sometimes, just a handful of good chocolate and a fridge is enough to make magic happen.
- heading: The story behind this recipe
Historical & Fun Facts
- This no-bake cheesecake idea gained popularity during wartime rationing when ovens were scarce, pushing cooks to find creative, no-heat desserts.
- The use of crushed cookies as a crust dates back to early 20th-century American cookbooks, making this a nostalgic twist on vintage treats.
- Chocolate cheesecakes without baking became a symbol of 1970s dessert innovation, combining rich flavors with minimalist prep.
Ingredient breakdown: key components
- Cream cheese: I like it soft and spreadable; it blends smoothly, creating that luscious texture. For easier mixing, leave it out to soften at room temp, about 30 minutes.
- Dark chocolate: I prefer a high cocoa content—sharp and slightly bitter. Melt slowly over a double boiler or in short bursts in the microwave, stirring until glossy and oozy.
- Heavy cream: Whips up into a silky cloud that lightens the filling. Chill your bowl and beaters first; it makes a noticeable difference in volume and texture.
- Graham cracker crumbs: I toast them lightly for extra flavor, then mix with melted butter and a pinch of salt. Adds a nutty crunch and balances the richness.
- Sugar: Use superfine for a quick dissolve, especially in the cream cheese. Adjust to taste, but a little goes a long way—just enough to enhance the chocolate.
- Vanilla extract: A splash deepens the flavor, rounding out the chocolate’s intensity. Fresh and fragrant, it brightens the overall taste.
- Optional toppings: Fresh berries or a drizzle of caramel can cut through the richness—add just before serving for a fresh hit.
Spotlight on key ingredients
Cream cheese:
- I like it soft and spreadable; it blends smoothly, creating that luscious texture. For easier mixing, leave it out to soften at room temp, about 30 minutes.
- Dark chocolate: I prefer a high cocoa content—sharp and slightly bitter. Melt slowly over a double boiler or in short bursts in the microwave, stirring until glossy and oozy.
- Heavy cream: Whips up into a silky cloud that lightens the filling. Chill your bowl and beaters first; it makes a noticeable difference in volume and texture.
Dark chocolate:
- Rich, slightly bitter, with a glossy, oozy melt. It’s the flavor backbone for that deep chocolate hit. Use good quality, and melt gently to avoid seizing.
- Heavy cream: It transforms into a smooth, billowy whip that folds into the filling. Make sure it’s cold for maximum volume and creaminess. Watch for soft peaks—don’t overbeat.
Ingredient swaps for different diets
- Dairy-Free: Swap cream cheese for a plant-based cream cheese alternative. Expect a slightly different tang and creaminess.
- Vegan Chocolate: Use dairy-free dark chocolate or cocoa solids with coconut oil. It might be a tad less rich but still luscious.
- Low-Sugar: Replace sugar with coconut sugar or a sugar substitute like erythritol. Be aware it may alter the sweetness and texture.
- Gluten-Free: Choose gluten-free cookies for the crust. They might have a different crunch but keep that satisfying base.
- Coconut Cream: Use chilled coconut cream instead of heavy cream for a dairy-free, subtly coconut-flavored filling.
- Sweetener Variations: Honey or maple syrup can replace sugar but may introduce a different moisture level and flavor profile.
- Add-ins: Toss in chili flakes or sea salt into the chocolate for an unexpected savory contrast, if you’re feeling adventurous.
Equipment & Tools
- springform pan: To shape and hold the cheesecake while it sets in the fridge.
- mixing bowl: To combine and fold ingredients smoothly.
- saucepan: To melt chocolate gently using a double boiler method.
- spatula: To spread the crust and smooth the filling evenly.
- whisk: To whip the cream and beat the cream cheese for a smooth texture.
Step-by-step guide to no bake cheesecake
- Gather your equipment: a 20cm (8-inch) springform pan, a mixing bowl, a saucepan, a spatula, and a whisk.
- Crush the cookies: Place cookies in a plastic bag and crush with a rolling pin until fine. Measure about 1 1/2 cups.
- Make the crust: Mix crushed cookies with 4 tbsp melted butter and a pinch of salt. Press evenly into the bottom of the springform pan. Chill in the fridge for 15 minutes.
- Melt the chocolate: Use a double boiler or microwave in short bursts, stirring until smooth and glossy. Set aside to cool slightly.
- Soften the cream cheese: Leave it at room temp for about 30 minutes until soft and spreadable.
- Whip the cream: In a chilled bowl, beat the heavy cream with a whisk or mixer until soft peaks form, about 3–4 minutes. Keep refrigerated.
- Combine the filling: In a large bowl, beat the softened cream cheese until smooth. Add sugar, vanilla, and mix well. Pour in melted chocolate and fold gently until uniform.
- Incorporate whipped cream: Carefully fold the whipped cream into the chocolate mixture, maintaining the lightness. Do not overmix.
- Pour the filling: Spread the chocolate filling over the chilled crust, smoothing the top with a spatula.
- Set in the fridge: Cover with plastic wrap and chill for at least 4 hours, preferably overnight, until firm and set.
- Final check: The cheesecake should feel firm but slightly wobbly in the center when gently shaken. The surface should be smooth and glossy.
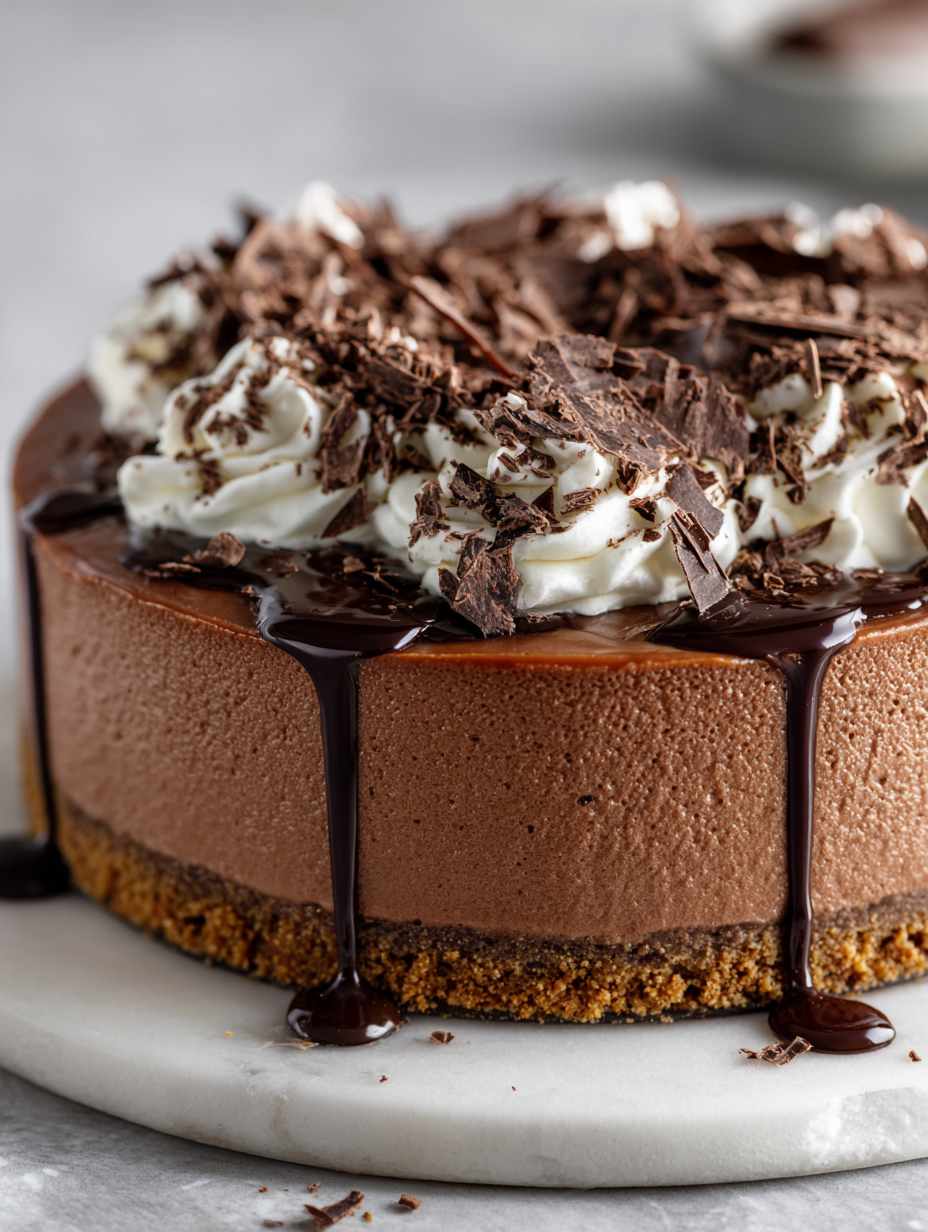
Once set, remove the cheesecake from the fridge. Carefully run a knife around the edges of the springform pan to loosen. Transfer to a serving plate, slice with a hot knife for clean cuts, and serve directly.
How to Know It’s Done
- The crust is firm and holds together when pressed.
- The filling is set and jiggles slightly in the center when gently shaken.
- The surface is smooth, glossy, with no cracks or cracks just starting to form.
No-Bake Chocolate Cheesecake
Ingredients
Equipment
Method
- Place the graham crackers in a plastic bag and crush them with a rolling pin until fine, then transfer to a mixing bowl.
- Mix the cookie crumbs with melted butter and a pinch of salt, then press the mixture firmly into the bottom of your springform pan to form an even crust. Chill in the fridge for 15 minutes to set.
- In a saucepan, melt the chopped dark chocolate over low heat, stirring gently until glossy and smooth. Set aside to cool slightly.
- In a large mixing bowl, beat the softened cream cheese until smooth and creamy, about 2 minutes.
- Add the sugar and vanilla extract to the cream cheese, beating until well combined and fluffy.
- Pour the slightly cooled melted chocolate into the cream cheese mixture and fold gently until uniform in color and texture.
- In a chilled bowl, whip the heavy cream with a whisk or mixer until soft peaks form, about 3–4 minutes.
- Carefully fold the whipped cream into the chocolate mixture, maintaining the light, airy texture.
- Pour the filling over the chilled crust, smoothing the top with a spatula for an even surface.
- Cover the pan with plastic wrap and refrigerate for at least 4 hours, or overnight, until the cheesecake is firm and set.
- Once set, run a hot knife around the edges of the springform pan to loosen, then carefully remove the sides.
- Slice with a warm knife, serve immediately, and enjoy the luscious, glossy chocolate cheesecake with its velvety filling and crunchy crust!
Tips & Tricks for Perfect Cheesecake
- Bolded mini-head: Use high-quality chocolate for a richer, more intense flavor that melts smoothly.
- Bolded mini-head: Melt chocolate slowly over a double boiler or short microwave bursts to prevent seizing and maintain gloss.
- Bolded mini-head: Chill your mixing bowl and beaters before whipping cream for maximum volume and fluffy texture.
- Bolded mini-head: Press crust firmly into the pan with the back of a spoon or spatula for an even, compact base.
- Bolded mini-head: Gently fold whipped cream into the chocolate mixture to keep the filling light and airy.
- Bolded mini-head: Let the cheesecake set in the fridge for at least 4 hours or overnight for best firmness and flavor melding.
- Bolded mini-head: Run a hot knife around the edges before slicing to get clean, neat pieces without cracks.
Common mistakes and how to fix them
- FORGOT to chill the cream before whipping? Fix by refrigerating for 20 minutes before beating.
- DUMPED the melted chocolate too hot? Let it cool slightly until just warm, then fold in.
- OVER-TORCHED the crust mixture? Add a splash of cold milk or water to loosen before pressing.
- MISSED the fridge time? Extend chilling to 6 hours or overnight for best firmness and flavor.
Quick Fixes for Cheesecake Troubles
- If the crust crumbles, patch with a thin layer of melted butter and press again.
- When the filling is too thick, splash a little warm milk and fold in gently.
- DUMPED the chocolate too hot? Let it cool until just warm before mixing.
- When the cheesecake cracks, cover with toppings or serve as rustic slices for charm.
- Splash a tiny bit of hot water on the knife before slicing for cleaner cuts.
Prep, store, and reheat tips
- Prepare the crust mixture and press it into the pan up to a day ahead. Keep covered in the fridge, where it stays firm and flavorful.
- The cheesecake can be made up to 24 hours in advance. Cover tightly with plastic wrap and store in the fridge to preserve freshness and prevent odor absorption.
- This dessert keeps well for 2-3 days; after that, the filling may begin to soften and lose its firmness. Best enjoyed within this window.
- Reheat slices briefly in the microwave on low power (about 10 seconds) if you prefer slightly softer texture—watch for melting edges and a warm, cocoa aroma.
Top questions about no bake cheesecake
1. Can I substitute different types of chocolate?
Yes, you can use semi-sweet or milk chocolate if dark chocolate isn’t available, but the flavor will be sweeter and less intense.
2. How long should I chill the cheesecake?
Chill the cheesecake for at least 4 hours, but overnight is best. It firms up and the flavors meld beautifully.
3. Can I make the crust without a food processor?
Yes, using a food processor for the crust makes it easier, but a plastic bag and rolling pin work fine too.
4. Is it possible to freeze this cheesecake?
You can freeze the cheesecake for up to 2 months, wrapped tightly. Let it thaw in the fridge before serving.
5. Can I use low-fat cream cheese?
Use full-fat cream cheese for the best creaminess and flavor. Light versions tend to be less rich and slightly grainy.
6. Can I customize the flavor?
Add a pinch of salt or espresso powder to deepen the chocolate flavor, or swirl in peanut butter for extra richness.
7. Can I change the crust ingredients?
Yes, you can swap out the graham crackers for digestive biscuits or cookies of your choice, though texture and flavor will vary.
8. How do I prevent the chocolate from seizing?
Make sure the melted chocolate is slightly cooled before mixing to prevent melting the cream cheese or causing streaks.
9. Can I make this dairy-free?
Yes, for a dairy-free version, use coconut cream instead of heavy cream and dairy-free chocolate. Expect a different texture and flavor.
10. How do I get clean slices?
Use a hot knife or warm spatula to cut through the chilled cheesecake. Wipe it clean between slices for best results.
This no-bake chocolate cheesecake is the kind of dessert that sneaks into your fridge without much fuss and leaves you feeling surprisingly proud. It’s simple, rich, and has a way of making last-minute gatherings feel a little more special. Honestly, it’s the kind of recipe that becomes a go-to when you want something satisfying without the stress.
Sharing a slice of this creamy, chocolatey goodness might just become your new way to celebrate small wins or wind down after a chaotic day. It’s not perfect, but that’s part of its charm—imperfectly delicious and totally doable.

Hi, I’m Grace Morgan, and welcome to my kitchen. This is a space shaped by family meals, curious hands reaching for snacks, paws under the table, and recipes that come together in the middle of real life. I’m a food blogger, a mother, and a passionate pet keeper. Most days, I’m cooking with one eye on the stove and the other on someone who needs me, whether that’s a child asking for a taste or a dog hoping something might fall.


